21. Now use that key on the shape that matches it. Continue doing so until you’ve unlocked them all. Then get the little blue and white piece.
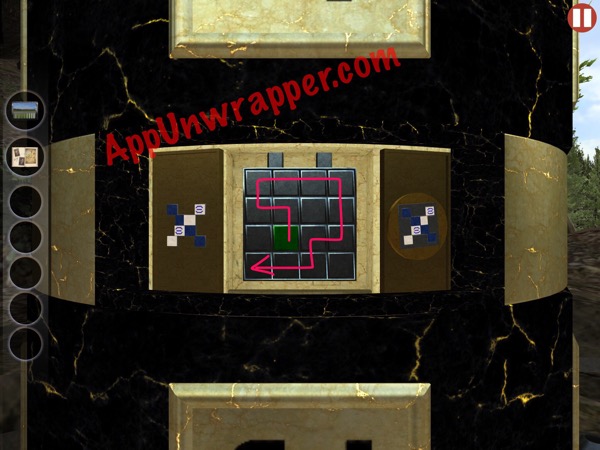
22. Find the puzzle that has the other blue and white piece. Place this one on the right and rotate it to match the left one. Then look at page 12 in your journal and draw out the path with the buttons, starting with the green one. It’s like the map we had earlier. Take the two pieces from inside.
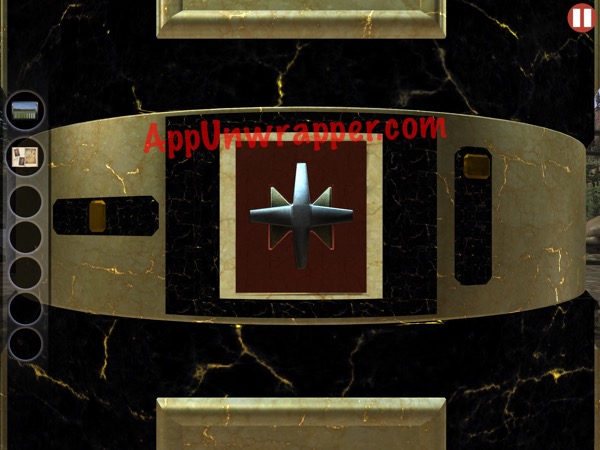
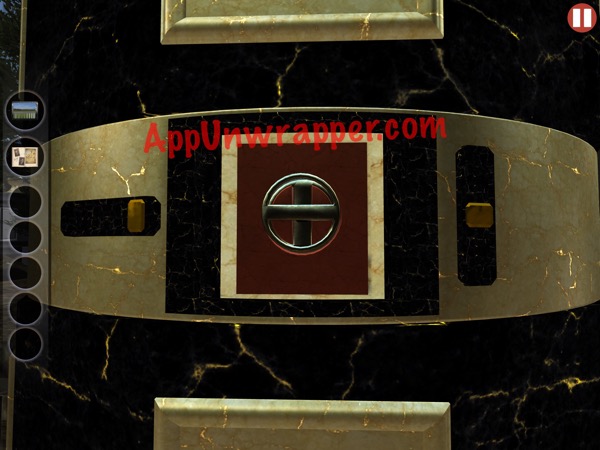
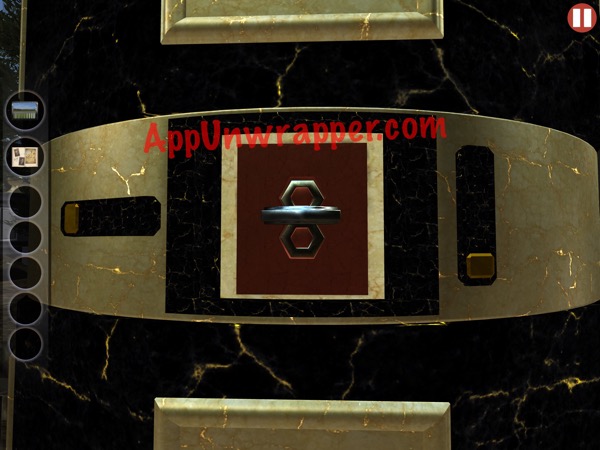
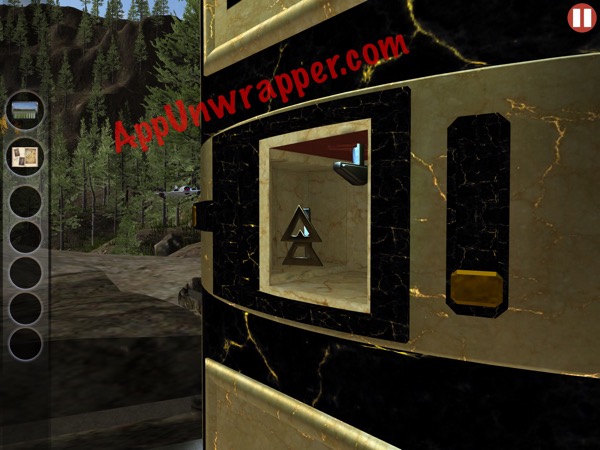
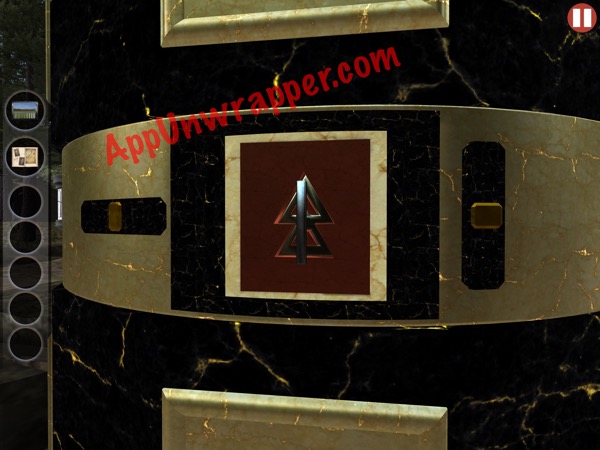
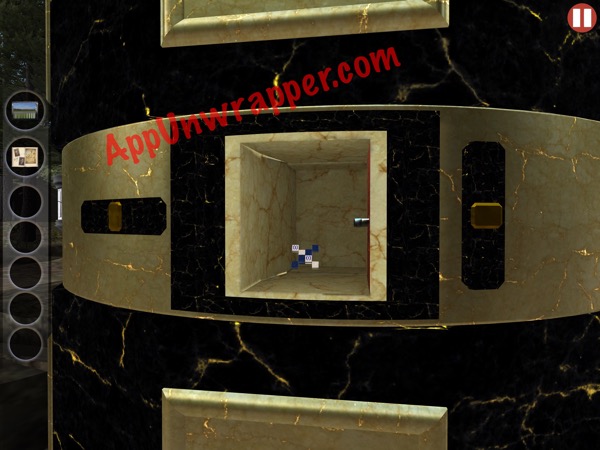
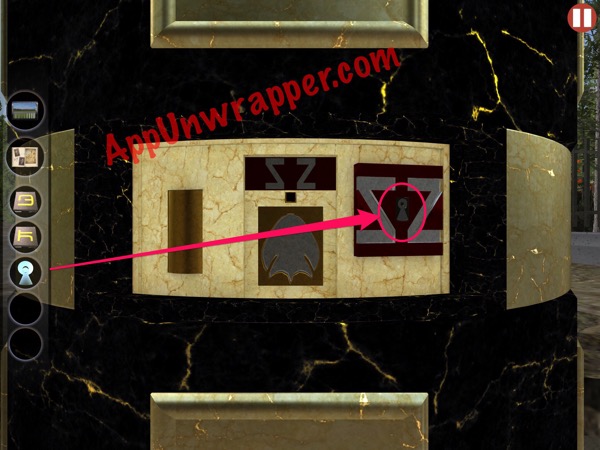
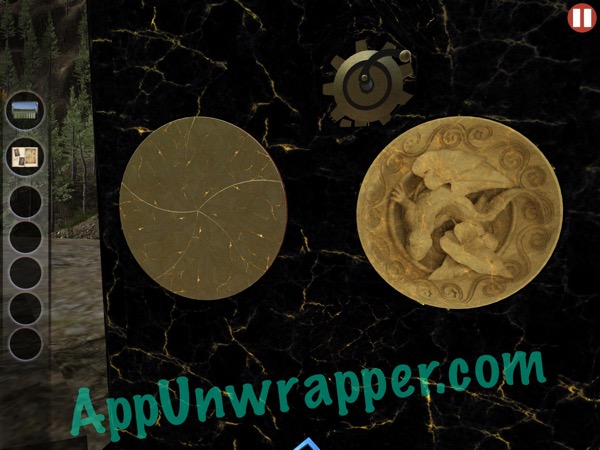
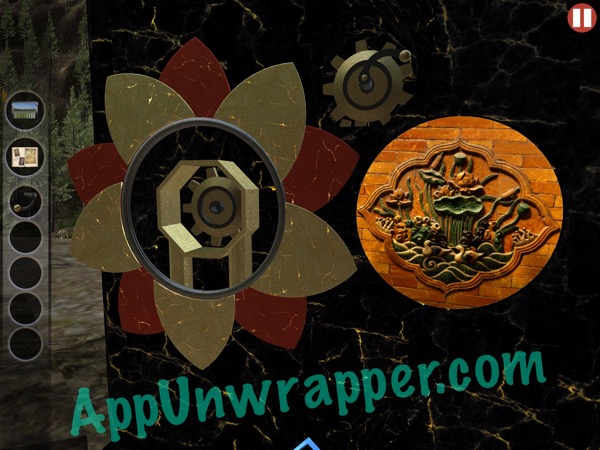
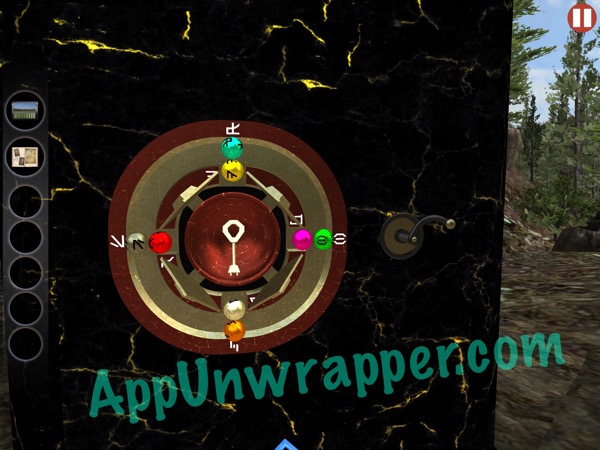
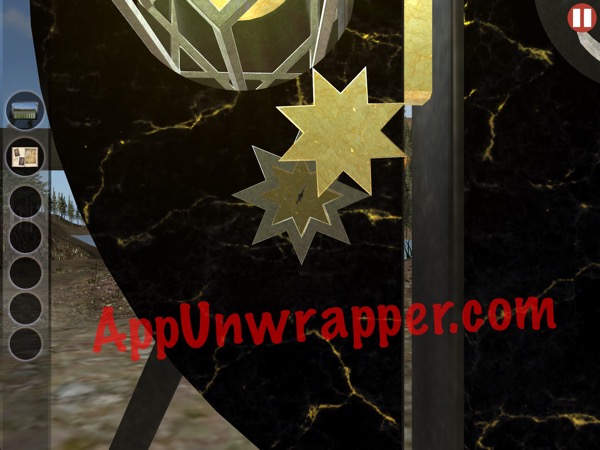
23. Find the shapes window. The middle one will just be all black. I didn’t get a photo of the one which takes the red piece, but I think it was directly below the all black one. Next, look at page 13 of the journal. It tells you the order in which to press the shapes. It goes Octagon (the one you just put the red piece on), Circle, Hexagon, Triangle, Star, Square, Pentagon, and last is an Eight-pointed Star. Take the strange letter piece and then turn the camera to look inside to the right and get a small key (the journal tells you about this, as well).
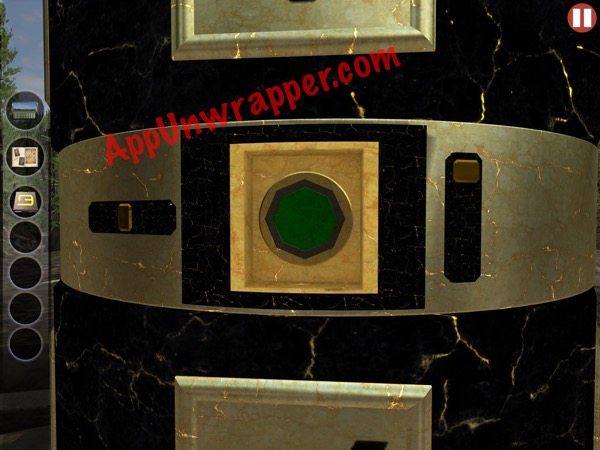
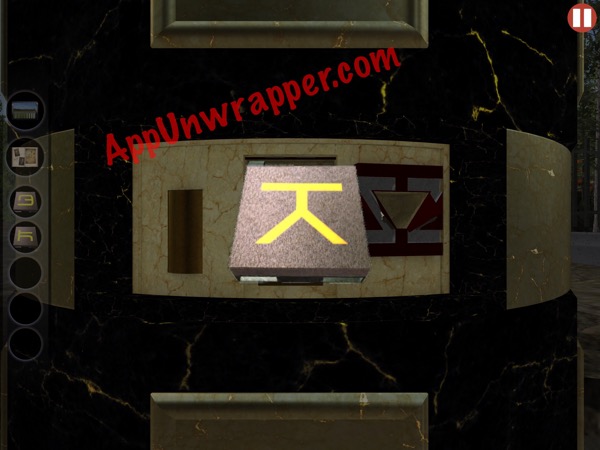
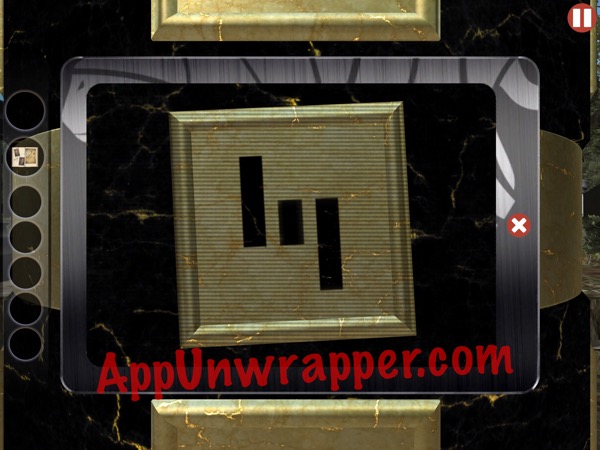
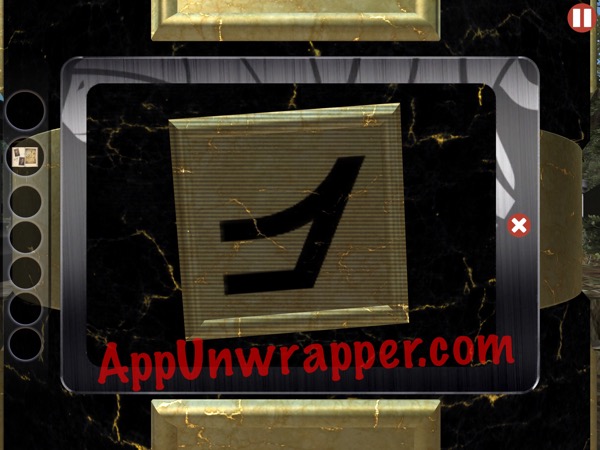
24. Take the little key you just found and place it between the two Z’s in another window. Take the odd symbol from the Z’s, then turn the screw that’s revealed to get another blue gem from the left side.
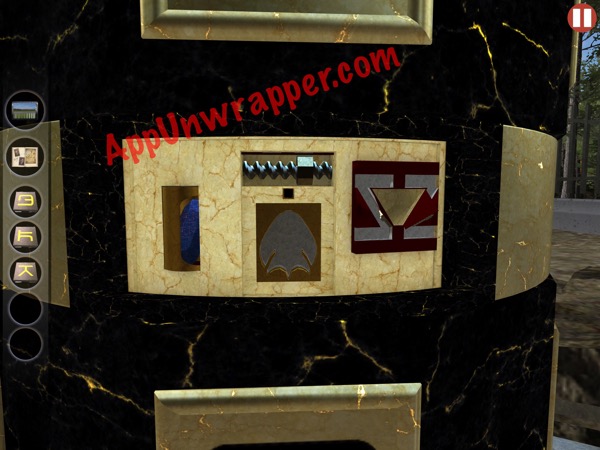
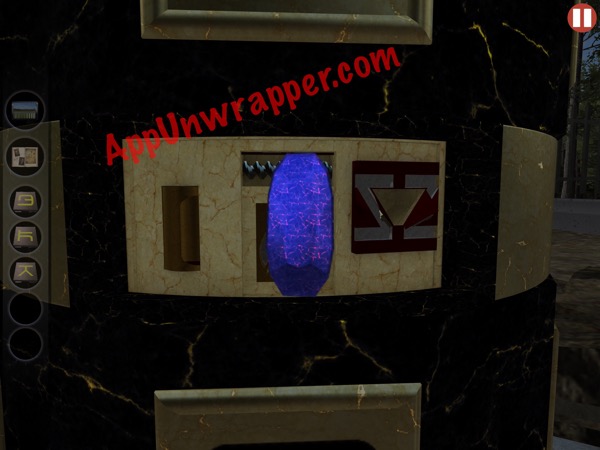
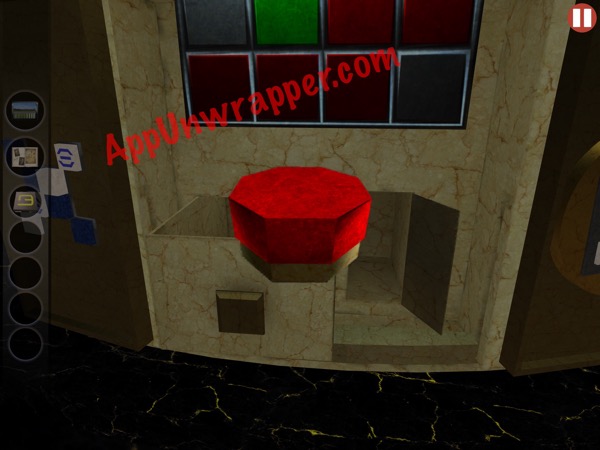
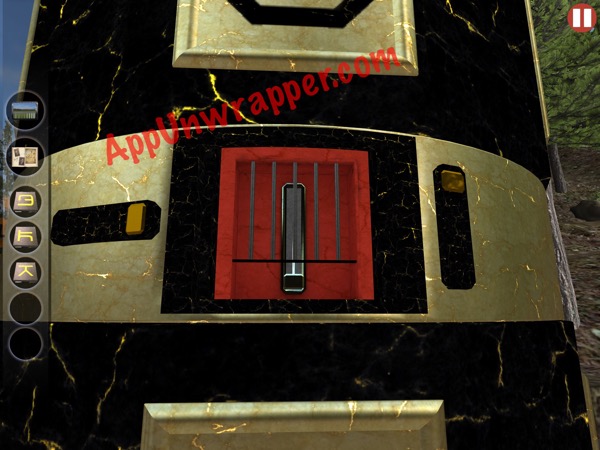
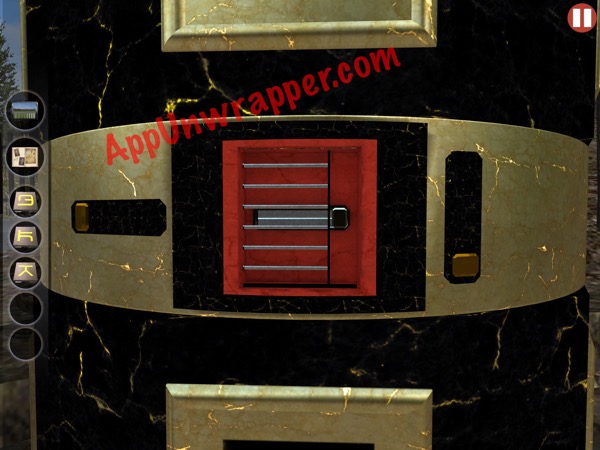
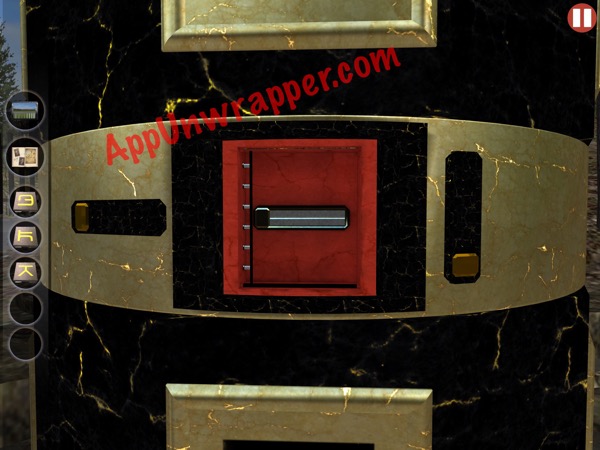
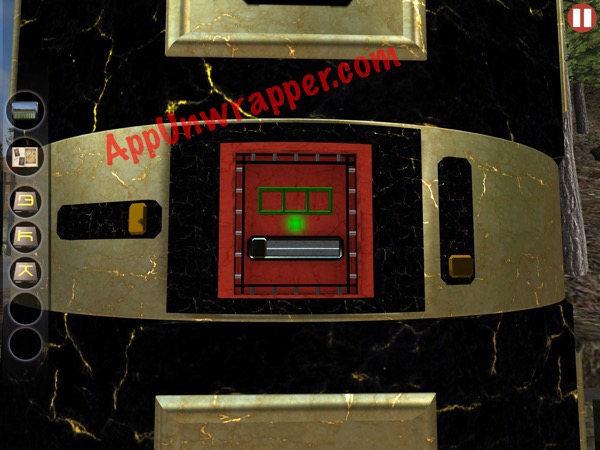
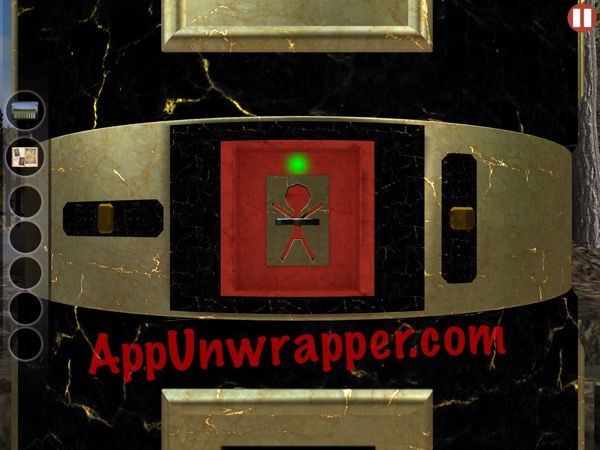
25. Find the red window with the little cutout of a person. Here, find the slot for the gem and place it in there. Now, you need to find the two gates with sliders and slide the gates open or closed (depending on their starting position). Then find the one with three little squares and move the slider so it lights up green.


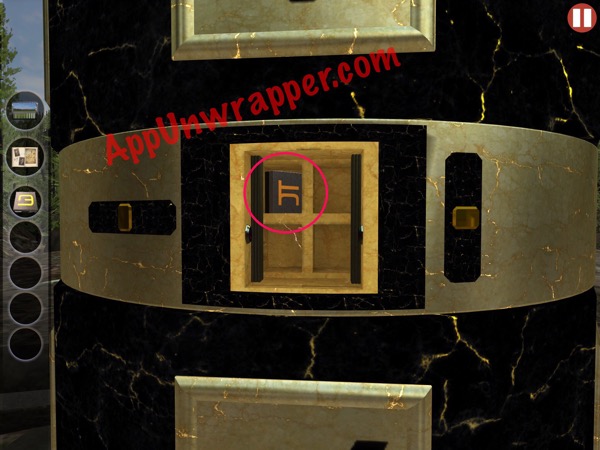
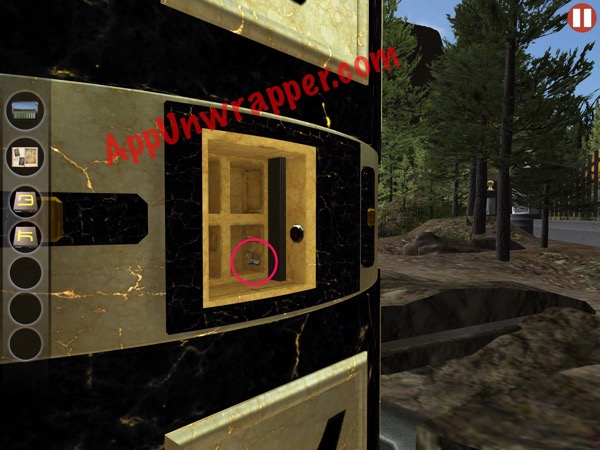
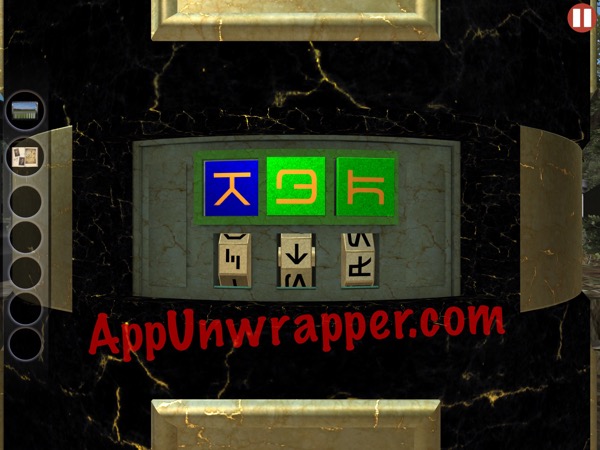
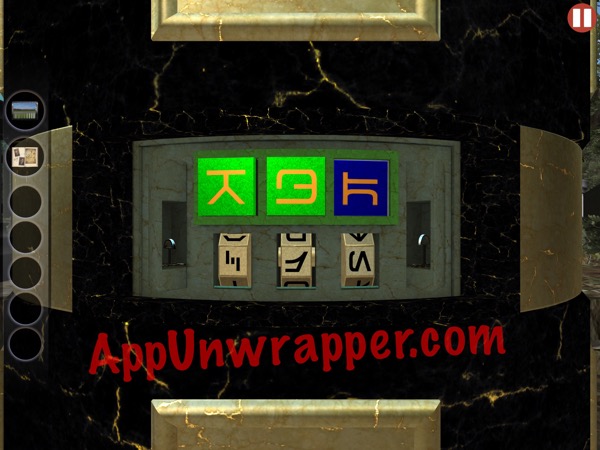
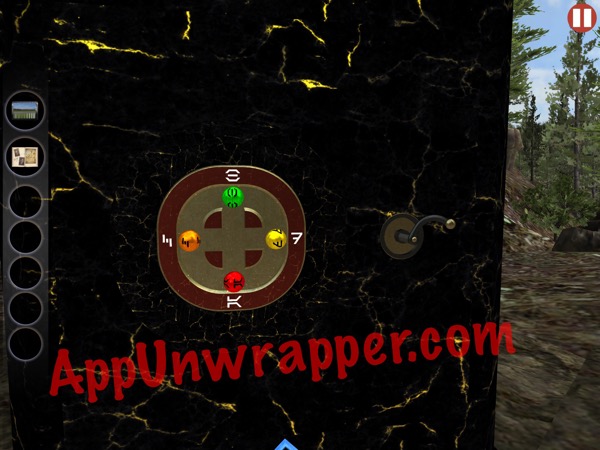
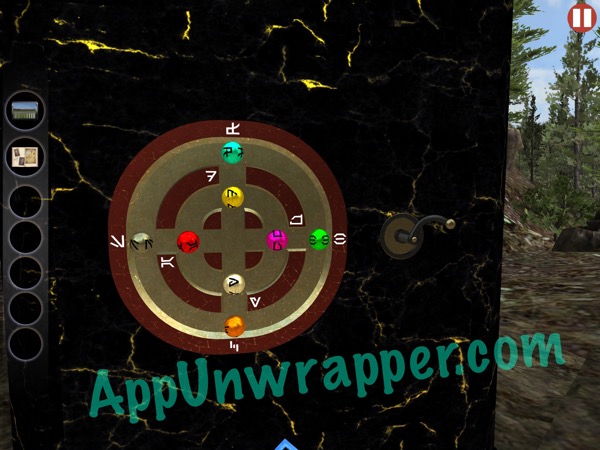
26. Find the three strange symbols (that almost look like “KEY” backwards) and place the symbols from your inventory on each one. They’ll light up green. They’re buttons!

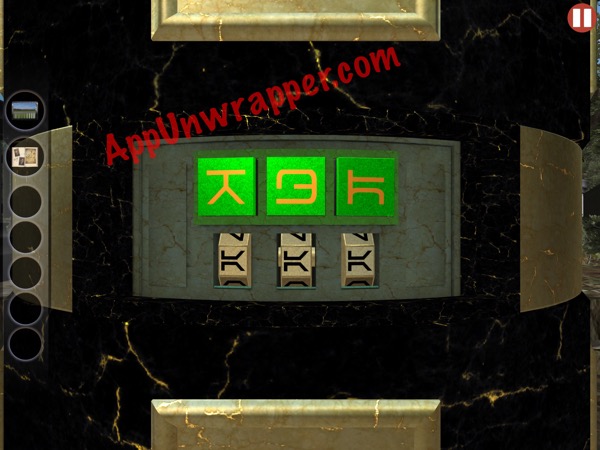
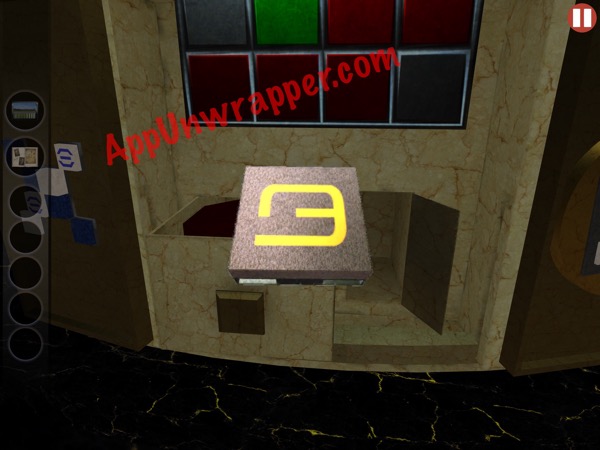
27. Page 14 in your journal tells you that you need Rover (the drone) to help you with this part. Press each letter, then look at your tablet and another symbol will show on the screen. Rotate the little wheel below that symbol to match the one on your screen. Then do the same thing for the other two buttons. Grab the fish key and human key from each side.

28. You need Rover to help you again here. Go to the fish symbol, place the key in the hole and turn it. The green light won’t stay lit! Go to the human symbol, place the key in the hole and turn it so you get a green light. Now, stay there and take out your tablet. Rover is looking at the fish key, and if you turn the key on the screen, the real key will turn as well. Onto a new puzzle!

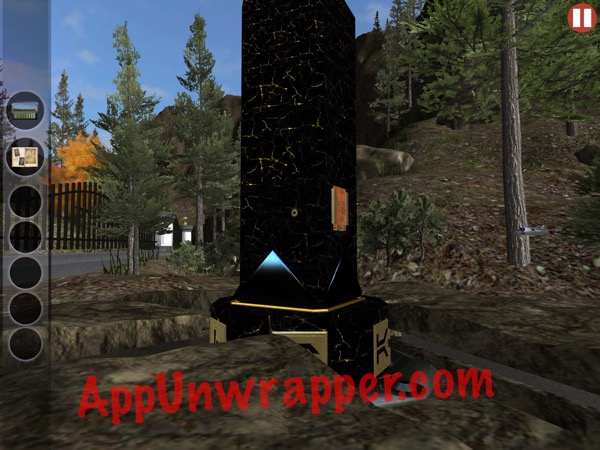
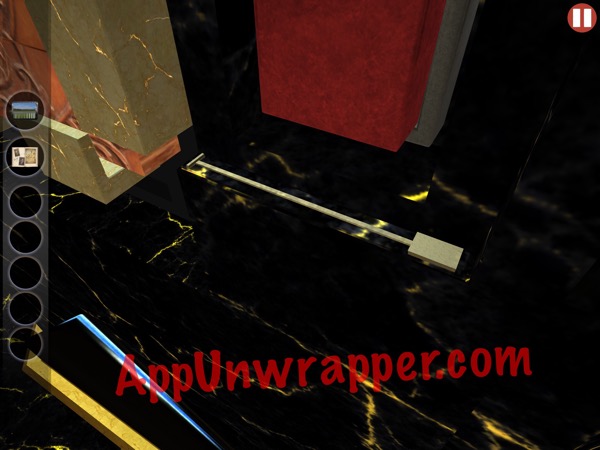
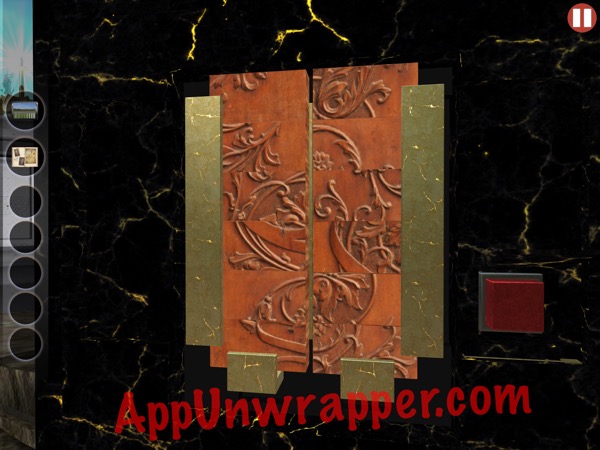
29. Page 15 of the journal is now available and tells you what the sliding puzzle design should look like. Go to the side of the obelisk with the puzzle. This part is hidden very sneakily again. But there’s a small slider to the right if you look closely. When you slide it, it will reveal a red button. Press it to release the puzzle pieces. Now you can solve it. Basically, you need to pull out tiles and drop them back on top of the others until they make the design. There are a few tiles that are on the wrong side, though. To fix that, get those tiles to the top, then slide them to the side. Solve the puzzle and get the ring.
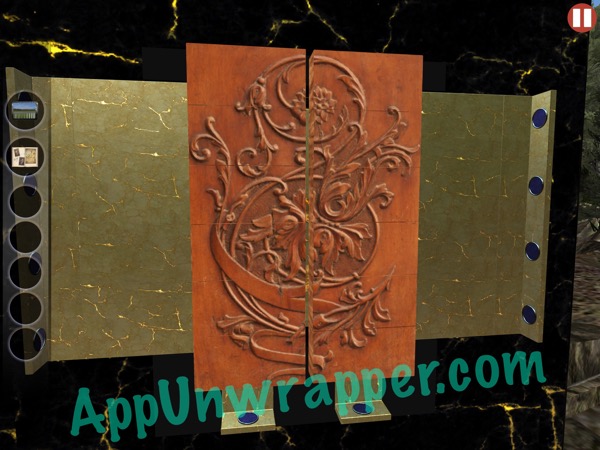
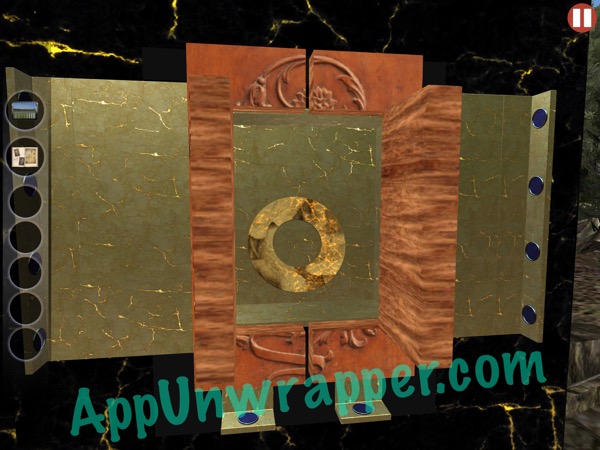
30. Find the other rings one of the obelisk’s sides and add the new ring to them. Rotate the rings to make an image. The circle to the left will open up, and you’ll have to solve another rotating rings puzzle. Then, place the crank handle inside the flower (this may happen automatically) and then take the crank.
31. Go to the other side of the obelisk, the one with a small socket and nothing else. Place the crank in the slot and turn. You’ll now have to solve to marble puzzles. There’s a cypher on page 16 of the journal that tells you what letter each symbol represents (might want to translate all the red writing in the journal?). But you don’t really need to use that. Just move he marbles around to their corresponding symbols. There are two puzzles like this to solve and then you’ll get a key.
32. The top of the obelisk will open up and reveal a locked box. Use the key to unlock it and lift the clasp. Some fancy lightning will come from it. Then take the top piece.
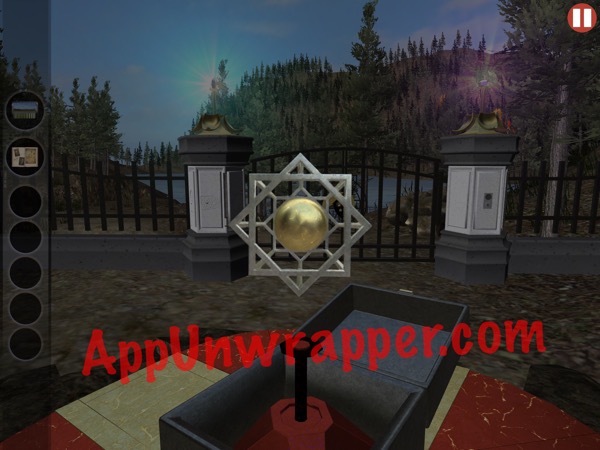
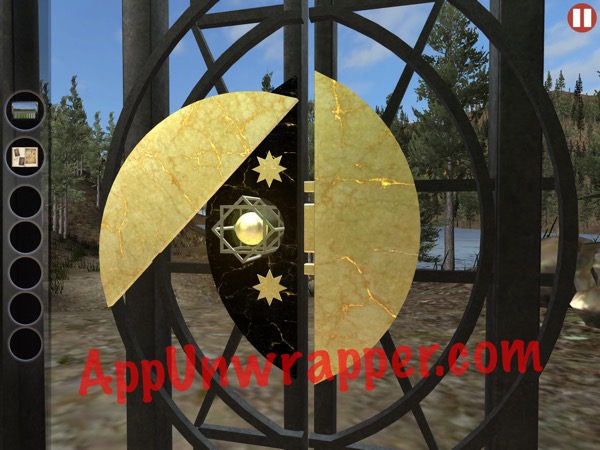
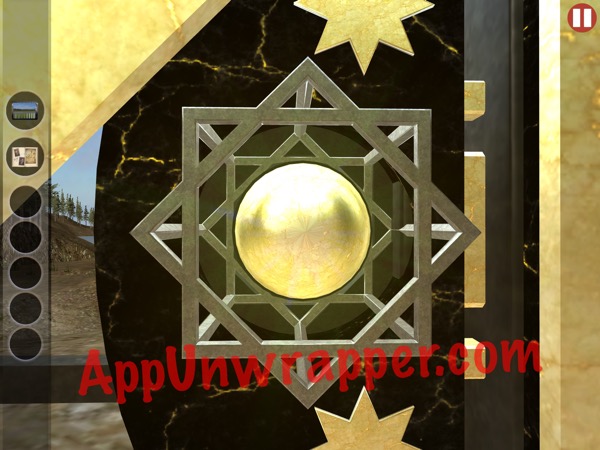
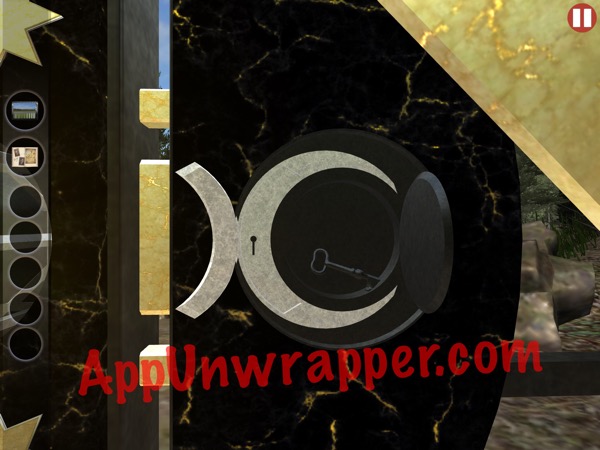
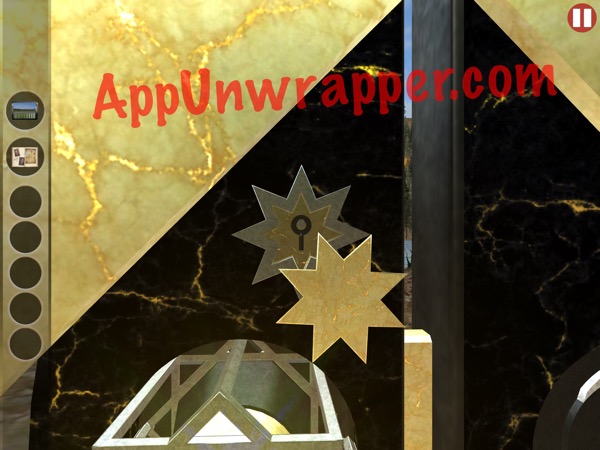
33. Go to the gate. Place the piece you just got on the sun side. Turn it until it glows. Now you can take a key from the moon side and unlock one of the bolts. Then go back to the sun side, find the tiny key and use it to unlock the tiny lock. Open the gate and go through!
Congratulations! You reached the end of the game. This is only the beginning, though! Stay tuned for the sequel!
You might also like The Trace, REBUS – Absurd Logic Game and Adventure Escape: Murder Manor.

@#6 – my sliders will not slide 🙁
could start over but not sure I want to 🙁
Are they green at all? They won’t slide if they’re not green — make sure you didn’t miss any steps.
no, I’m pretty sure they’re red! I’ll check and I’ll follow your w/t step-by-step as I did it without a w/t on or around March 16th.
thanks! at least that is a good tip to follow!
🙂
It’s a little “tricky” and I had trouble getting to the “switch” but when I did, the lines when green and I got the crank. On to page 2! (I had already uninstalled it since I couldn’t find a solution) I was very happy to get your email about the w/t today. It didn’t take too long to repeat what I had already done. Thanks again 🙂
It gets trickier. ;). I just unlocked another page in the journal. It works as hints/clues. Very cool.
@#23 – all my windows look the same 🙁
I have one blank box (nothing in it) and oodles of window frames but they all have blue & black bars. *sigh* Yes, I did get the red thing & the block. thanks.
Got it! I had to do some figuring but I got it! Thanks!
Wow! I never could have done this without your help! Incredible game! I opened and went through the gate – Wow!
Glad you enjoyed. 🙂
Hi, loving this game! However, I can’t seem to get the three l
“Letter” blocks to go onto the three green squares. In the walkthrough, the squares appear closer than mine. I double tap but they won’t come any closer. Not keen on uninstalling and restarting – I sense I’m not far from the end!!!
Thank you! Any help would be appreciated!
Hi Bobbie,
I’m the dev for the game. Glad to hear you are enjoying the game. Are you able to “zoom in” on other sides of the obelisk? the double tap should be all you do. Sometimes on slower hardware, it doesn’t register as quick as we’d want, so we have to double tap slower. Let us know how it goes.
Sorry! I didn’t realise the three tiles had to go on the other side!! Duh! Thanks for your help! Super game – I love it!! Any idea when we can expect the next one? (Can’t wait!)
Hi Bobbie,
We are actually planning an update to the current game first, then a release of Port of Call. We don’t have a date yet as this is a side job. We will keep you posted though. I’m really happy to hear you are enjoying it. Thanks for the feedback
-Curtis
Hi guys, after moving the sliders for the gates and lighting up the green light (the blue gem puzzle), I can’t get the the window with the “backwards key” symbols to stay open long enough to zoom in on it. As soon as I let go of the metal band which covers the puzzle windows it snaps shut again.
Can you please help?
Ps. I’m running the game on an iPad mini2 with the latest iOS 9
Hi Dave,
I’m on the game’s dev team. Thanks for playing the game. Glad you found it. Sorry this puzzle is causing some grief. Were you able to solve it? Can you post a screen shot of the place you are stuck? Without giving away the answer, often there is a pre-step that needs to be done to enable parts to stay open. Best wishes! Leave us another message if you figure it out, or need another hint.
-Curtis
Please help! I’m stuck- placed the blue gem inside box, bars closed, opened three other boxes, one lit up green, but now the bars on closed on the box that contains a vertical silver cylinder.
Thanks!
On walkthroughs have gone s far as number 28 but as soon as I zoom out the green light goes out ,l have waited as instructed but nothing happens, the journal is still locked also you say take the tablet but I do not see or find it.what am I missing or what have I done incorrectly. Enjoying the game so far also thank you for help that you give out. Thank you again.
Hey BillyBoy,
I’m one of the developers. Were you able to figure this one out? If you recall, the tablet is the icon in the top left, that lets you see the environment from another perspective. This may be useful. Let us know if you need anymore help.
-Curtis
Gack! My tablet shows a red button before I could use it with the green button. I couldnt get the key so now it seems I cat go back.
I started again and I got the green button on the tablet and remembered that I got it before because I just push green buttons without thinking. So I pushed it again. As before, it reveals a tile image but no key. No key in inventory either. Crappola.
I am on the 27th page of the journal and have done things on several sides of the obelisk, but now I am stuck and I have a gate pillar with a blinking green light that does nothing when I try to push it.
That is step 19 on this walkthrough above. I have an iPad Air2 and iOS 11.2.5
That was actually page 14 of the journal and I was able to progress. The gate pillar still has a blinking green light though.