Broken Age Γäó
By: Double Fine Productions, Inc.

There are a few different options for rewiring Hexipals and Hexi-gals (robots) in Broken Age. This is a quick guide to help you in case you forget which is which. If you need more help, feel free to ask in the comments section.
**Update: It has come to my attention that each game is different, so if these are not your exact patterns, hopefully my instructions will help.
See my step-by-step Broken Age Act 2 walkthrough.
You can also watch my video for the last puzzles of the game and the ending:
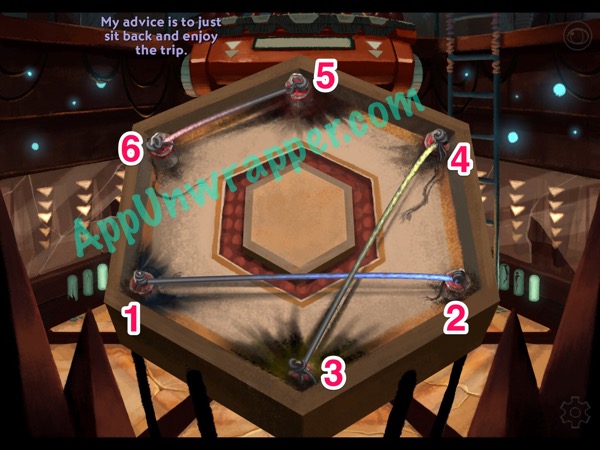
1. Rewiring the broken Hexipal that Shay finds so you can charge him him up and let him fix the ship. The clue is found by Vella in the control room of Shay’s ship. Once you have that clue, you need to use trial and error to see which symbol you get when you connect a wire in a certain connection on the back of the Hexipal. It’s a hexagon, so there are six corners/sides and six options where the wires can connect. There’s a blue, yellow, and red wire. Even though the photo is in black and white, you use the colors to control the order. Blue is the top row, then yellow, then red. The starting point for a wire will be the left shape and the ending point will be the right shape. So the direction of the wires matters. Once you get the first two wires in place, the last one is easy. Place the Hexipal in the charging station every time you want to check the results of your work. You can do one wire at a time or try all three. Once you get three blue bars and a smiling Hexipal, you know it worked and he’s charged! If you’re still having trouble with this one, I’ve explained it in even more detail here.


2. Fixing the safety Hexipal (Hexi-gal) that Vella finds so it can tickle the NavScarf robot and distract Mother. It needs to follow the harp controls that you find with Shay in a book downstairs on Alex’s ship. This setup is also used by Shay to reprogram his Hexipal to play the harp and distract the diamond pals.


3. Its unlikely you’ll be able to complete the final puzzle in one try without Mother rewiring the safety bot Hexi-gal to be a safety bot (unless you follow a guide and know exactly what you need to do). When this happens, you must collect the safety bot again and you’ll see how the wiring looks to program the bot to swing his arms outward. The burn marks also help you place it, if you don’t want to wait for Mom to fix it. The burn marks are the starting points for the wires, so all you need to do is swap the colors around until it works. You will need to program Shay’s Hexipal this way when it comes time to make him hammer with the mallet at the drum.
4. Bonus just for fun: dancing Hexipal! After Shay finds the broken radio downstairs, he gives it to the dancing Hexipal that Rocky programmed. After he fixes the radio, the dancing Hexipal will go into your inventory and you can see his wiring. It’s not needed for any puzzles, but take note of the wires if you want to make him dance for fun. This is how mine looked:


This still doesnΓÇÖt help me. The shapes donΓÇÖt match up and IΓÇÖm stuck for the second time wiring the stupid Hexipal. I tried using the shapes as a key, but it just makes me make a wire from point A to point A. I canΓÇÖt do that!