Finding Love:
You can also watch my video for Finding Love, Childbirth, and The Staircase here:
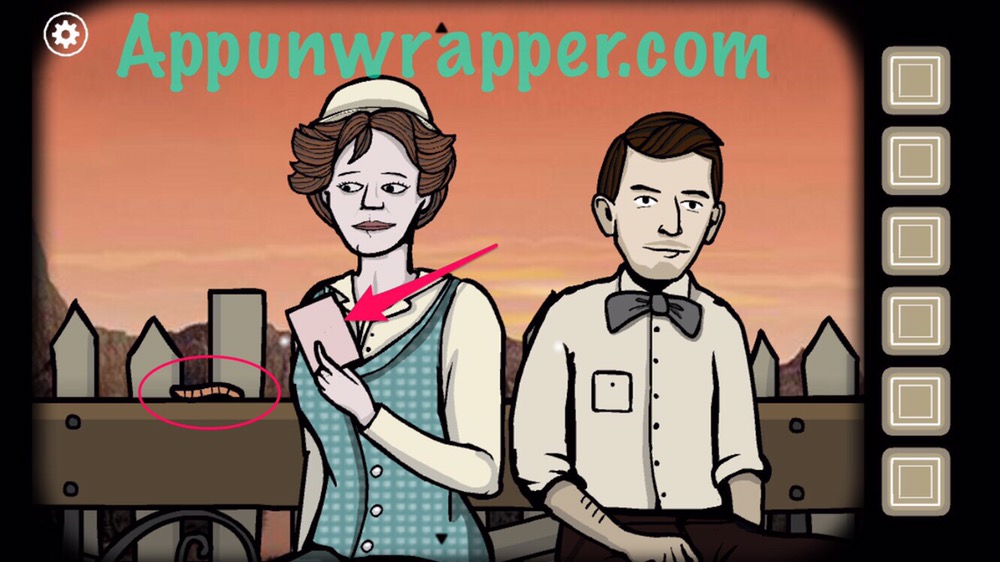
1. Take the Rose and hand it to the woman. Make her sniff it until her nose bleeds. Take the handkerchief from James’ pocket and use it to wipe up the blood.
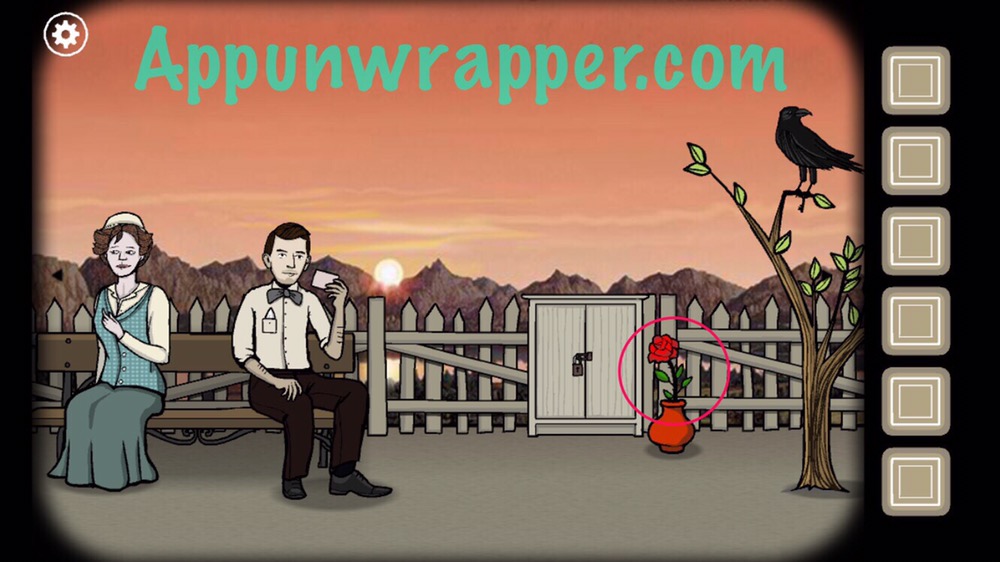
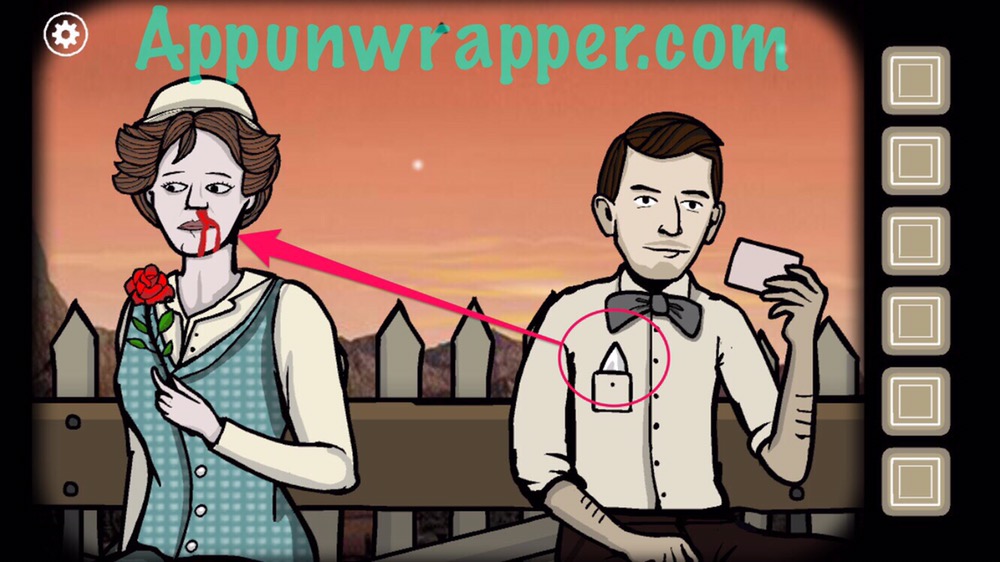
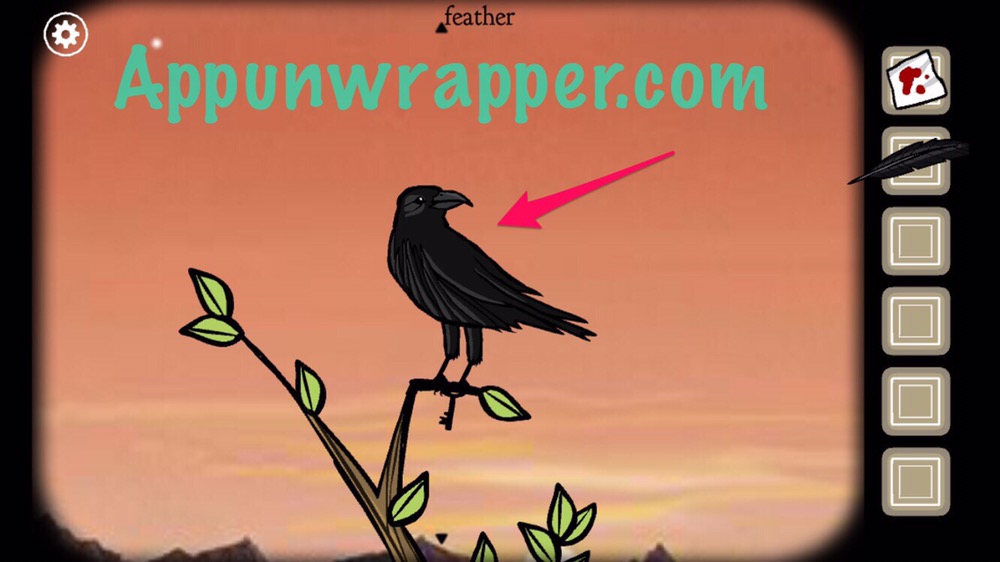
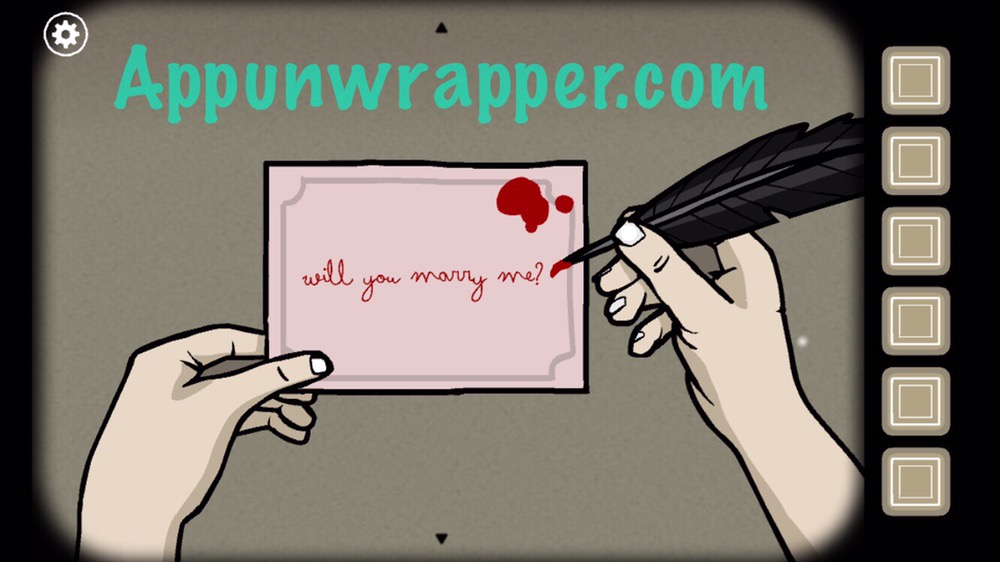
2. Pick off a feather from the crow. Then give it to James and add the blood. Have him write “Will you marry me?” and take the love note.
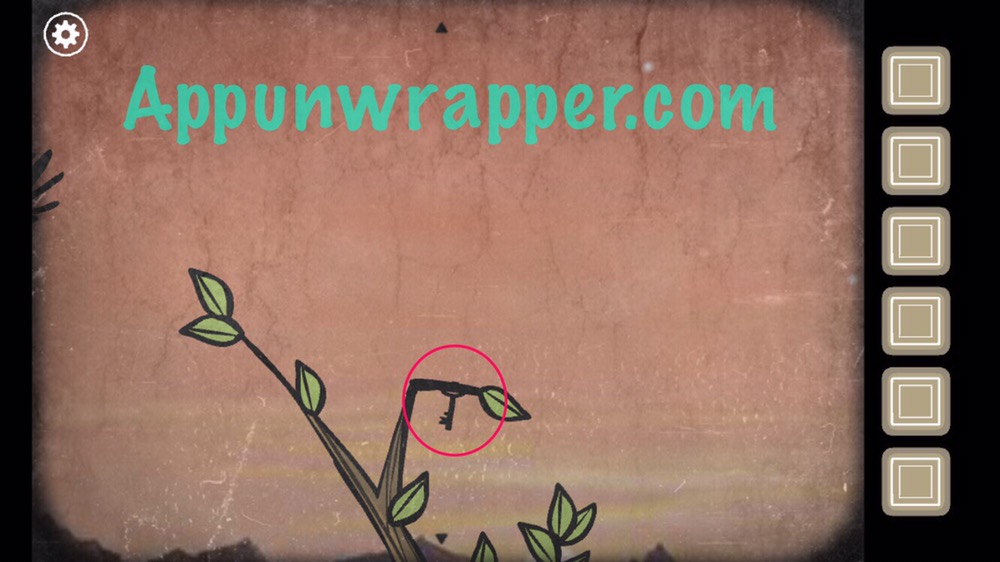
3. Give the note to the woman and she’ll move closer to James. Take the worm. Feed it to the crow to get the key.
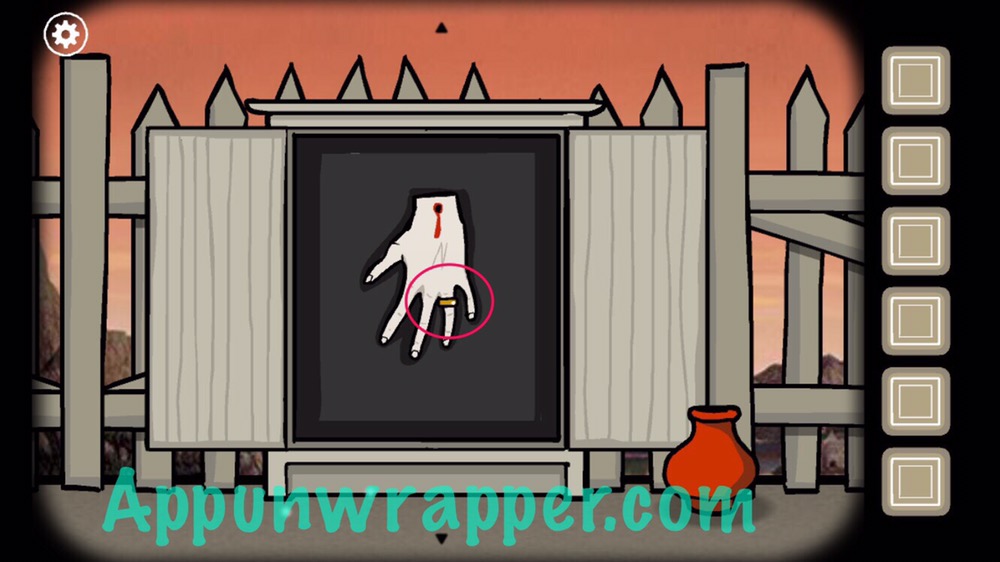
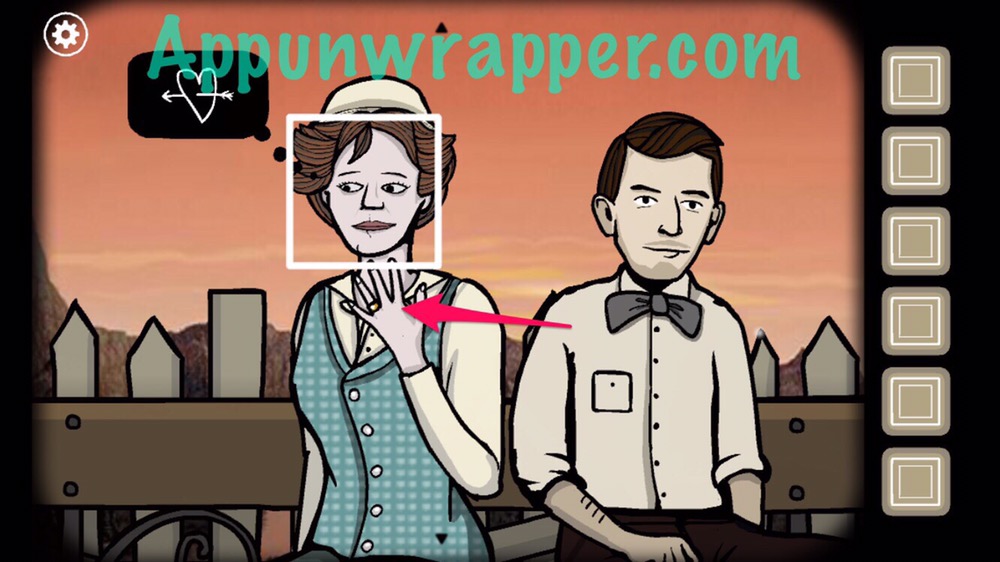
4. Use the key to unlock the shed (or whatever it is) and get the ring off the hand. Give the ring to the woman, tap on the white box and complete the chapter. It turns out her name is Mary!
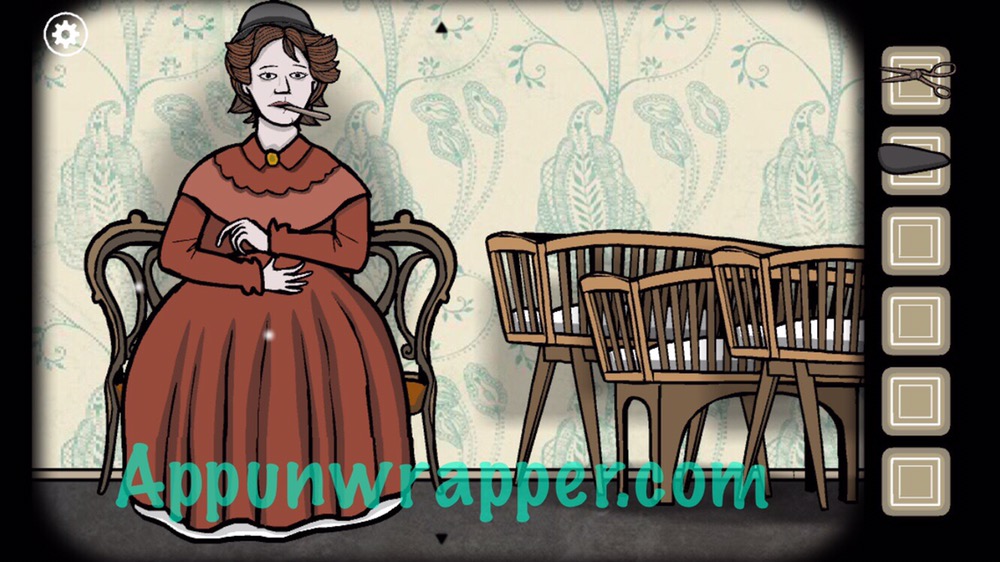
Childbirth:
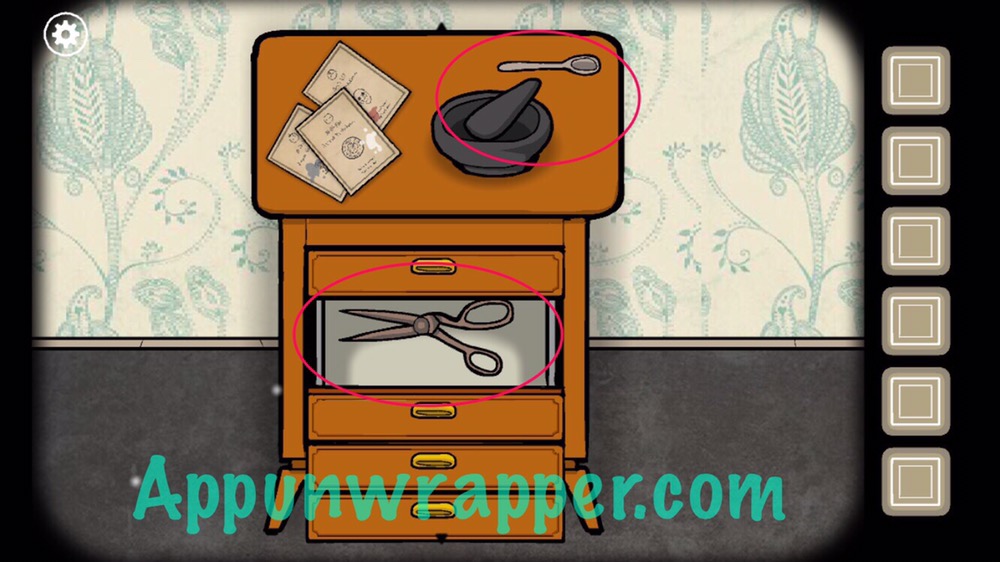
1. Head right. Open the second drawer from the top to get the scissors. Also, take the spoon and the pestle (the game calls it the mortar). Look at the three papers. You’ll need that information for later.
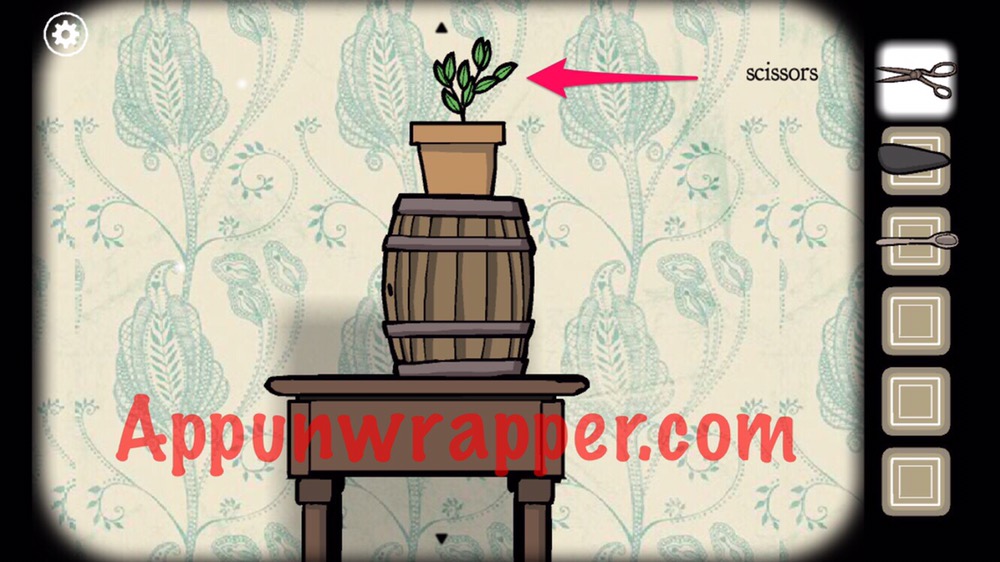
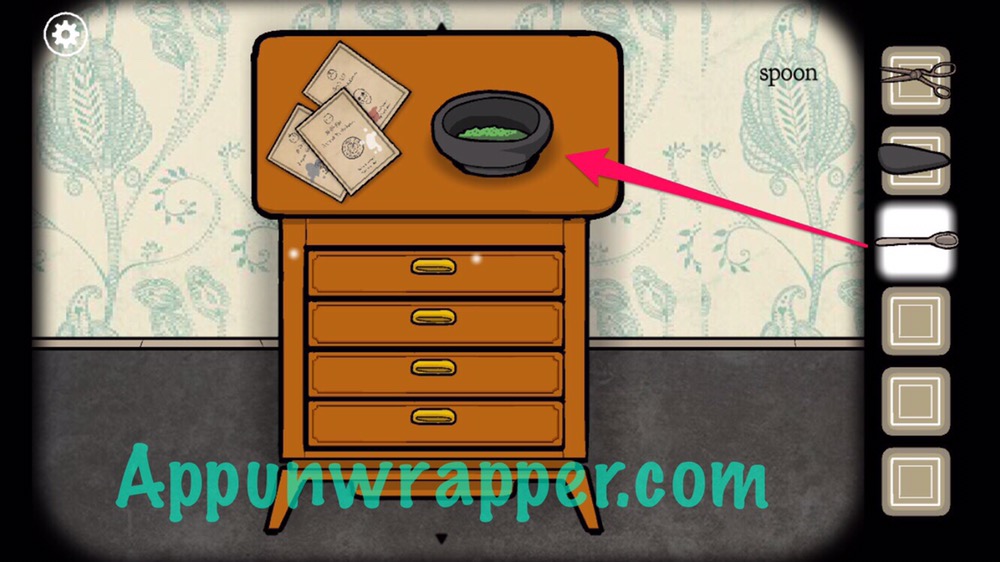
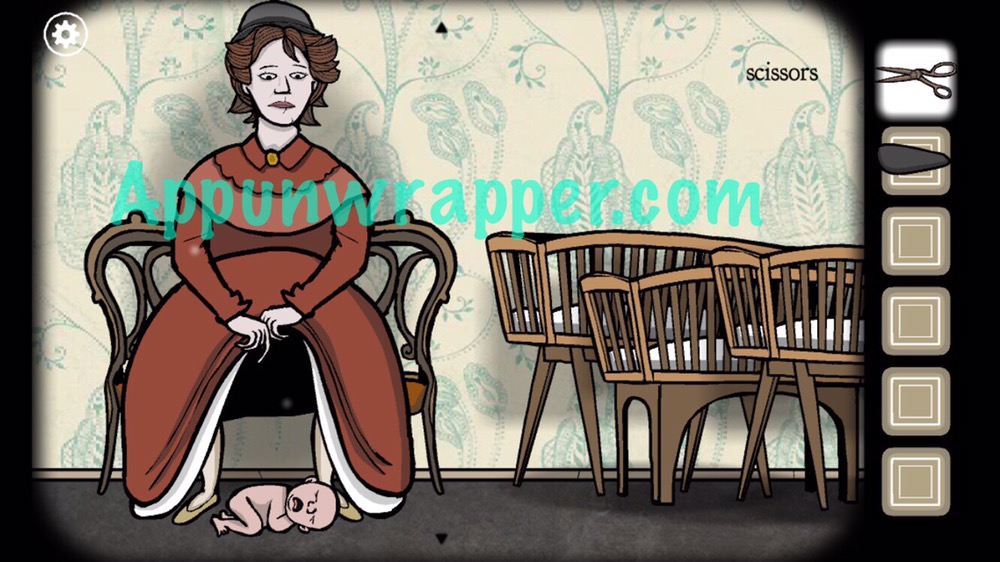
2. Use the scissors to cut the plant. Place the plant in the mortar and use the pestle to grind them to a powder. Use the spoon to gather up some of the birth potion and feed it to Mary.
3. Mary now lifts up her skirt. Tap that area until a baby pops out. Use the scissors to cut the umbilical cord. Pick up and place the baby in one of the cribs. Take the tap from the second crib. Mary still has two more babies in her! Get the other two so you have three babies in the cribs.
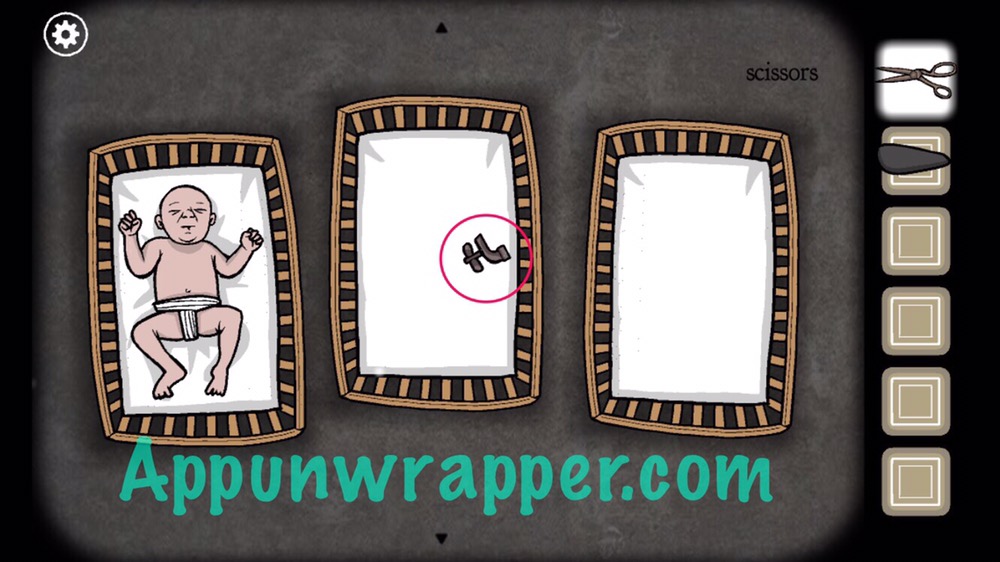

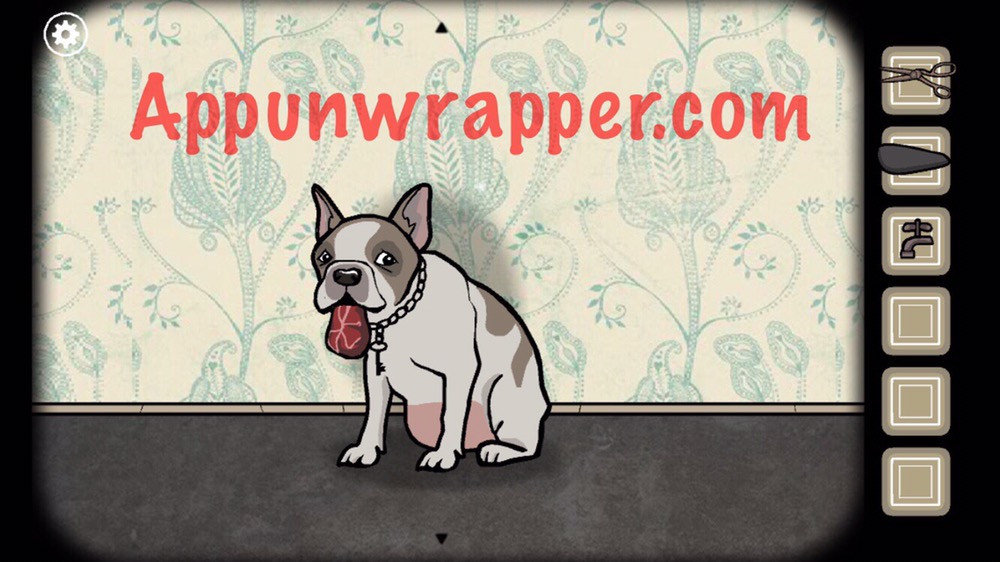
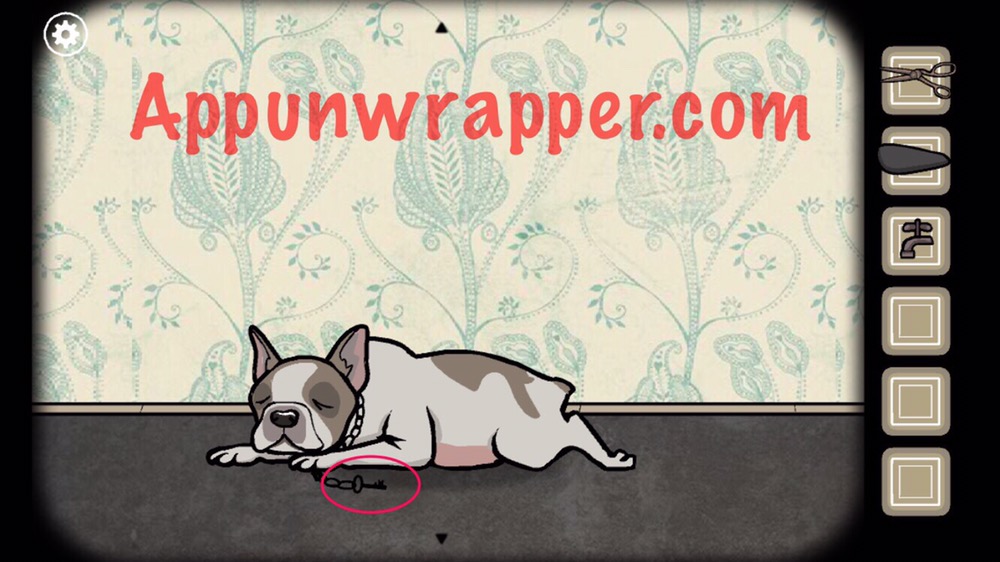
4. You’re not done yet with Mary! Tap a fourth time to get her placenta! Feed it to the dog. He then falls asleep and you can take the key.
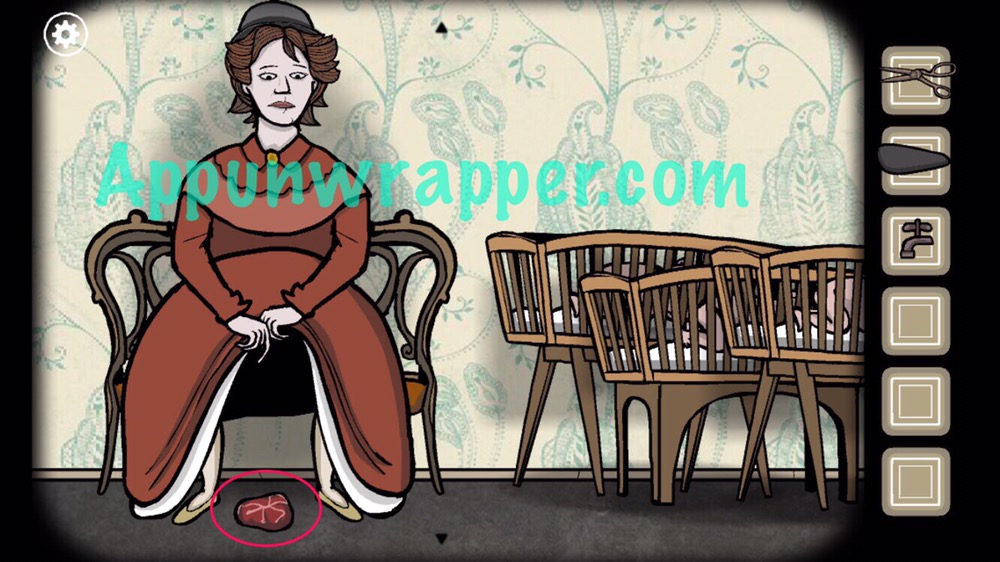
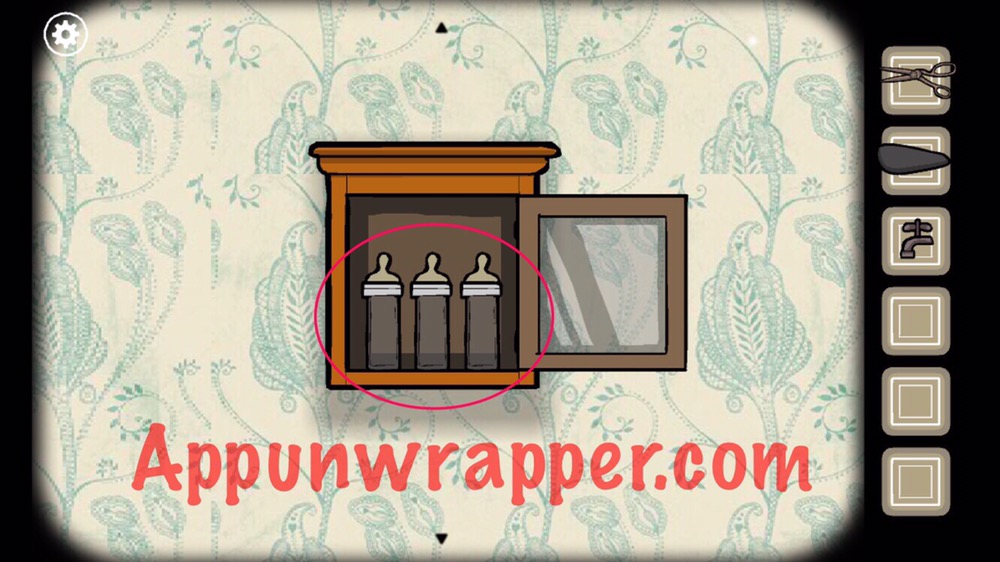
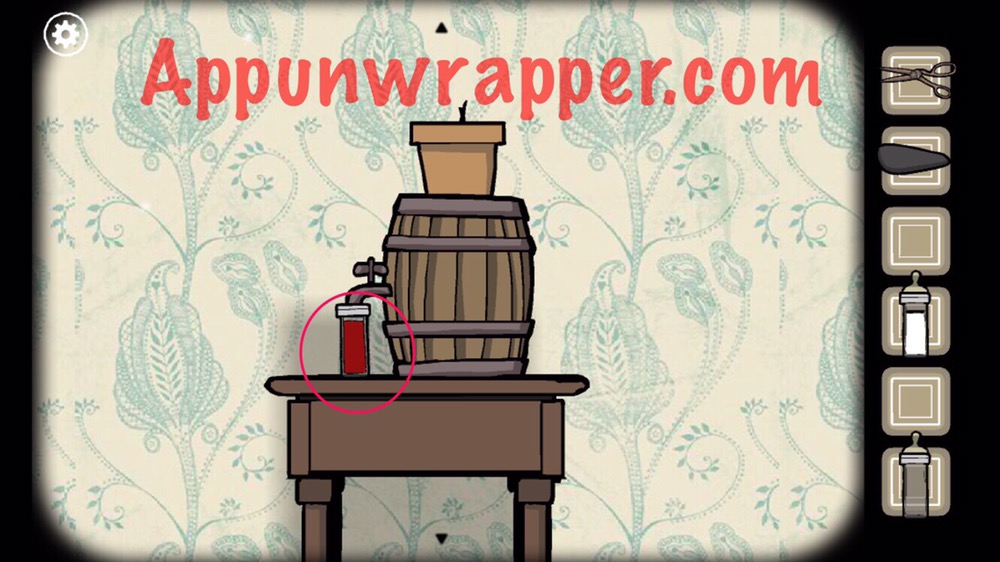
5. Use the key to access the three bottles. Give one to Mary so she can fill it up with milk.
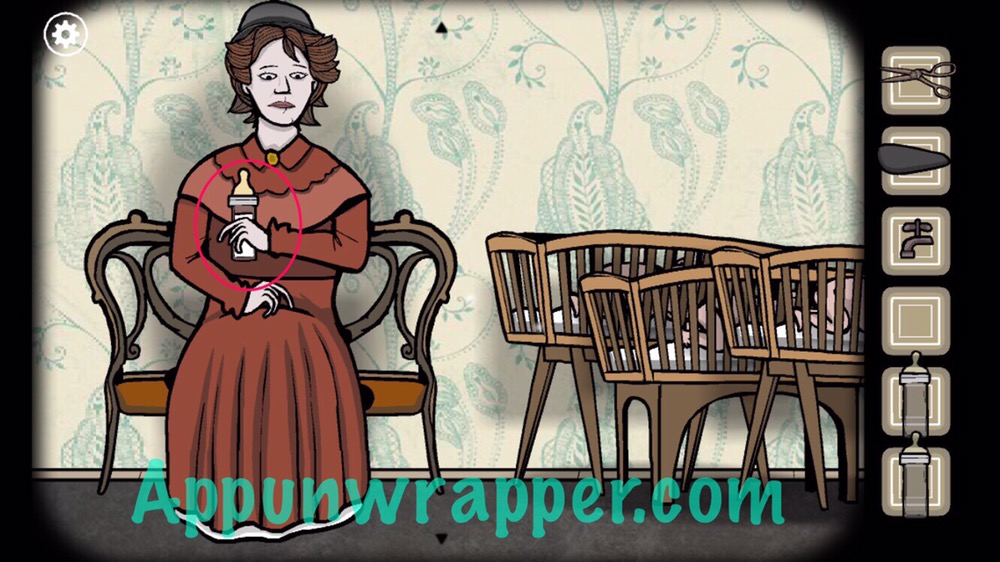
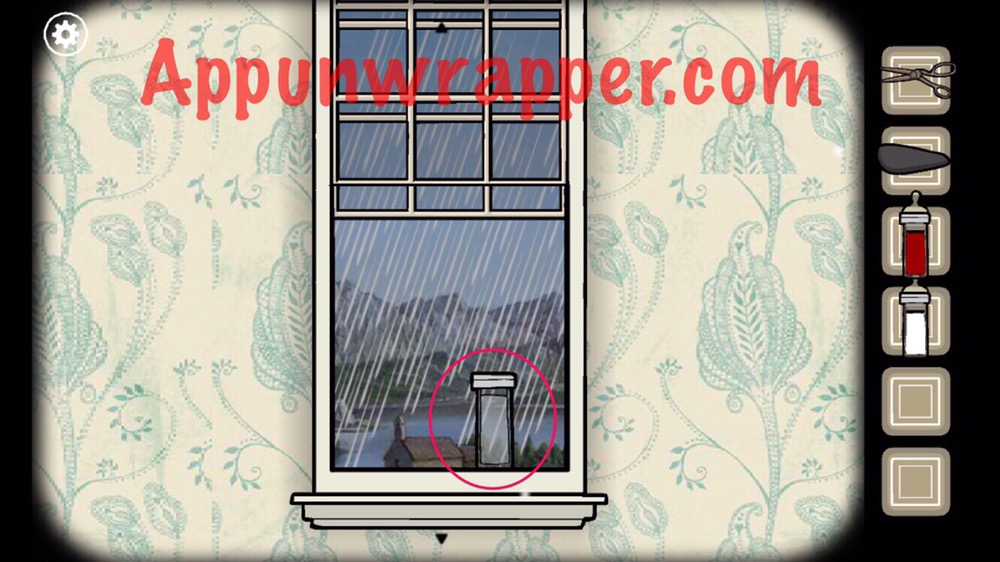
6. Use the tap on the barrel of wine and fill up the second bottle with wine. And last, open the window and fill the third bottle with rain water.
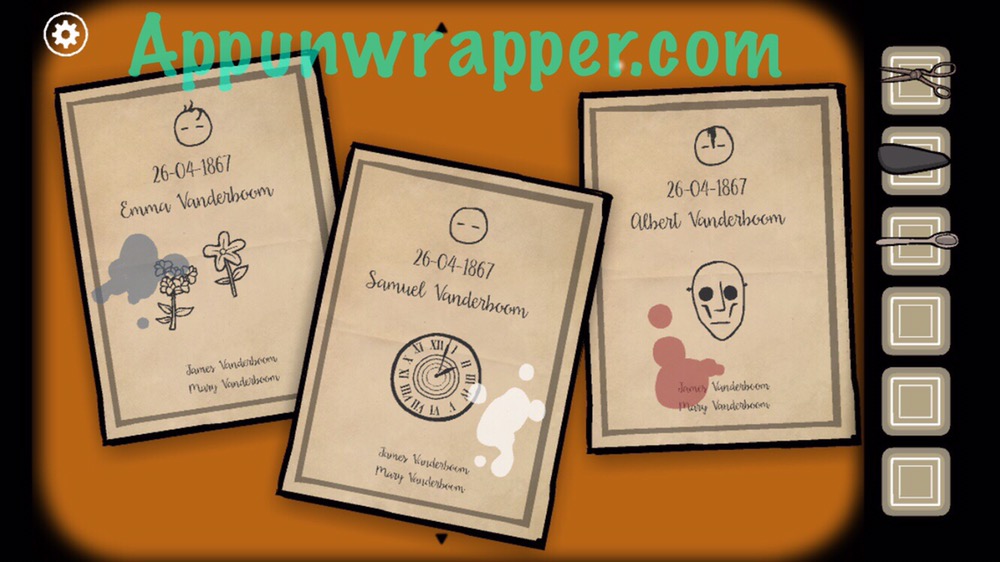
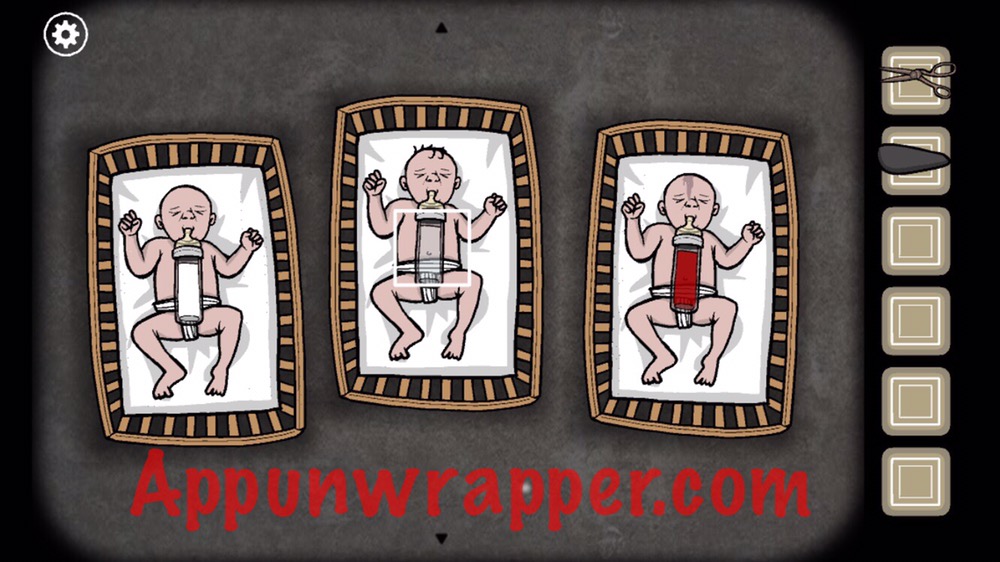
7. Look at the notes with the different stains on them. Each one has a little drawing of the baby it matches. So give the correct bottles to each baby based on those notes. Emma gets the water, Samuel gets the milk, and Albert gets the wine. Tap the white box to complete the chapter.
The Staircase:
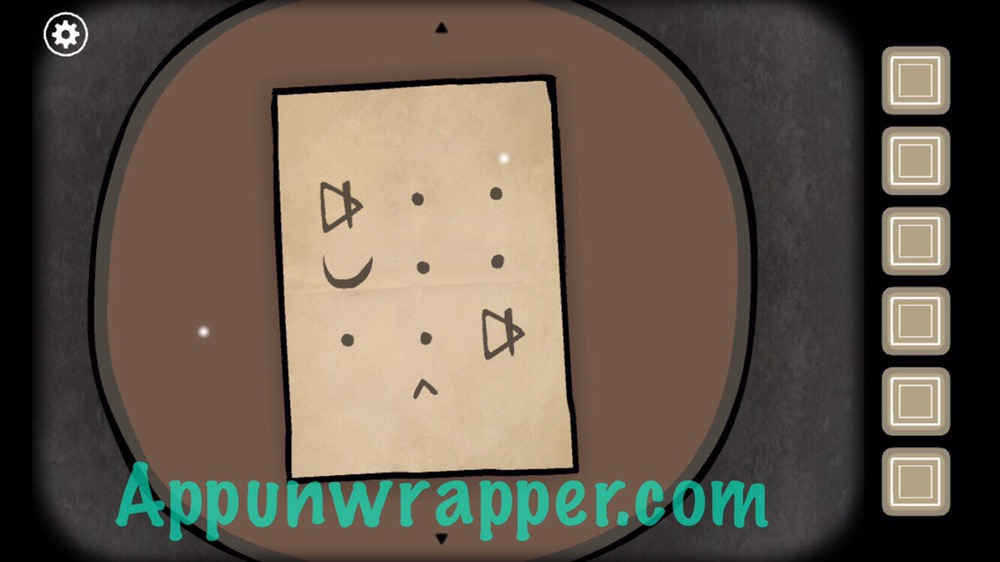
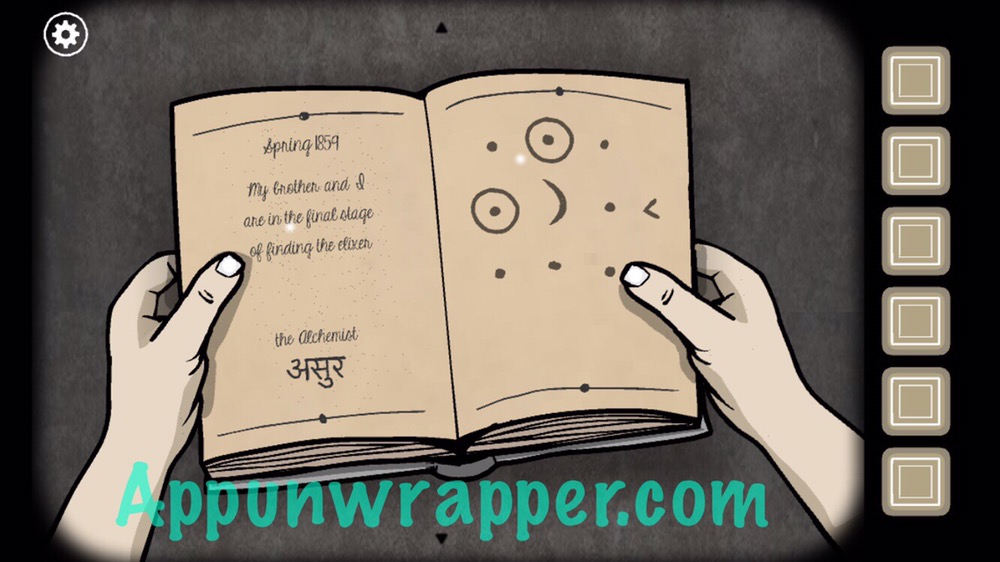
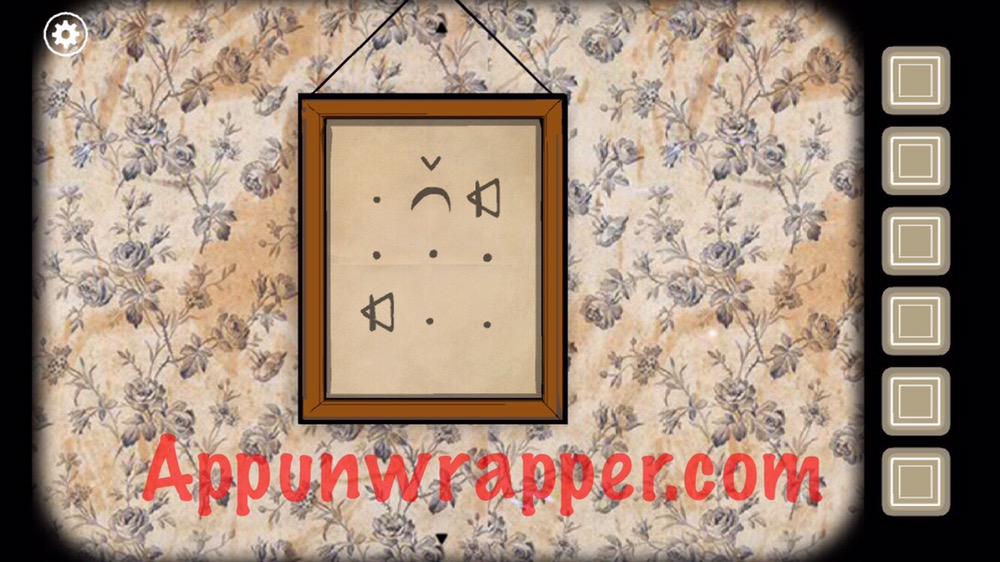
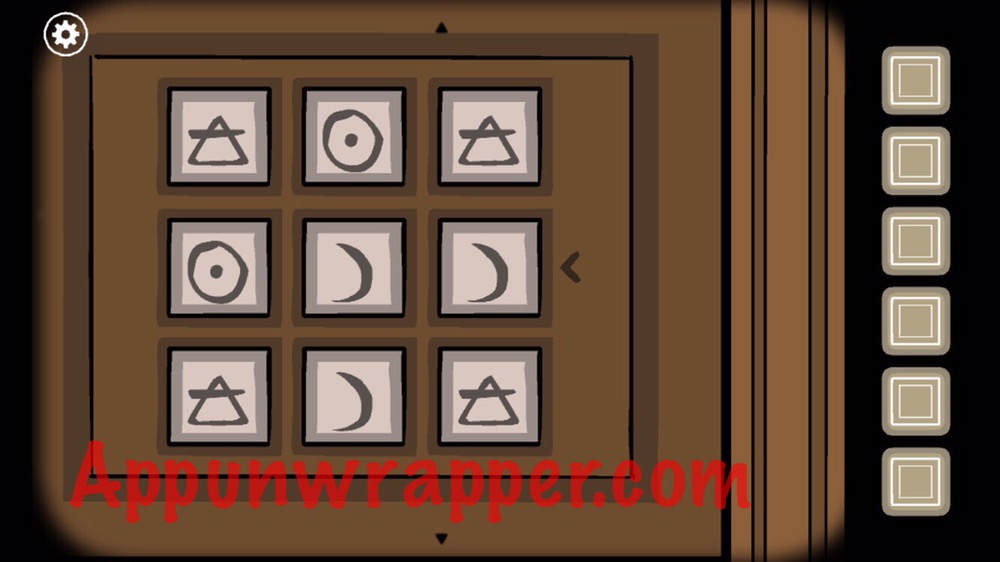
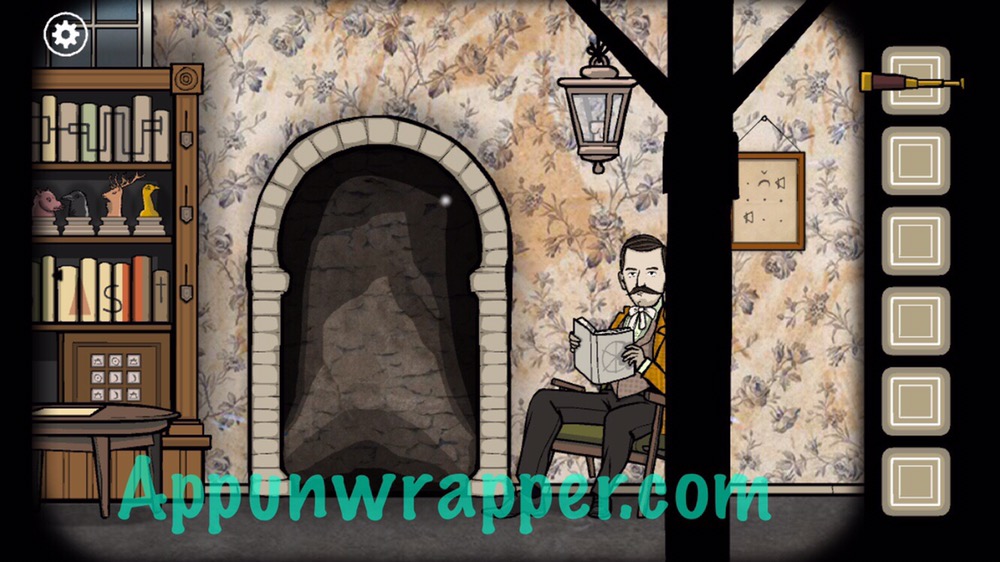
1. First, look at the note on the table for a clue. Look inside the book James is reading for another. And last, peel back the framed painting for the third clue. Pay attention to the arrow on all three and combine them to figure out the right symbols to enter on the bottom of the furniture (swipe up to change the symbols). Then take the telescope (binoculars).
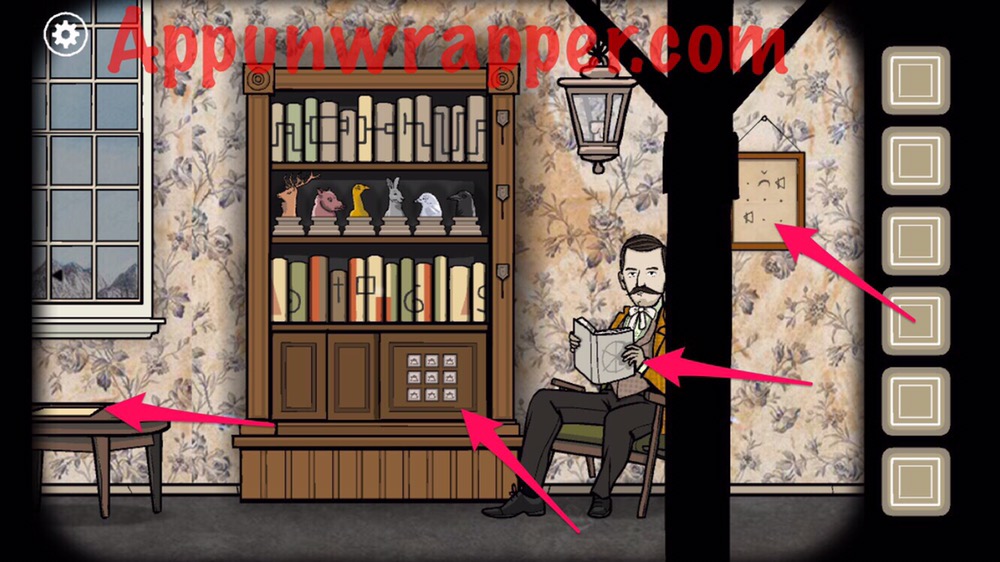
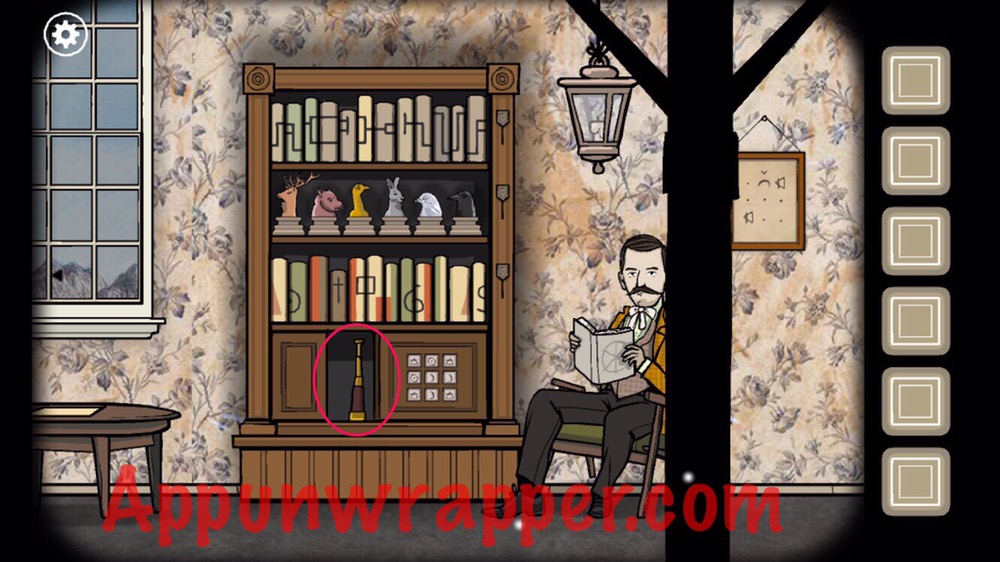
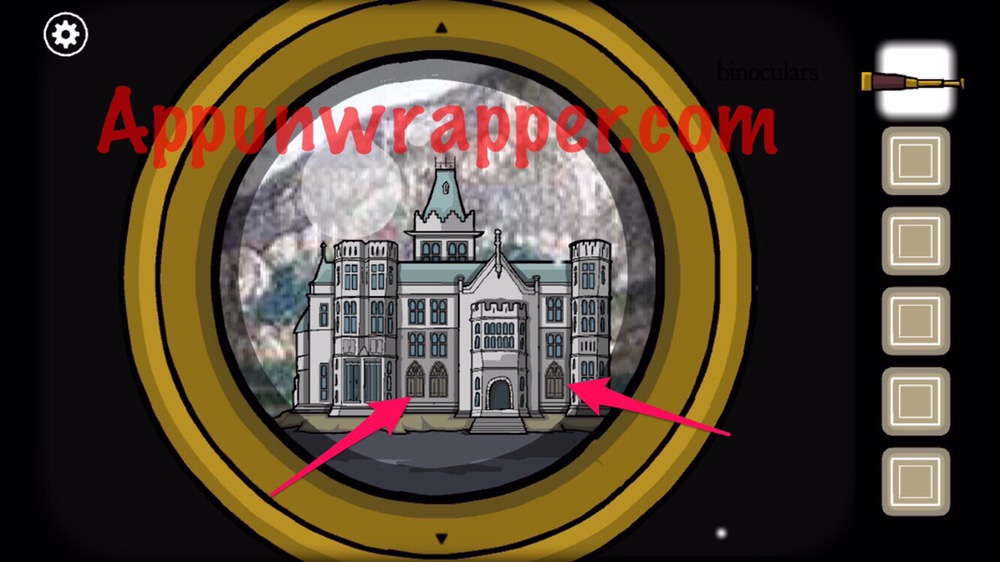
2. Use the telescope to look out the window. Zoom in one the three Windows to see silhouettes of different animals.
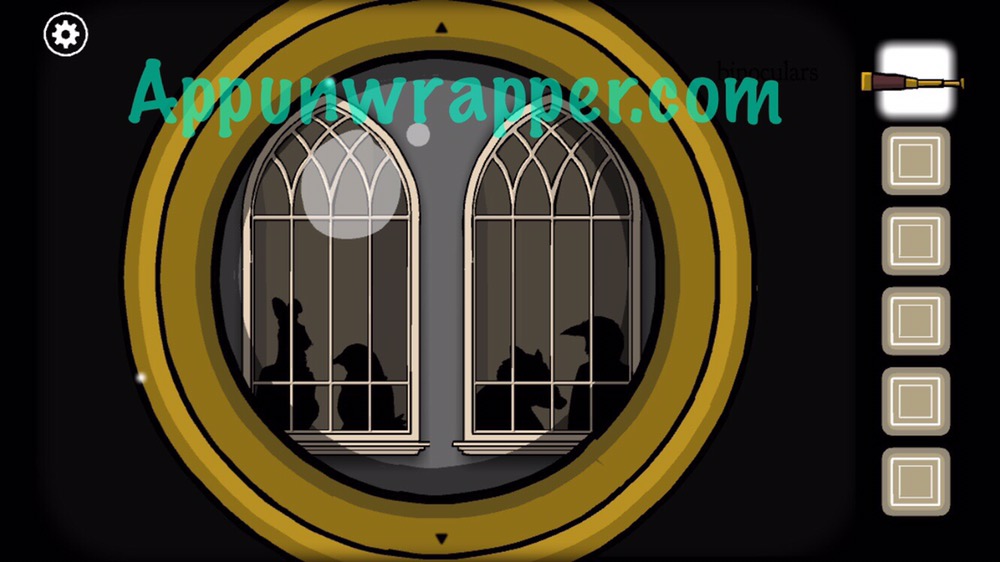
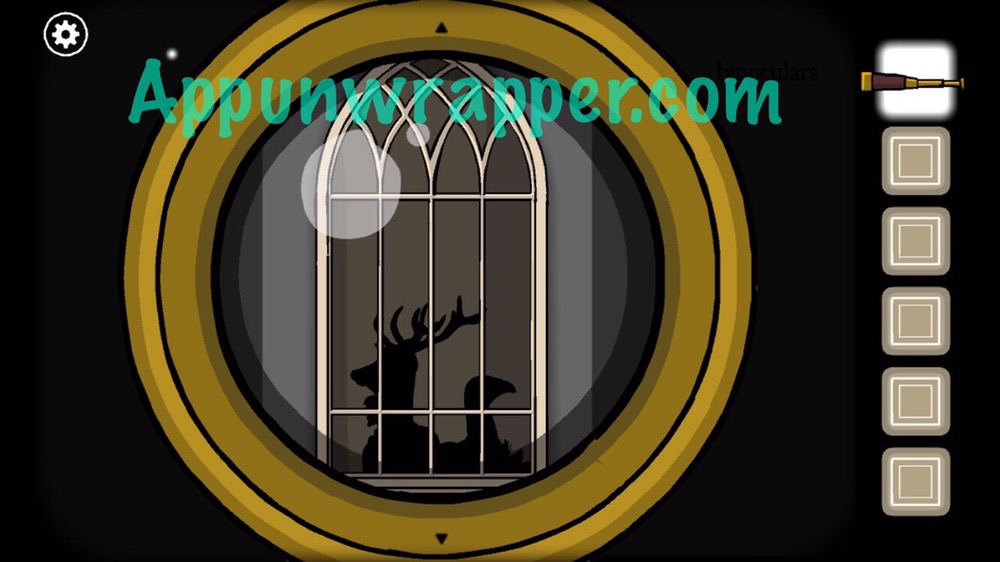
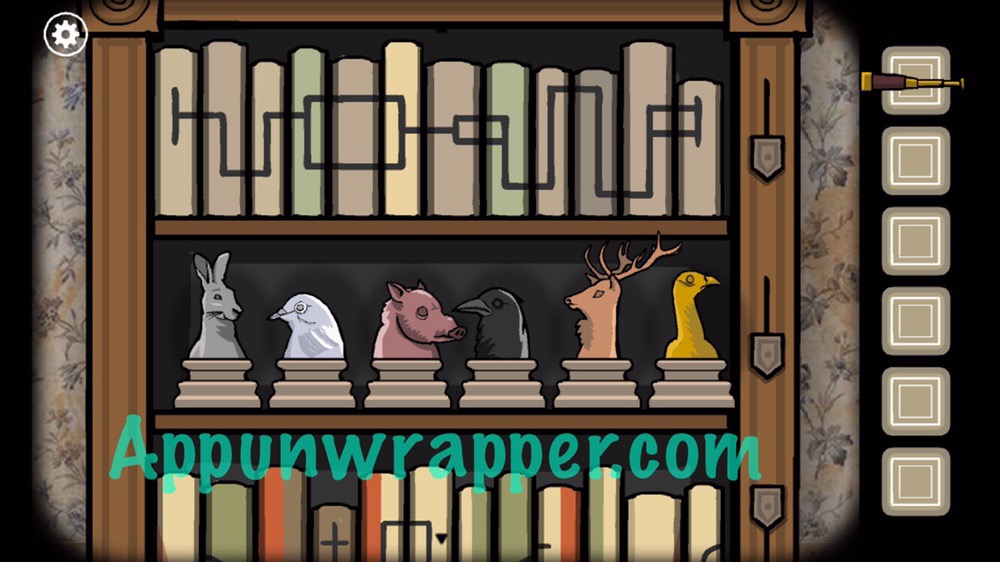
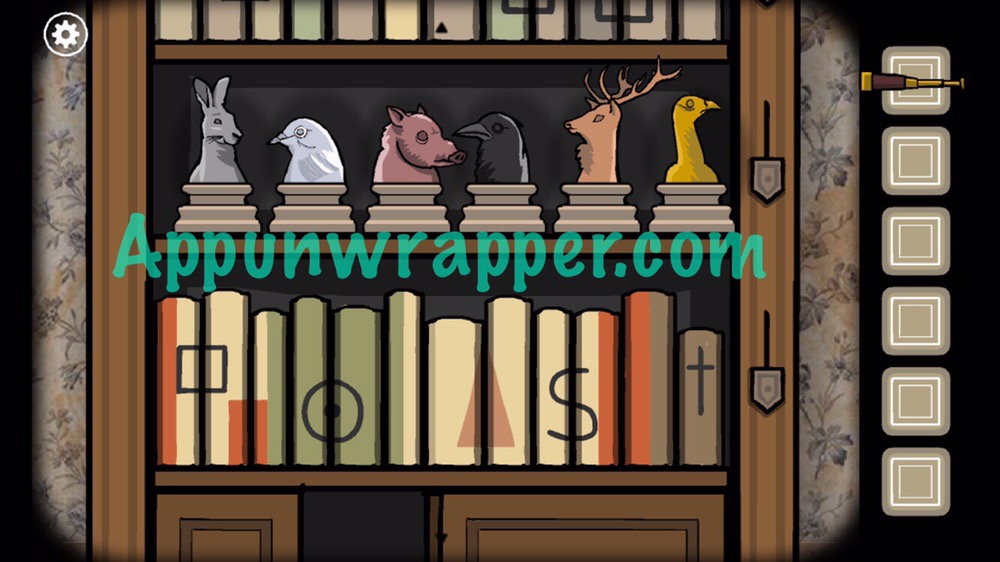
3. Go to the bookshelf and arrange the animal heads in the order you saw. It goes Rabbit, Pigeon, Boar, Crow, Pheasant. While you’re here, arrange the top shelf, too.
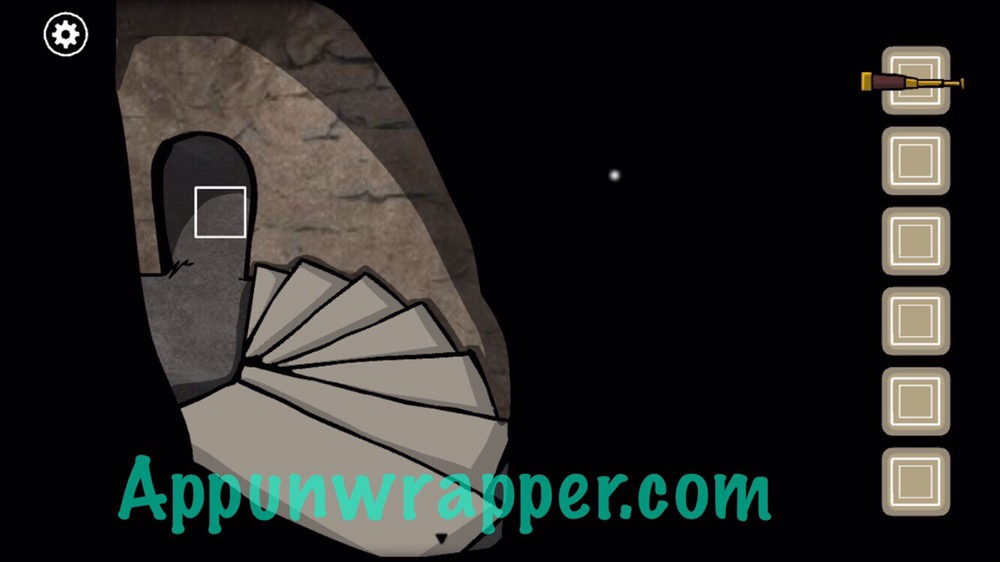
4. Zoom back out and then tap on the bottom shelf. Arrange the books in the right order and then the bookshelf will move, revealing a secret doorway. Head down the stairs and tap on the white box to complete the chapter.
Click on the little numbers below to continue to the next page of the walkthrough or click here.
I’m in the flower garden – presumably using the bee to create an Orange flower like the one marked 1 in Roman Numerals. I can get an orange flower – but when I use the garden tool to pick it – it disappears? What about a little clue?
You need to match not only the color/petals, but the stem as well. All of the numbered flowers from the planter in the back take three colors of pollen to get the petals right, plus one or two of the stem combinations (which are all empty except for the green leafy one when you start).
Once you’ve matched the color just right, and chosen the right stem, pressing the flower again will automatically place it in your inventory. Keep in mind that certain colors may be used twice when creating each flower!
I just posted screenshots that should hopefully help you if you’re still stuck on this. You almost had it right!
The garden tool, or weasel, is only used to remove errors. When you get the right flower, it will automatically populate in your inventory or in the other pots. Ask Emma for advice 🙂
please help me i am stuck in the well part 2, I lost my wooden stick. I can’t find it anywhere. Please help😭😭
Make sure when you tell the bee to go to the flower that you are not currently selecting the tool to harvest the flowers, that happened to me as well.
I had the exact same problem! The Garden ‘weasel’ removes your current flower- make sure you aren’t holding it when you try to use the bee!
You need to make it EXACTLY like the one she wants or it will disappear
When you see the orange flower, do not use the gardening tool, because the gardening tool is used to start over, which is why it disappears.
I can’t move past the well part 1. I’ve put the Y shaped twig in the bucket to ask for a drink but the bucket won’t rise up. I’ve tried restarting the level. Any help?
it’s the Y plus the stick. Y- the stick (-) confused me thinking it was a separator like in a formal document lol
You can mix more than 2 flower dyes to make one flower. You also have to match up the leaves. I think for the orange flower it’s either 2 yellow and 1 red or 2 red and 1 yellow, some of them you also have to add the matching stem and leaves.
If you use the garden weasel, it plucks the flower up so you can start over if you get it wrong. Have a nice day! 🙂
If you miss collecting something— like tears— do we get the chance to go back at some point? Right now it says “you’ve already finished this chapter” if I try to go back.
Are you sure you don’t have them? For me, I think they collected automatically when I tapped on her face.
No you can’t go and without tears the level can’t be finished.
I am hopelessly stuck on The Clock. I had all of the gears, and placed them incorrectly the first time. I tried dragging them away, and as soon as I dragged them away from the clock, they just disappeared. I have only one gear, and the rest are nowhere to be found, can’t finish the level. I can’t even figure out how to reset the level and start over. Anyone had this issue or know how to resolve it?
You can reset a level by pausing while in that level. Press “Reset” and make sure that it asks you if you want to reset that level, not the whole game. Be very careful, because that same button is used to reset the whole game.
Thanks! I had a really hard time figuring out how to reset just the level. It didn’t give me the ‘reset level’ option, just the whole game. But I tried it again and randomly worked.
I’m shooting marbles but the beehive does not fall
This game is pretty early and still will have some bugs. Unfortunately I’d have to recommend restarting the level to get the gears back.
Wheres the last part?? I cant see the root part im stuck on the weighting scale with 9 sacrifices help meee
Look back at the drawings of the people, one of them tells you what weight a certain sacrifice should be placed on. After that, place the surrounding sacrifices on the other waits so that they all are balanced.
Weird. The drawings say the tongue is 1 and the hair is 3. But those don’t balance out. I balanced them out by ignoring the tongue = 1 but the numbers didn’t work to open the chest. Ugh.
It’s really difficult. The hair is supposed to be three I think. I eventually had to look up a walkthrough to beat the level.
Will work on the rest of it today.
I see it’s been updated, but everything needs to total 6 for the weights to balance out, so the tongue weighs 1, and it goes on the 5–getting 6. The hair 3 works because 3+3 equals 6.
And yeah, I figured that out eventually, but not on my own. It’s the one point in the game where I felt there wasn’t really enough info. But maybe that’s just me! Was weird getting the 6 clue after you already use it. :/
I realize this is from two years ago, but I just finished Roots now. Your walkthroughs have gotten me through some tough places in all the Rusty Lake games. Thanks! The reason the “six” clue didn’t make sense is because you were supposed to do them in the opposite order. You were supposed to figure out the weights of the six family sacrifices based off the weights of the two they told you. By going back and forth you
could figure out what they all weighed, and once you opened up the box and got the heart, THEN you were supposed to go balance them. At least that’s the way I understood it – thanks again for all of your walkthroughs, they’ve been fantastic!!
Can’t wait for the elixir to be finished. I find it frustrating that when experimenting, previously created elements will disappear from shelving when created again in the bowl. Still trying to figure out how to create the elements that make the elixir. Thanks for your help with these walkthroughs. For some areas, I was doing things *mostly* correctly but missed placement of an item or something like that.
I’m updating it now. I just finished everything. 🙂
You are the best! I just figured out how to make a lightbulb, and I’m like oh, great, still not what I need! Thanks!
Wait I never made a lightbulb! Lol I thought I made everything! And it won’t let me go back and play around anymore.
I’m guessing the lightbulb was lightning + glass? I didn’t try that.
Yup! All I need to do is make the darn egg.
Thanks for the help. I figured the pigeon thing out, but it didn’t work because when you ring the bell for the second time to call the pigeons back, you have to wait there zoomed in. If you zoom out while they are flying, they don’t bring the stuff. I literally spent an hour trying to figure out what im doing wrong… i find it stupid that some of the solutions in this game depend on small things like this
yes! 10000000 times what i hate the most about this game
The elixir part is super frustrating. Though I think I’ve narrowed it down to the first and second boxes on the first shelf, and the middle box on the second shelf. If you place something in any of those three boxes and leave then they will disappear when you come back. It’s a small and annoying bug.
I don’t think the boxes matter. You can only have one of each item at a time, so if you make a duplicate the first one disappears.
Can anyone explain to me why the bottom shelf in ‘the staircase’ has to be like that? I did it on my first try but just couldn’t figure out why the order of the symbols couldn’t be swapped.
thanks for the guide!
i got the ff recipe while trying to figure out what I really needed to get before I got frustrated and finally checked your walkthrough!
stone + metal bar = blade
blade + tree = wood
wood + fire = campfire
campfire + air = coal
coal + fire = diamond
Thanks! I’ve actually found some of those, as well as a few others like the blender, knife, caramel, etc. And apparently there’s even more I’ve missed!
By typing CUBEESCAPE in the Ouija board in level Communication, Rose says, “My daughter will return to Rusty Lake.” Is the young lady from previous cube escape games her daughter…or William Vanderboom was reborn as a girl who was raised by rose as her daughter? (another thing, Rose, during the last dance, wore the same dress which is worn by the young lady).
Oh I didn’t try that. But I think they’re working on a new Cube Escape game now, so maybe that’s what it will be about.
Sand + Plant = Grain
Grain + Glass with Water = Vodka
Vodka + Fruit Juice = Rusty Lake Cocktail
Could you please do a video of how to do the map in The Treasure? I must be placing the frog etc in the wrong place as I’ve tried countless times but can’t get it to work! 🙁
I made videos of the whole game. You should see them at the top of each page.
In the final level Roots/Elixir, after you drink the elixir and William is lying dead or the floor, did anyone else notice the arrow on his side pointing towards his nipple? I tried pushing it but nothing happened. Just curious if it ment anything.
Discard my last comment. I just remembered the arrow was a clue to one of the levels. My bad.
How long I need to wait for baby to appear?
It should happen instantly if you did everything right, but I have had that part glitch up on me. If that happened, try restarting that level until it works.
You forgot to specify that you need to use the flint to light the candle
Diamond + Fish = White Cube
Man where did the game say you should say rustylake on the Ouija board??? That was impossible to figure out.
Not found in the guide:
In AlbertΓò¼├┤Γö£├ºΓö£├╗s chapter, when you get the emblem, there is a card of The Empress. If you click on it, you get the clue for Rose’s chapter:
“Tell Rose the letters in the names
R1 S4 J5 A6 M4
L1 I3 F5 E1”
It gives you the position (number) of the letter in the name that represents the capital letter in the paintings in chapter “roots”. For example, R1: R is for Rose, 1 is for 1st letter of the name, which is R.
S4: S is for Samuel, 4 is for 4th letter of the name, which is U. J5: for James, 5th letter, is S, and so on…
At the end, you spell RUSTYLAKE.
All the love from Greece!!
Help! In “The Treasure” I cannot figure out how to jump the grasshoppers. Thanks, KC
I also found lightbulb + crow egg = crow. Fish + diamond= white cube. Crow + white cube = black cube. Sand + algae = grain+ water= vodka+ fruit juice= rusty lake cocktail. Blade +electricity= blender+friut= fruit juice.
I’ also curious why WShe Illiam is mixing elixer butt nakked.
Im at the elixir part..but when i enter the right code to the box below the bookcase..i cant open it..help meee
In the roots part, the clue for the code to the chest is the tongue is 1 but when put on the scale it’s 5, it’s a hard clue but it is there.
Is there anyway that I can redo a level? I forgot to take the crow and dead mans timepiece and I canΓÇÖt complete the game without it? IΓÇÖve tried to click on the tree part but it just tells me that IΓÇÖve already done this level. I really donΓÇÖt want to do it all again itΓÇÖs took me ages and thatΓÇÖs with your Walkthrough, which are excellent I may say. The detail in each level is so good? thank you??????
P.S. I am already a subscriber and have been for quite a while
IΓÇÖve tried to reset the crow and dead mans timepiece (see comment before) but it still wonΓÇÖt let me reset it, cos IΓÇÖve already finished it. Does this mean I will have to start game over again?
IΓÇÖm trying to get the green grasshoppers over the brown but itΓÇÖs not working very well. Any thoughts on how to do it?
I dont know what can I say about this game
This is legend
This is a dream
This is Mr owl
I can’t get the bee to drop pollen in the white pot!
The last few tasks on the main game got super obscure, had to use your walkthroughs. Then the “more rusty lake” activities I didn’t even try and figure out on my own, way all over the place and would have taken hours of trial and error. Thanks for these haha
This hand is Albert’s hand :p
I have played and reset the game 3 times now and every time I get to the final level I only have 9 sacrifices!!! And the missing one is different each time. I am extremely frustrated! This walk through was extremely helpful when I got stuck, so thank you!
You can replay sections, if I remember correctly. You donΓÇÖt need to start from scratch if youΓÇÖre missing something.
The problem is that the game says I have everything in the main menu area, but I don’t have them all in the level.
I need help with war hero. I finished putting the bike together, but when I tap on him nothing happens.
I can’t get past the war hero. I put the bike together, but when I tap him nothing happens. Please help.
In the well pt.2 the fire wood isnΓÇÖt showing up
I finished the main game and now I’m doing “More Roots”. I have gotten every emblem except for the one in Samuel’s chapter because I’m stuck! Instead of turning the clock’s hands to 10:35 and then the amulet popping up, it was already there next to the clock before I did anything. I tried tapping on the emblem and nothing happened, so I figured that it was stuck there until I did the puzzle. But when I tried to move the hands on the clock, it wouldn’t work. I’ve tapped and dragged in every direction and neither hand will move. I can’t get the last emblem and I’m unable to change the time on the clock. Help 🙁
What about the code on the back of the empress card?
It says: r1-s4-j5-a6-m4-l1-i3-f5-e1
So the number of the letter of the family members name:
for example the first letter of Rose (R)
forth letter of Samuel (U)
fifth letter in James (S)
which gives us “rusty lake”
Where, exactly, are the matches for this level? I got light this suckerΓÇÖs pipe and move on.
So, for the sacrifices puzzle, the logic isn’t straightforward, but rather simple once you solve it. The tongue does equal 1u, each of the pedestals are marked with their weight. If you put the tongue on the weight marked 5u, it will show you the balance level for 6u. Balance all the scales (except the last spare one hint at bottom), and you get your results.
((The empty one should be 5, and one tick higher than the others.))
In the “roots” chapter, there is a wedding photo that has 6 people in it.
The “human body parts” container jars, each of them have a single numbered value of their own. Every “jar holder” also has it’s own value.
A jar’s value and the value of that jar’s holder, when added, needs to give a total of 6.
Maybe the “total = 6” is supposed to represent the 6 roots of that family tree (roots = people).
Hi, after balancing the sacrifices. Like you said tongue is (5+1) =6 . The rest can be simply subtracted from 6 respective to the weights of each sacrifice.
S-1 –> 6-1=5 (same for Ida)
Likewise for Emma 6-4=2
Albert and Mary 6-3=3
Rose 6-2=4
For Roots, i think the number on each platform is the weight of the platform itself. For each pound, the platform sinks one level. That’s why, when there is nothing on a “1” platform, it rests at the highest position, when there’s nothing on a “2” platform, it rests one spot lower than the empty “1” platform. We know the tongue has a weight of 1 from the picture. When you put the 1 pound tongue on a “1” platform, the total weight is 2 pounds, and that platform rests at the same level as the empty “2” platform. If the weight of the jar + weight of the platofrm is 6 or more, the platform will be at the lowest point.
Where. The. Hell. Is. The. Grasshopper. Video?
Thank you so much for this. I had no issues with the riddles until the one with the weights of the sacrifices.
Hi I am in the treasure section I wanted to know how to move the locusts to the opposite directionک
Someone might’ve already figured this out, but I think the first set of numbers associated with the letters/photos/box on the last level might have something to do with the numbers of the order you found the body parts in the game? I’m pretty sure it adds up somehow. It wouldn’t make sense to get the “6” weight/scale clue after opening the box, right? I think that’s why they kept showing the poster of the sacrifices throughout the entire game. I’m going to play it again and write down the order to make sure.
The bird is gone
Good god. That last puzzle was a stretch. Thanks for explaining it (tongue 1, 5+1 =6; hair 3, 3+3=6).
In “The Painting,” every time I finish painting it, Emma is not hanging by the noose. Does mine have to look exactly like yours? It seems as if my brush is making thicker lines than shown in the picture.
I want to write something to roots, point 6. It is a question about the 6. I think, it’s cause the sacrifices can’t have zero weight on the scale, they need to exist..╬ô├½├¡Γò₧├åΓö£ΓûÆΓö£Γòó It need a wight, so you take the 1
What do you think?
I thought this: when you put the jar with the eye on the scale with the 5 on it, it completely moves down. So my assumption was: 5+1=6 Same with the 3+3=6
It says: r1-s4-j5-a6-m4-l1-i3-f5-e1
So the number of the letter of the family members name:
for example the first letter of Rose (R)
forth letter of Samuel (U)
fifth letter in James (S)
which gives us “rusty lake”