Adventure Escape Mysteries – Trapmaker 3 The Final Trap
By: Haiku Games Co

Haiku Games is back with another Adventure Escape game! This is the sequel to Trapmaker and Trapmaker 2 and is called Trapmaker 3 – The Final Trap. In the first game, we discovered that Frank Dietch is the Trapmaker! In the second game, we visited his childhood home and learned more about him. In the end, Detective Kate Gray’s friends got kidnapped! Will Kate finally catch him after he got away? Let’s find out in the conclusion to the trilogy! This walkthrough guide will help you with answers and solutions for all the puzzles in Chapter 7. Feel free to ask for extra help in the comments section.
Walkthrough:
Chapter 1 | Chapter 2 | Chapter 3 | Chapter 4 | Chapter 5 | Chapter 6 | Chapter 7 | Chapter 8
Chapter 7:
You can watch my video for Chapter 7 here or continue below for my step-by-step guide:
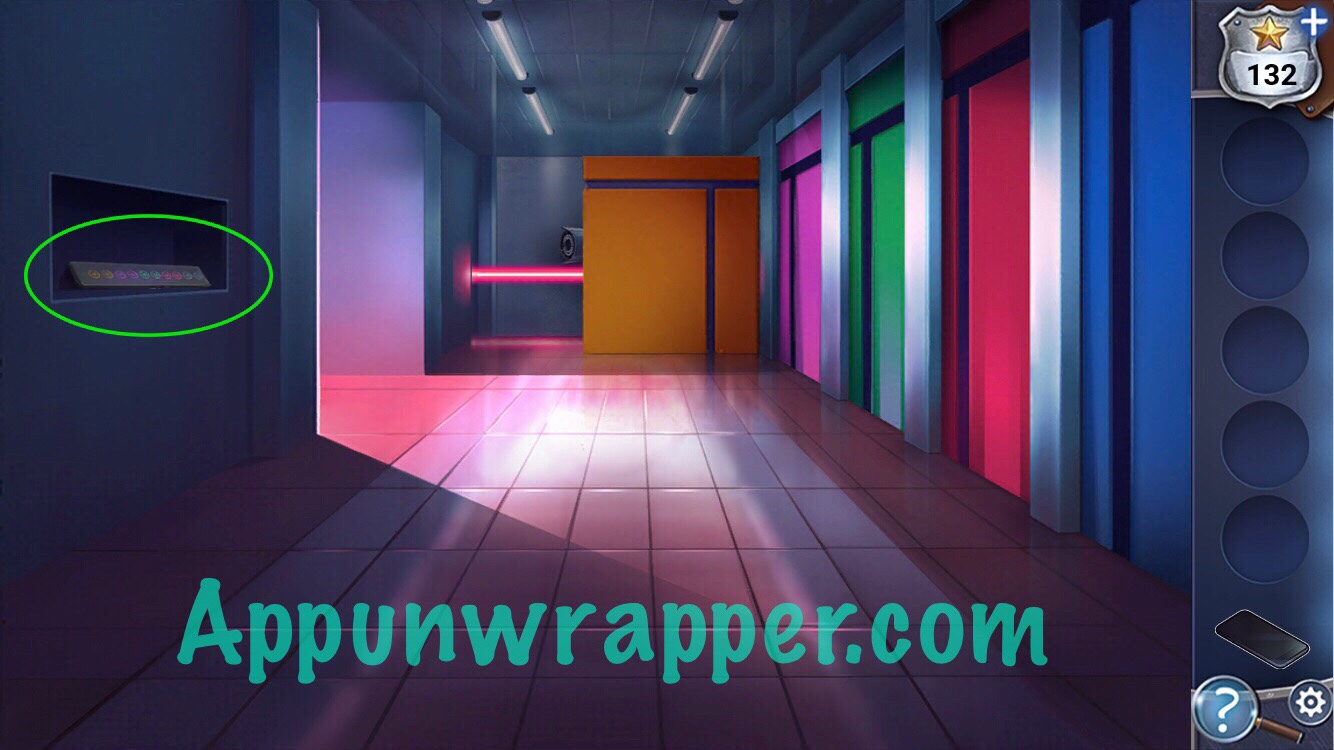
1. Answer the phone for another clue from Trapmaker. Head left. Open the curtains to see some x-rays. Knock down the curtain rod and pick it up. Grab the blanket. Move a pillow to get a knob. And open the draw to get a key.

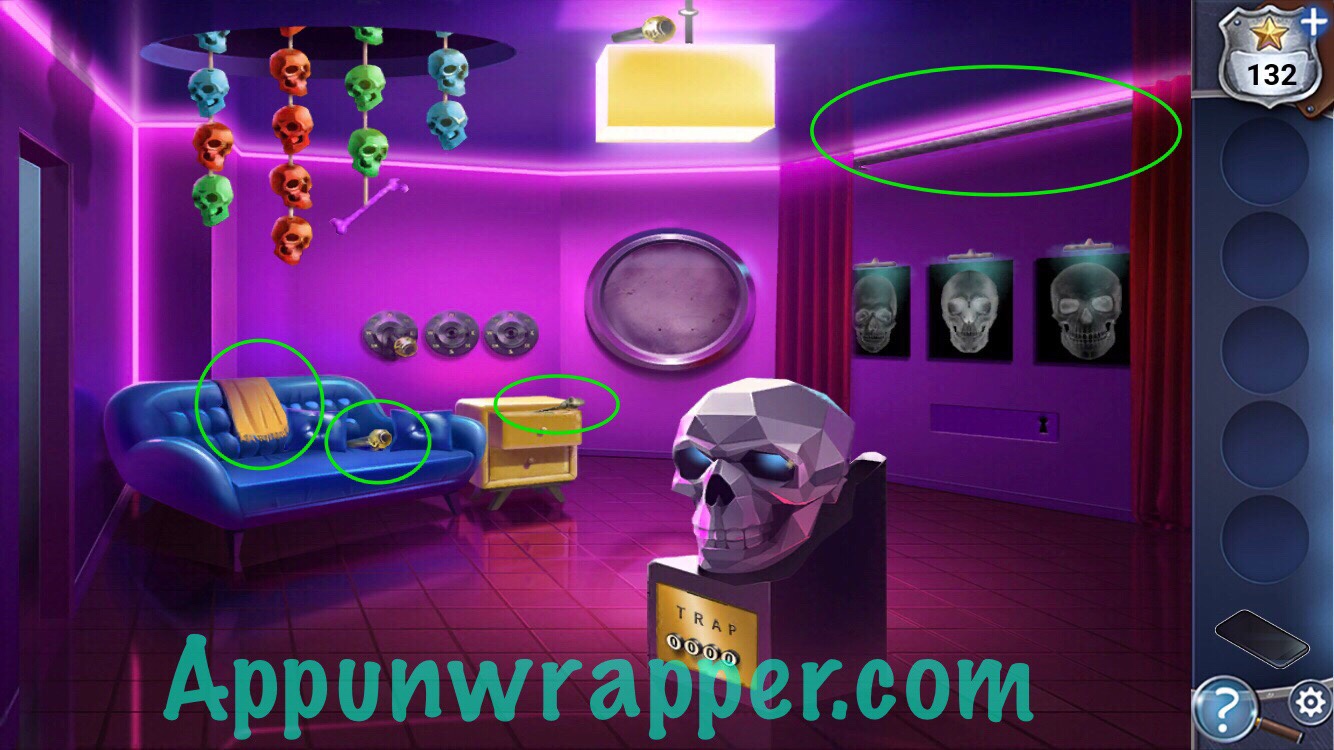
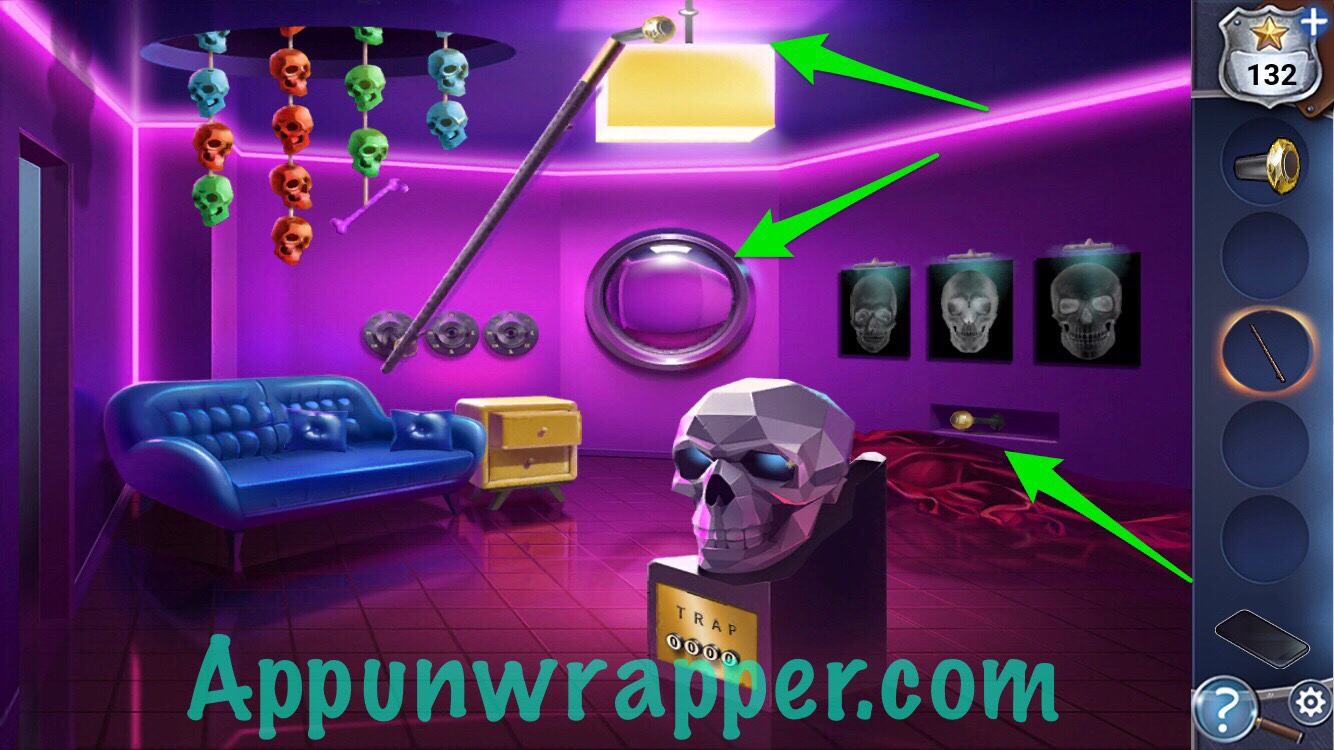
2. Use the curtain rod to reach the second knob. Use the rag to wipe the mirror clean. Also, use the key to reveal a switch under the x-rays.
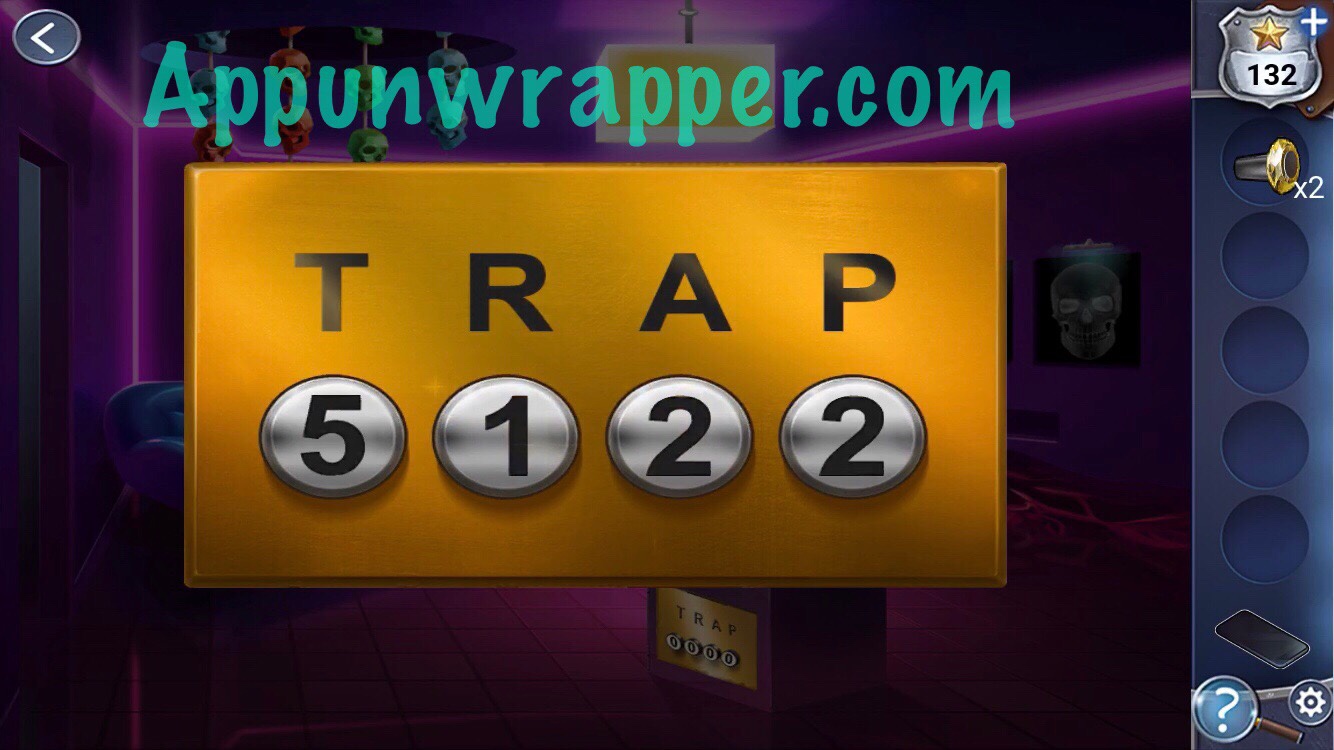
3. Look at the mirror. Kate’s, Penny’s, and Keiko’s faces are all swapped! Fix them. A message appears: PEOPLE CAN’T TRUST WHAT THEY SEE.

4. Count the number of T’s, R’s, A’s and P’s in the message on the mirror. You get:
T = 5
R = 1
A = 2
P = 2
Enter 5122 into the TRAP combination lock to reveal some geometric shapes.
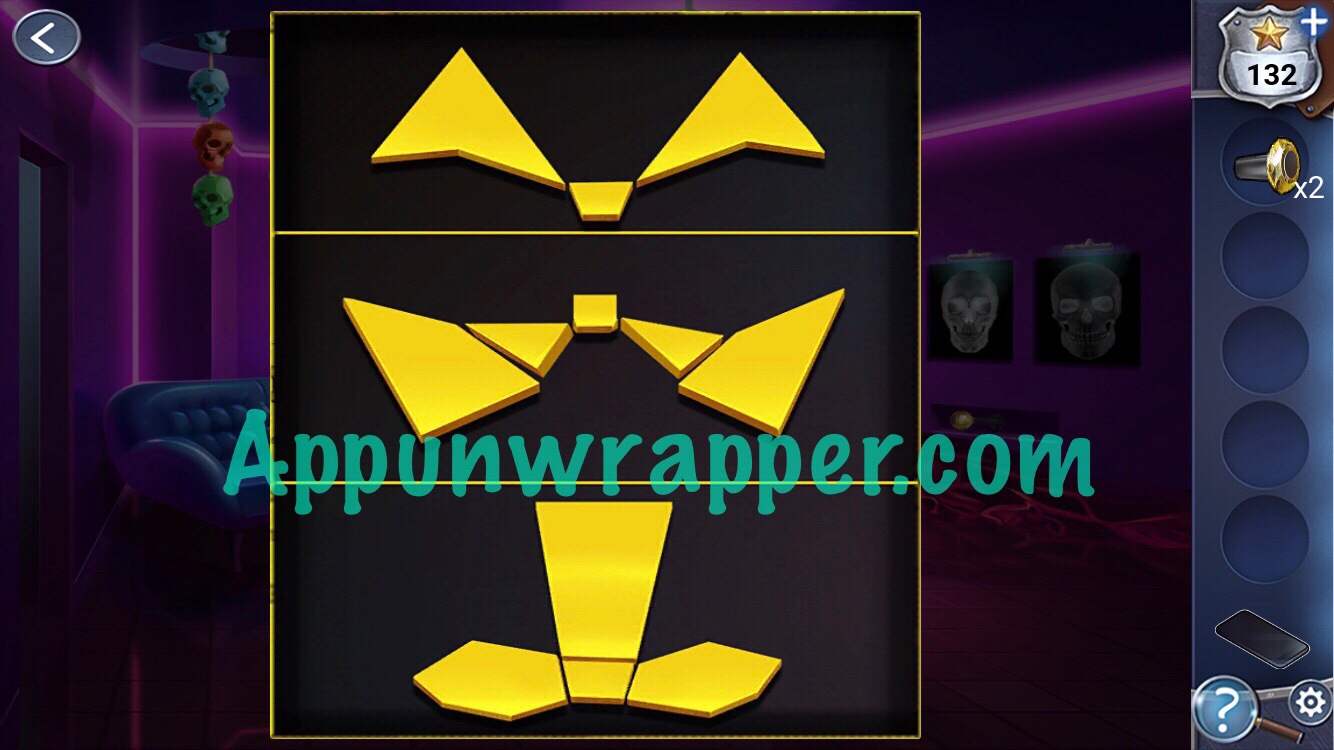
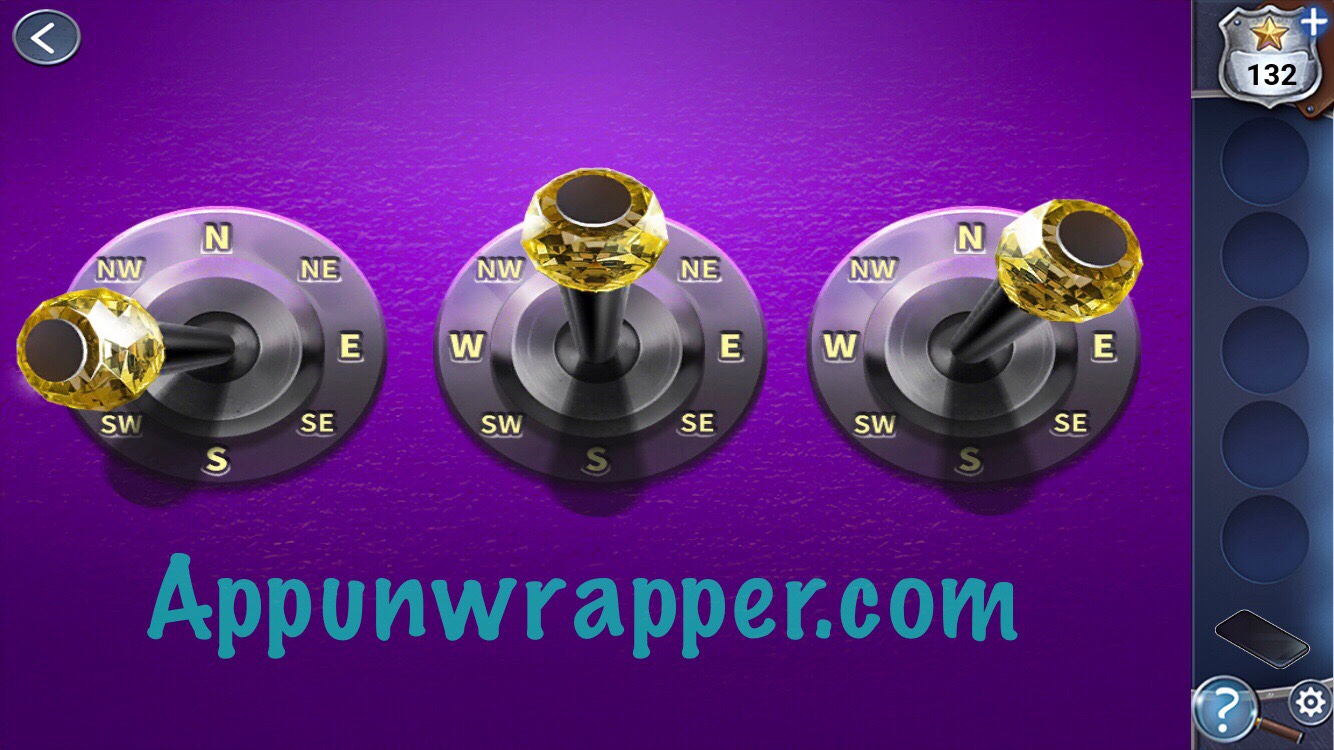
5. Pull the switch under the x-rays to create a mesh over them. Each one is a connect-the-dots puzzle. We need to recreate those geometric shapes we saw. Then notice the highlighted letters in WENDY, SANJANA, and CONSTANTINE. You get W N NE. They appear to be coordinates.
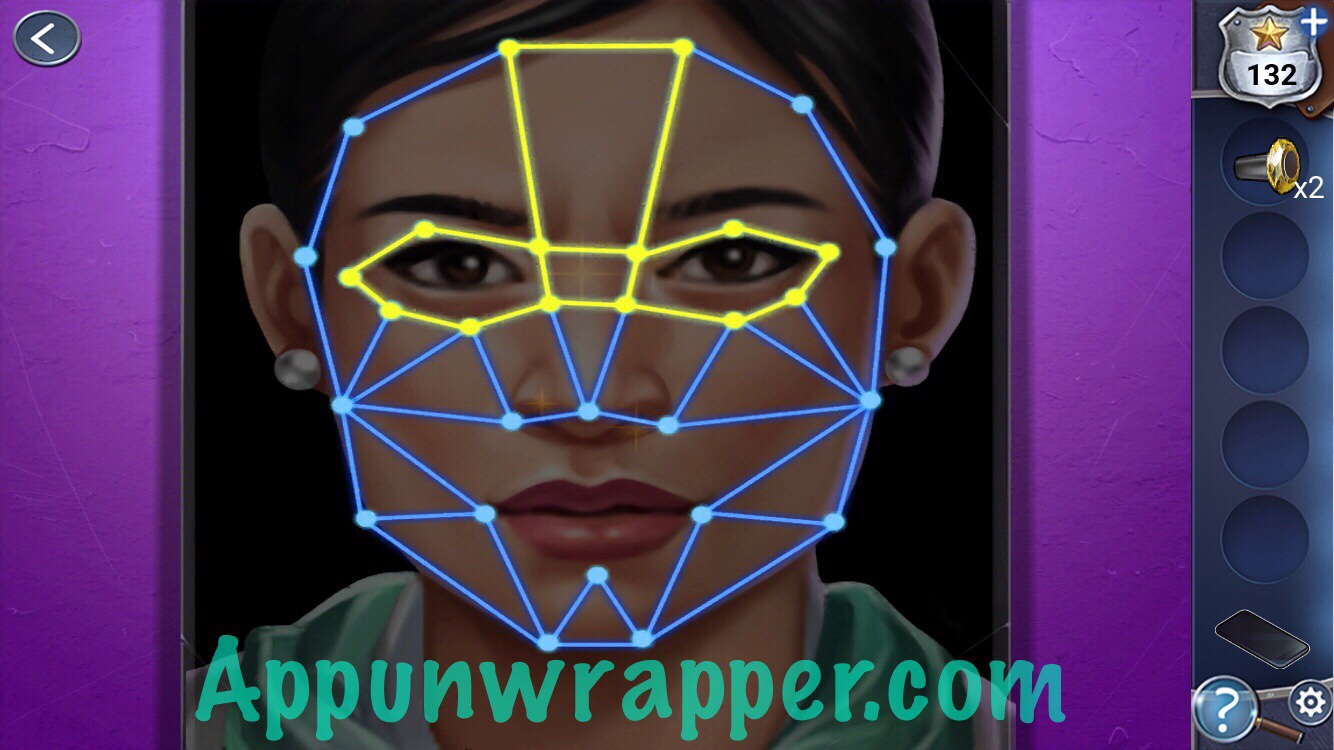

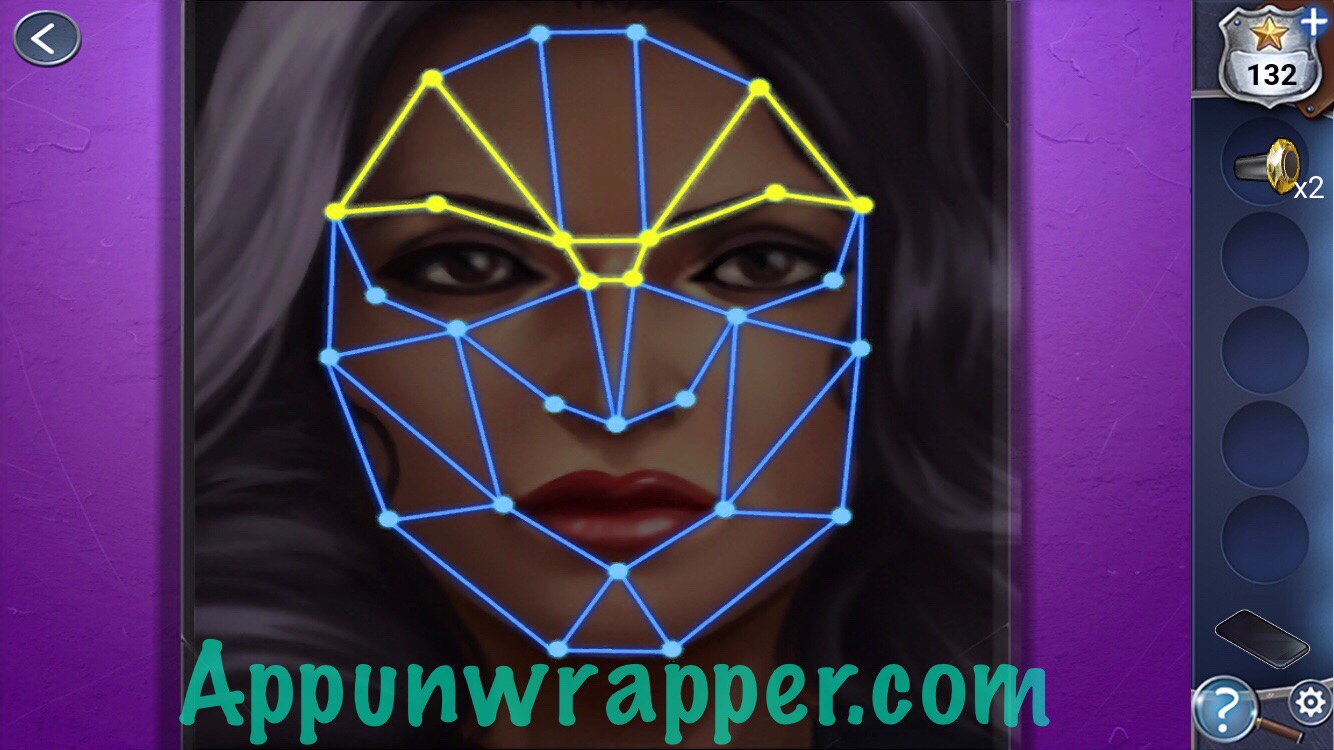

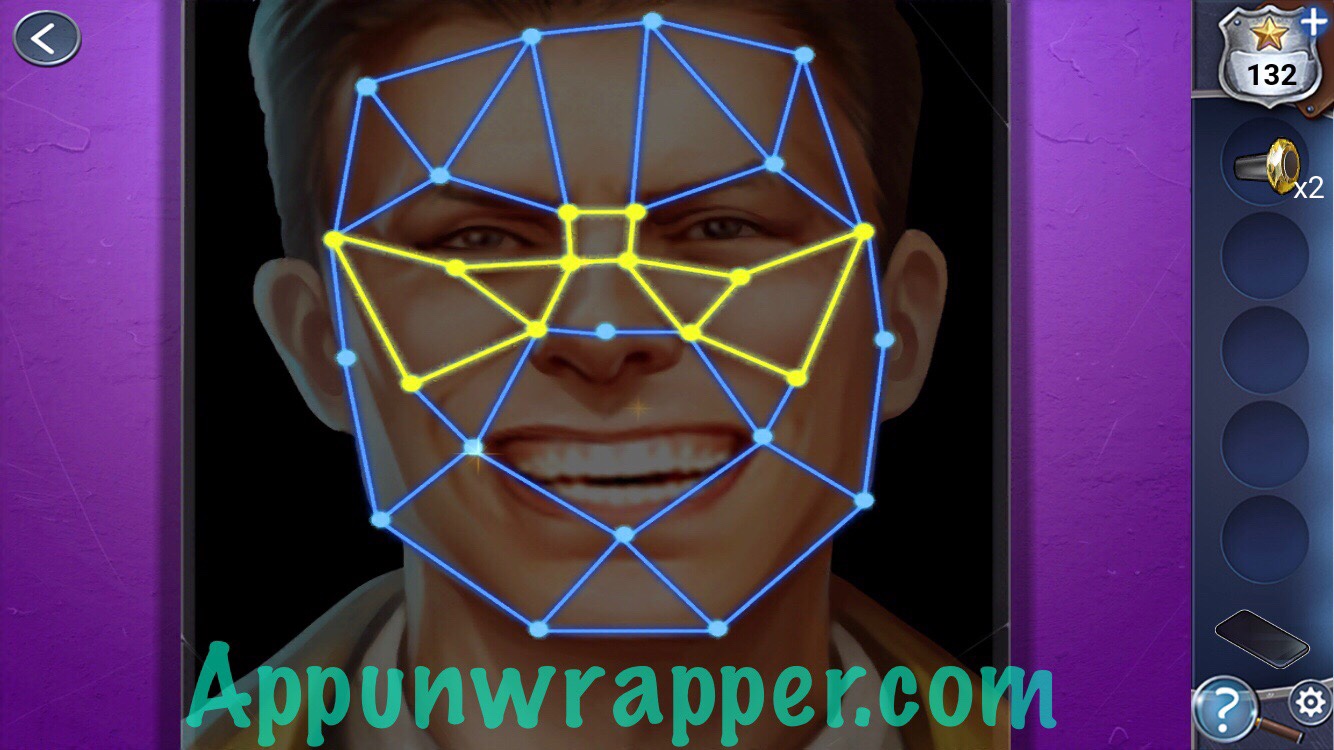

6. Attach the knobs to the wall and then rotate the first to W, the second to N, and the third to NE. Now you can see the whole skull mobile!
7. Notice the total weight of the mobile is 60 lbs. That means each side is 30 lbs and each string is 15 lbs. We have to work out the math to figure out how much each skull or bone weighs. So let’s make some equations:
Red x 5 = 15 | 3 x 5 = 15 | So Red = 3
Blue x 3 = 15 | 5 x 3 = 15 | So Blue = 5
Blue + Blue + Red + Green = 15 | 5 + 5 + 3 + Green = 15 | So Green = 2
Green + Green + Green + Purple = 15 | 2 + 2 + 2 + Purple = 15 | So Purple = 9
So we have:
Red = 3
Blue = 5
Green = 2
Purple = 9
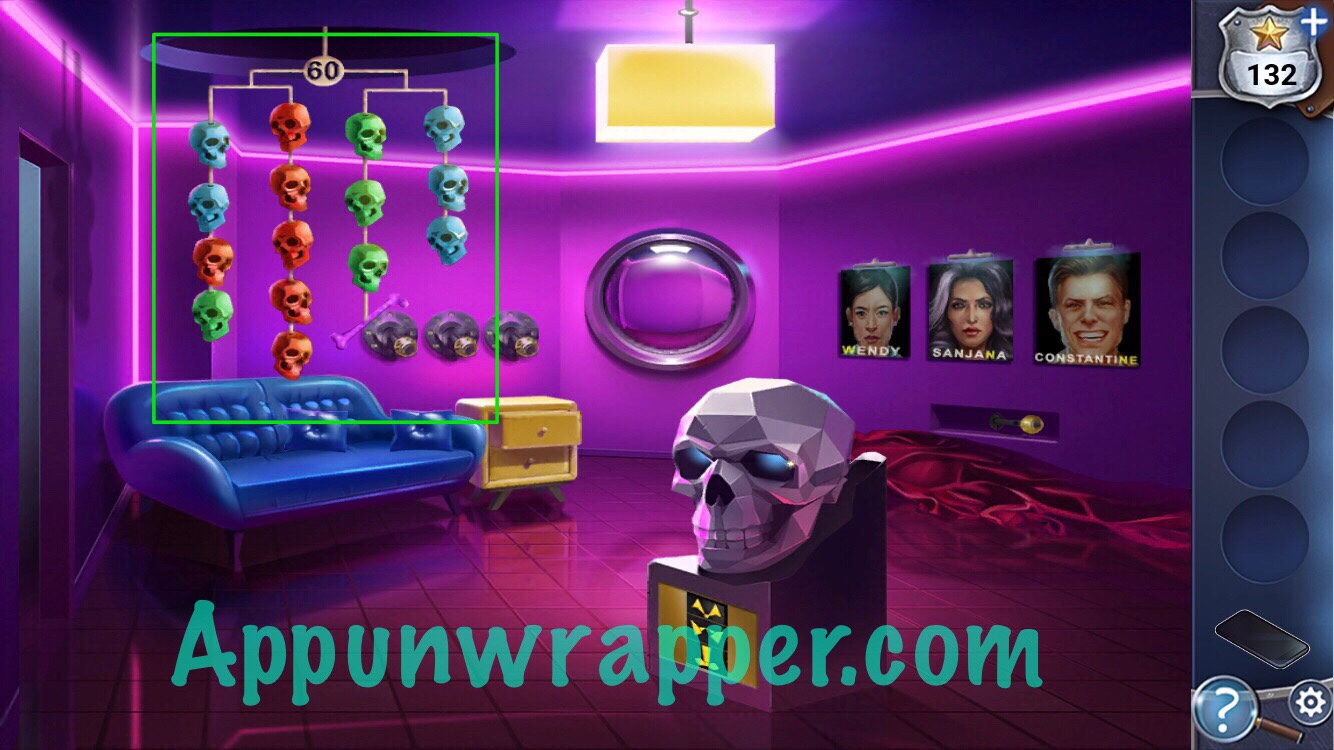
8. Go back to the first room and enter 3529 into the skulls combination lock.
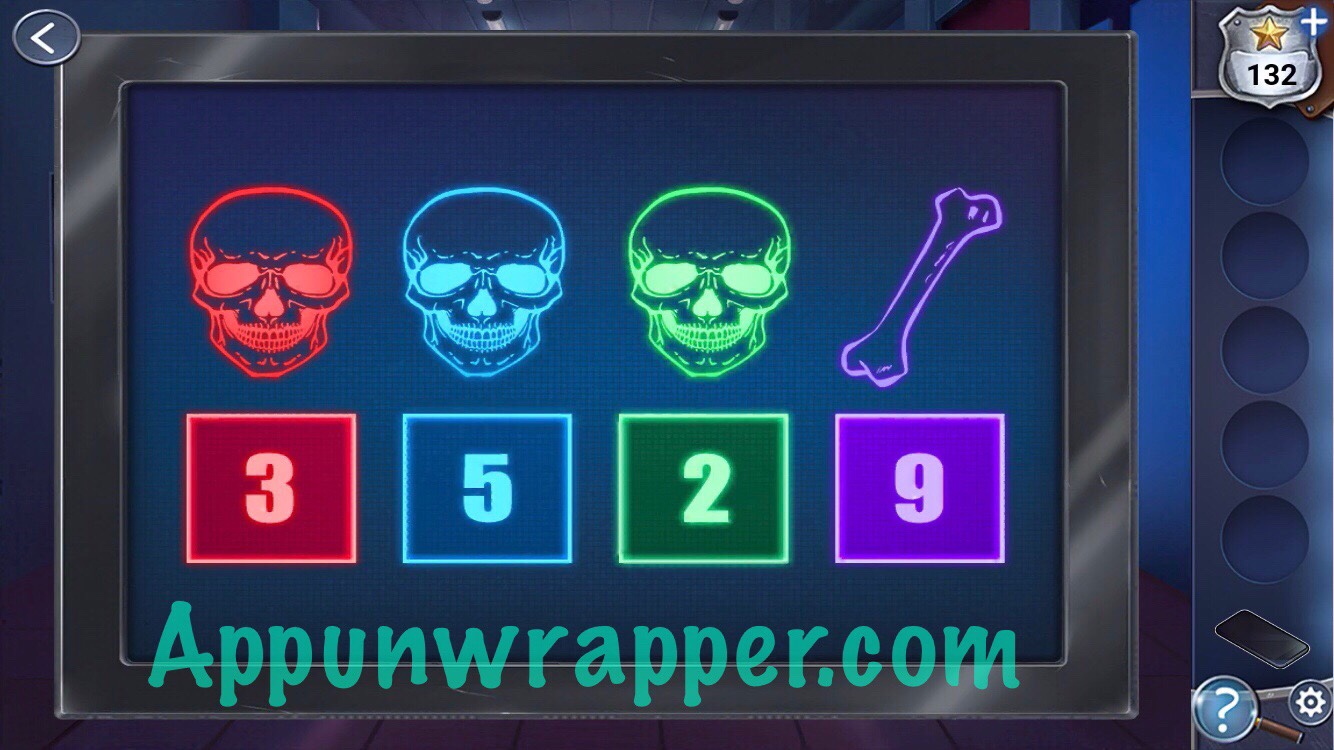
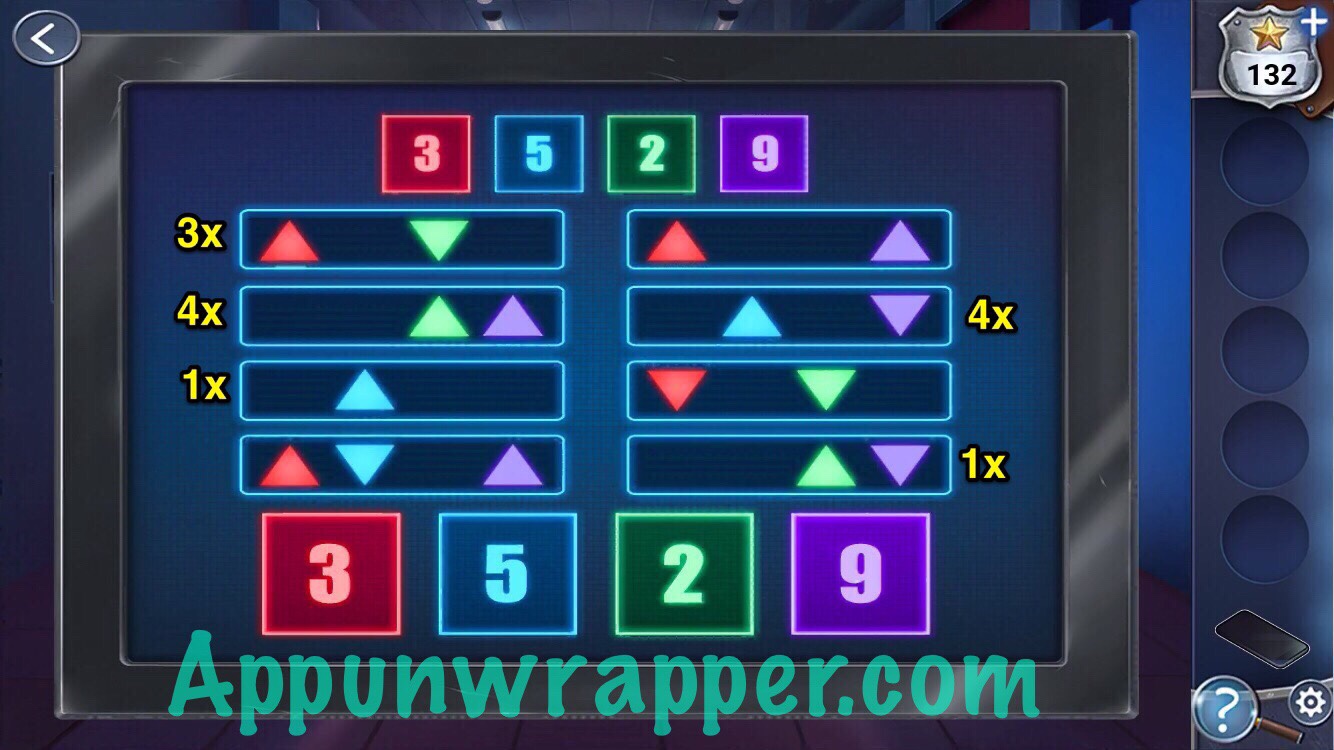
9. Now we have to solve the puzzle on the verification screen. Each box contains different colored arrows. When you tap a box. The up arrow adds that color and the down arrow subtracts from that color. You need to get 3529 on the bottom. I don’t know if there’s a simpler way to do it, but this is how I got it. Pick up the remote.
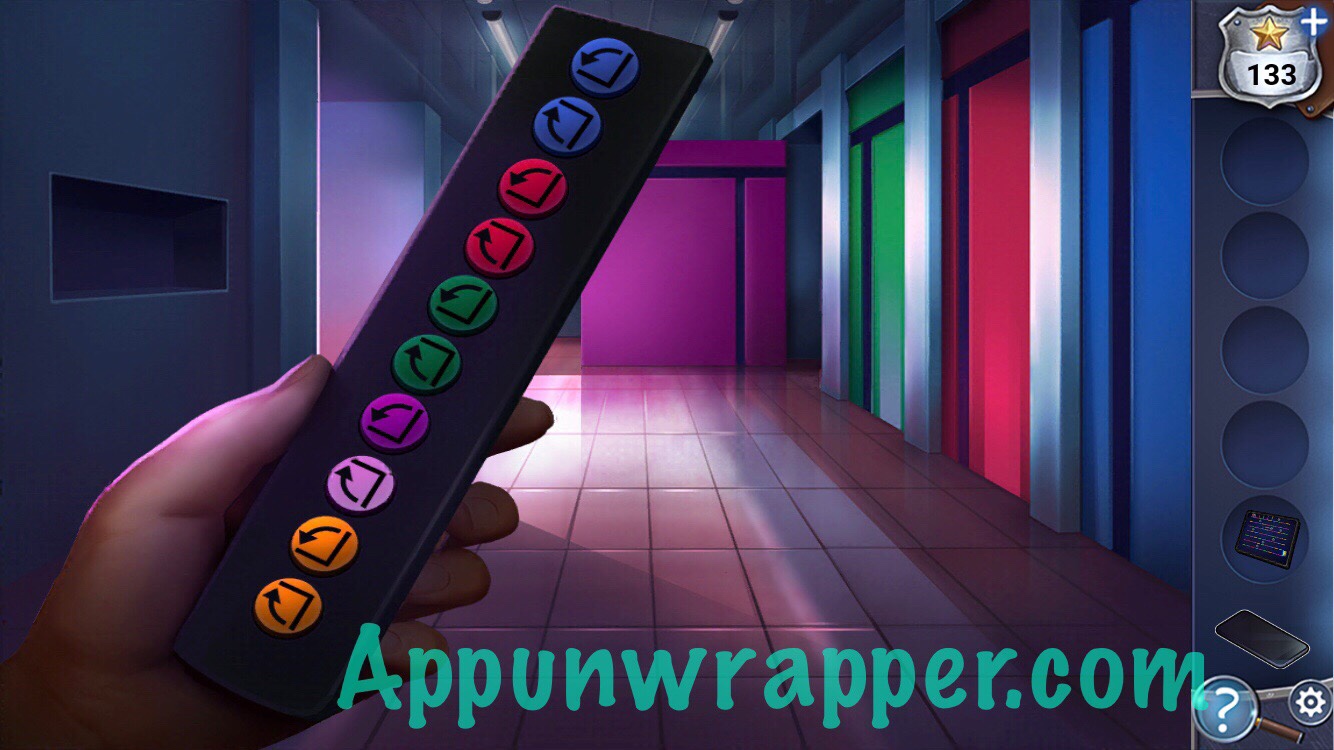
10. Now we have a remote that controls the different doors. Press the bottom red one to find a maze map. Pick it up.
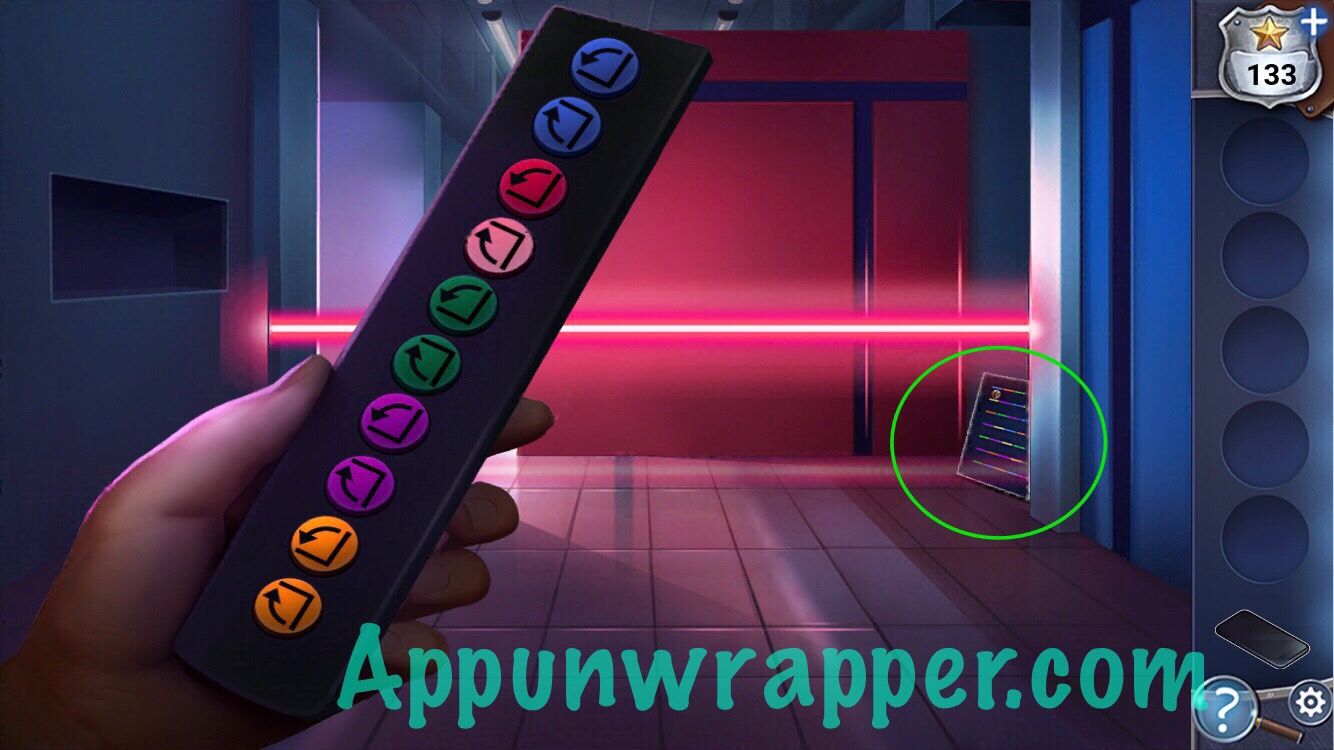
11. Press the rest of the buttons until you find one that doesn’t have a laser shooting out of it. If you press the bottom pink button, you can see it’s safe to go through there. Head in and get ready to solve the maze puzzle.
12. Trapmaker calls again and tells you that the cameras will shoot you on site. And that you need to collect all the keys to open the exit. This is a very annoying puzzle, because you can only make three mistakes before you have to start over.
Thanks to Brittany for the solution. You can also use the video I added if you prefer that.
Move to red.
Press the 2nd blue and move down to yellow.
Press the 1st purple, get the key and move to green.
Press the 2nd yellow, get the key and move back to green.
Press 2nd red and move down to the red/yellow corner.
Press the 1st yellow, get the key and move left to the red one.
Press 2nd blue and get the key.
Press 2nd green and move to red.
Press 2nd purple and move to the second green line.
Press 1st red and move to yellow.
Press 2nd yellow, get the key and move to purple.
Press 1st purple, get key and move back to original spot, where the door is currently open.
Press 2nd yellow and head to the exit.
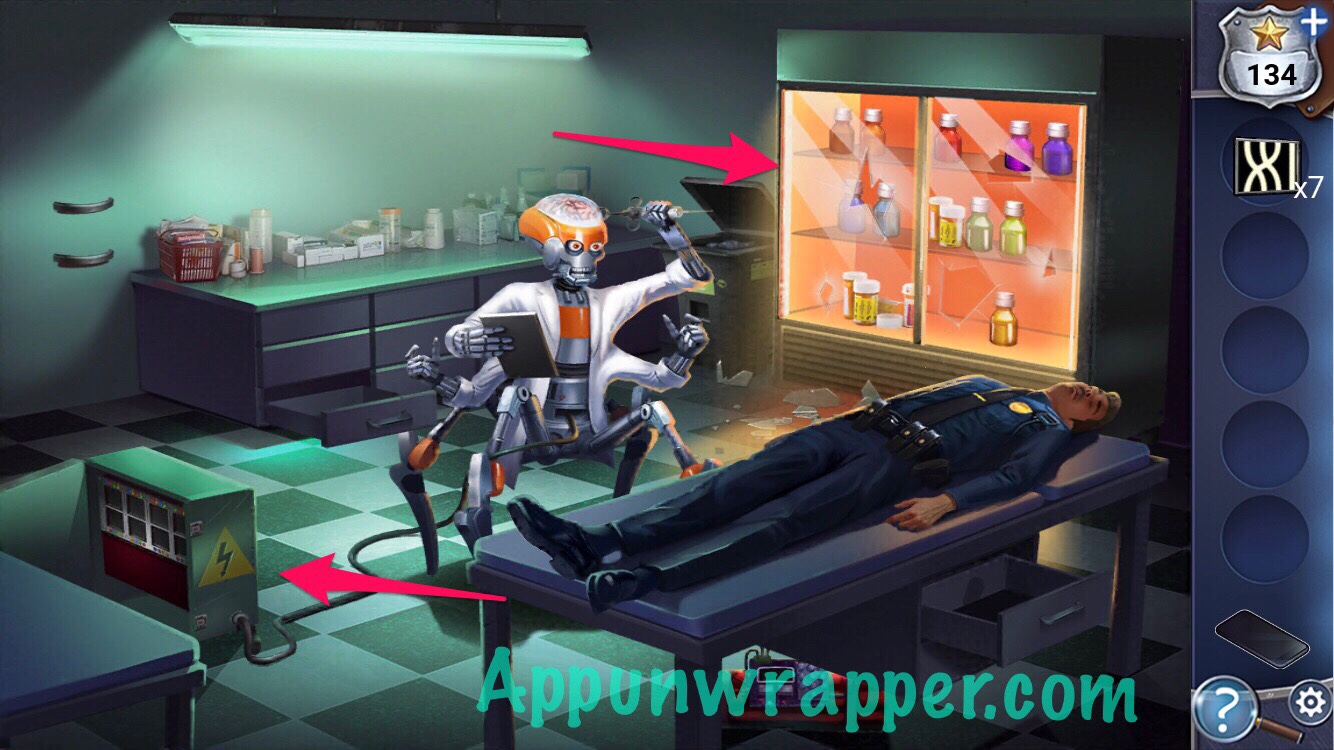
13. Murphy appears to be dead! Grab the fire extinguisher and find all seven chips.
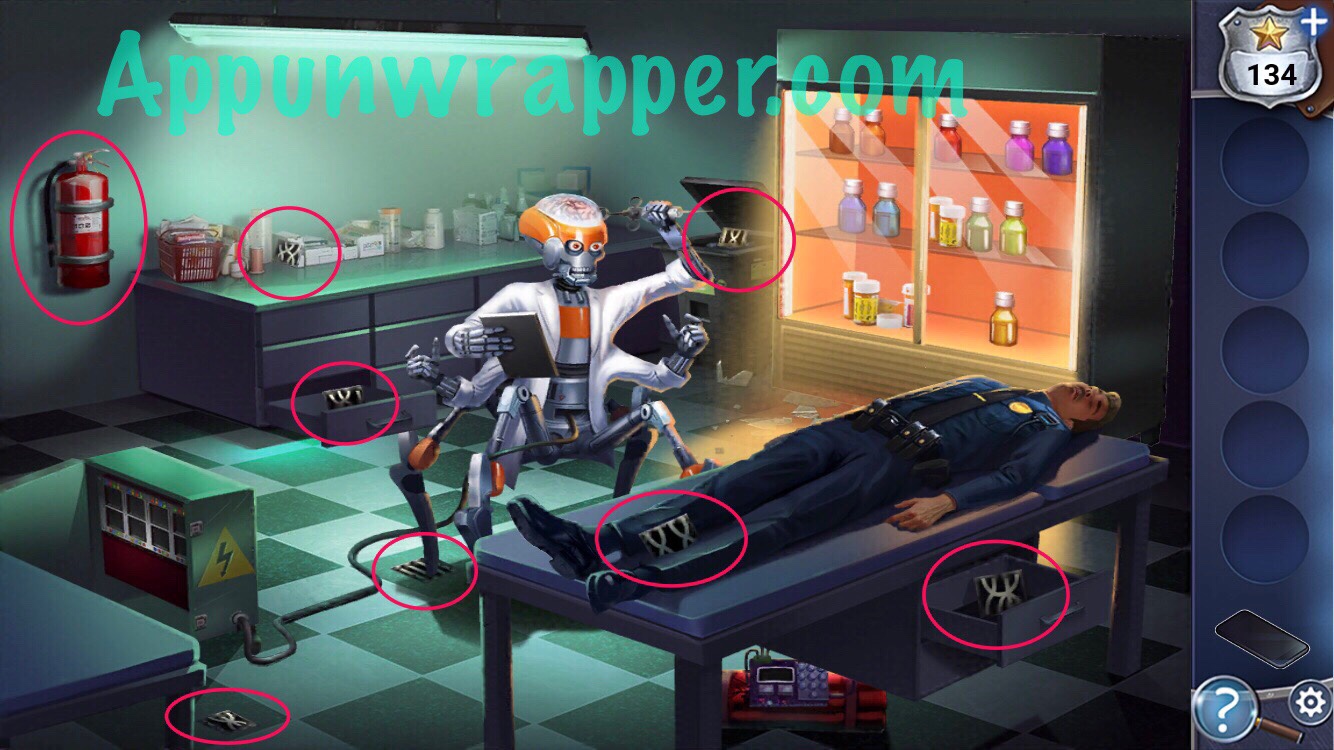
14. Use the fire extinguisher to break the glass of the medicine cabinet. Also, open the control box. Place all seven chips in the box.
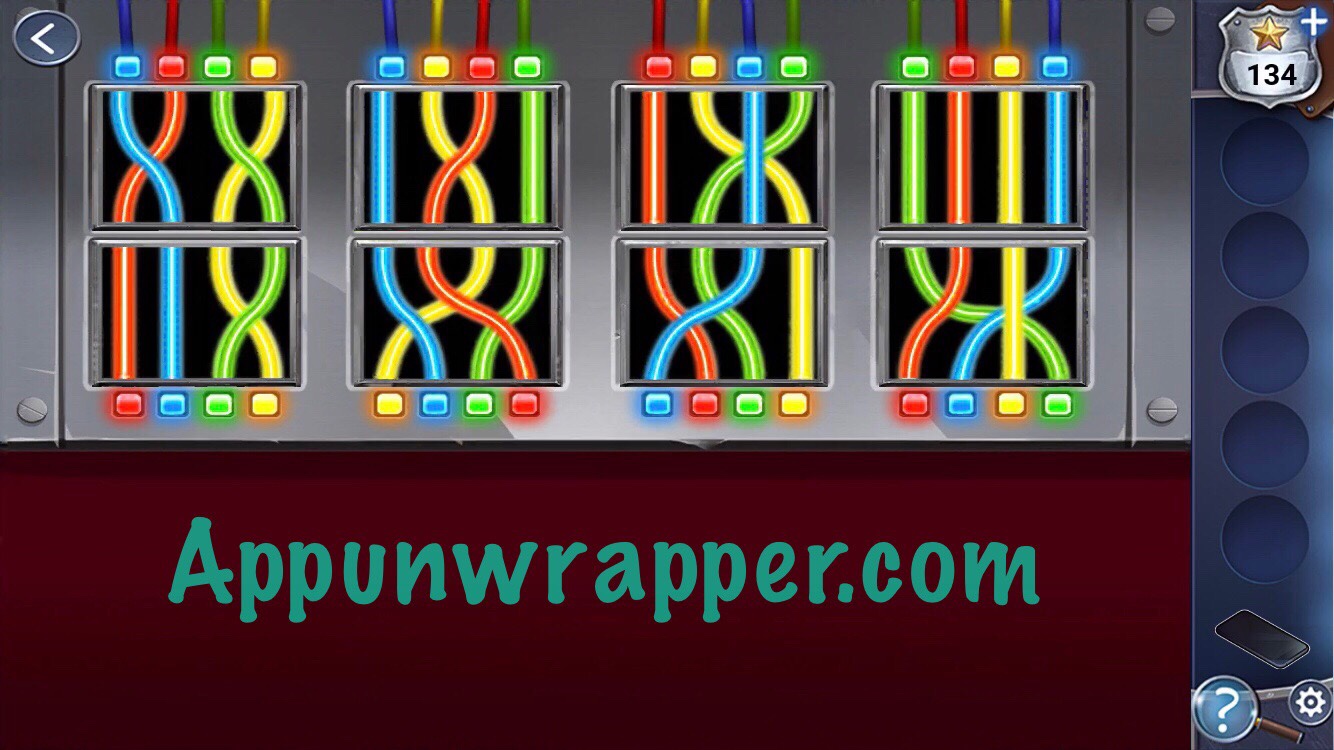
 15. Let’s solve the control box puzzle. You need to get all the colored lights on the top connected to the colored lights on the bottom using the wires.
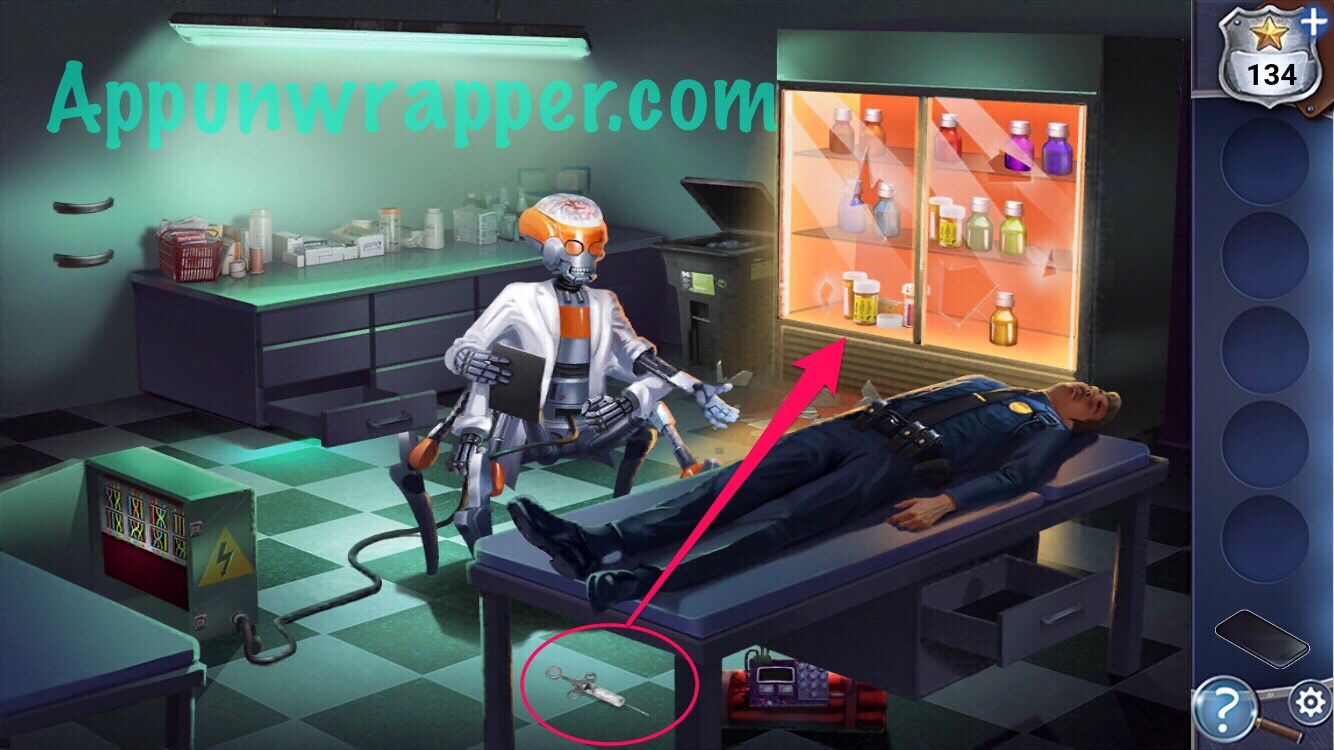
16. Now you can get the syringe from the robot. Fill it up with some adrenaline from the medicine cabinet and then inject it into Murphy to wake him up.
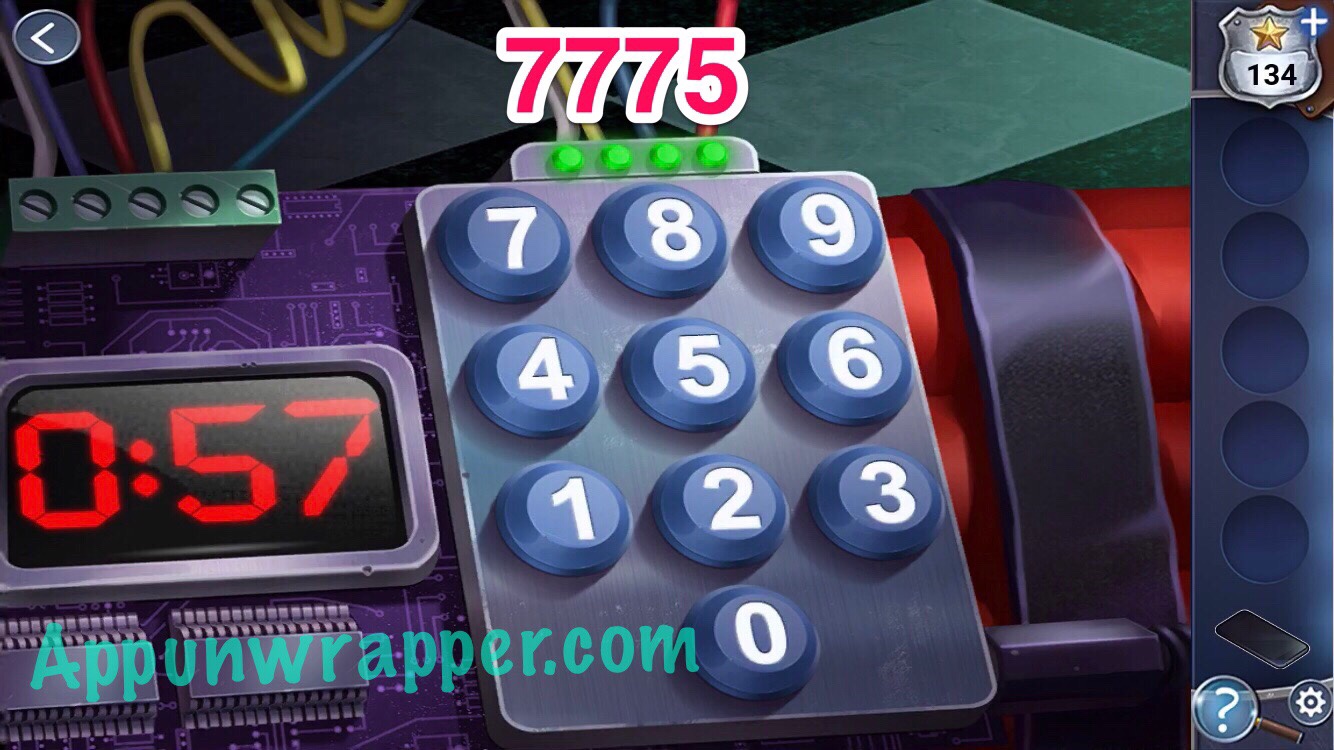
17. Murphy remembers some clues for the bomb! He says that the numbers were all odd and added up to 26. And that the first three numbers were the same.
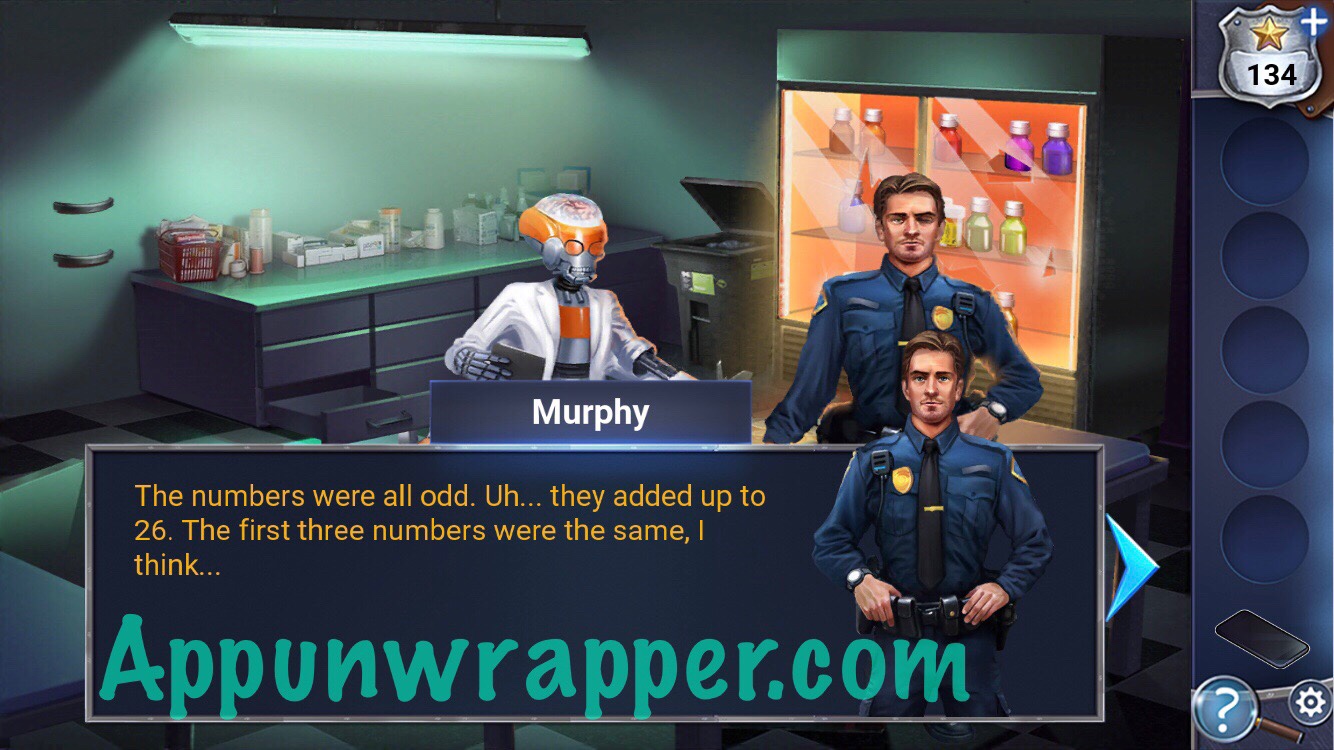
18. Let’s use that information to disarm the bomb!
7 + 7 + 7 + 5 = 26
So the bomb code is 7775. Enter that to turn off the bomb and complete the chapter.
That’s all for Chapter 7! Click here to continue to Chapter 8 or choose a chapter below.
Chapter 1 | Chapter 2 | Chapter 3 | Chapter 4 | Chapter 5 | Chapter 6 | Chapter 7 | Chapter 8


Please finish the company sail
Please finish. I already did the mirror. I have the knobs. What do I do with the x-rays?
You have to use the message from the mirror to get the code for the skull statue which then gives you the patterns for the xrays
The message from the mirror give you the code for the skull statue which gives you the patterns to use the xrays
Use the geometric shapes to join the dots
Just wondering if you have the camera maze figured out
Same. That maze is killing me
I’ve gotten all but 2 so far. It’s definitely a little tricky
Me too
The maze puzzle goes:
Move to red.
Press the 2nd blue and move to yellow.
Press the 1st purple, get the key and move to green.
Press the 2nd yellow, get the key and move back to green.
Press 2nd red and move down to the red/yellow corner.
Press the 1st yellow, get the key and move left to the red one.
Press 2nd blue and get the key.
Press 2nd green and move to red.
Press 2nd purple and move to the second green line.
Press 1st red and move to yellow.
Press 2nd yellow, get the key and move to purple.
Press 1st purple, get key and move back to original spot.
Press 2nd yellow and there’s the exit.
cheers!
YouΓÇÖre awesome! I couldnΓÇÖt get past 2 keys. Thank you!
I have another solution for maze:
1. Move to purple(4th one) – press 1st yellow – get key
2. move back to red (2nd from start position) – press 2nd blue – go down to yellow – press 1st purple and get key
3. Press 1st yellow – get key (the one I think under not the one to the far right)
4. Press 2nd purple – move to green/purple corner – press 2nd green – get key
5. Go down to purple (1st) – press 2nd purple – go to yellow at end at the right – press second yellow – get key
6. Finally go down to yellow/blue corner – press second green – collect key and move to the exit which is open in front of you!
Thank you
I am stuck on Chapter 8, please help. D:
Which part? I havenΓÇÖt finished yet either, but IΓÇÖm working on it
I am stuck on the door exit, the one with the bear trap in the room, and the Pink-Blue color dots on/above the keypad to unlocking the door.
Never mind, I got it, but thank you for offering to help. :). if youΓÇÖre stuck on that part too, look at the five pairs of purple-aqua striped teeth on the bear trap. You only use one color from each pair, so the code is 1-2-4-1-2.
And now I canΓò¼├┤Γö£├ºΓö£├╗t enter in the password for the Smart Chompers… ;A;
Just when I was making progress. 🙁 I have the patent for them, and IΓò¼├┤Γö£├ºΓö£├╗m pretty sure I understand it, but it just wonΓò¼├┤Γö£├ºΓö£├╗t work. Please help. :U
IΓÇÖm stuck too and donΓÇÖt know what to do
Got it. ItΓÇÖs circle top square bottom, triangle top circle bottom, square top triangle bottom, triangle top square bottom
Where is chapter 8 walkthrough? I’m that chapter now.
The bomb code is 7,7,7,5. 7+7+7+5=26
Maze solution. I numbered the colors 1 – 10
1,key,2,key1,key,10,key,move left to red, 1, move right to purple,4,move right to yellow, 2,key,move down to red, 9, key go out door
Thank you for the walkthrough. Not sure why, but my game doesn’t have names under the x-rays/biometrics so I couldn’t work out the directions. Very frustrating!
Why wonΓò¼├┤Γö£├ºΓö£├╗t Keiko let me go into the maze?! IΓò¼├┤Γö£├ºΓö£├╗ve found the safe door with the remote and she says no. Kate asked me if thereΓò¼├┤Γö£├ºΓö£├╗s anything she can do to convince her and I canΓò¼├┤Γö£├ºΓö£├╗t get any further…
Same issue reset level and started over
Hi on chapter 8 with the robot and Murphy bodie u need 8 pieces to the puzzle but there is only 7
Hi I’m stuck on chapter 7 it’s saying I need 8 pieces but there is only 7 😭
Me too, only 7 pieces
Never mind, found 8 under robot foot
There is one in the case on the left of the cabinet.
I LOVE your Webpage…
But while using my IPhone I can barely navigate the site due to all the intrusive ADS! 😭
They pop up just seconds after closing – and come from all angles – so I am constantly removing them so I can SEE!!
ItΓò¼├┤Γö£├ºΓö£├╗s like a frustrating Whack A Mole game….lol.
Omg – yet another one just popped up while typing – that makes a total of seven in less than two minutes!
Is there a setting (another Ad just blocked my view again !)
so they wonΓÇÖt continuously open after closing..??
🙏🏻
Thanks.
(And two more as I am trying to type my name…!)
Hi,
Sorry about that. Which ads are blocking your view? On mobile, they should all be in between paragraphs except for the one sticky at the bottom.
How did you know to figure out the weight of the skulls? I just thought to count them!
I can’t view the maze map, it just sits as a unusable item. I have no idea what you mean when you say move to a different color.. ╬ô├½├¡Γò₧├åΓö£ΓöÉ╬ô├╗├┤
So just switching to another color, neither solution for the maze works for me.. 😖
Can’t see the map except for online, and then it triggers the app to restart..
Just getting the first key would be easy. I even have one yet..😭
Correction – You would think just getting the first key would be easy.. but I don’t even have one yet.!
When in the hallway holding the remote.. click the bottom purple button.. Look down the hallway, at the end, on the right hand side you can barely see where there’s a doorway.
Click on net area and it’ll take you into a room where you will then see the map, or be able to work on the laser game like in the videos.!
This Major solution to an issue has not been mentioned by anyone… How to get to the room to view the map aka and do camera lazer maze we can actually collect the keys..
That’s would have helped me tremendously.. no wonder I have been able to collect keys.!
I was going to give up on the game.!
I had the same problem. The walkthrough doesn’t actually say how to get to the maze in the first place with the remote, and for some reason, I couldn’t get past it (even though I didn’t need a walkthrough for anything after that point in the game). Thanks for figuring it out and sharing!
i love this game