Phone Escape: Hopeless
By: ENIGMATICON


Phone Escape: Hopeless is a room escape game in which you use your phone’s interface to solve puzzles and unravel the mystery. It’s quite good, but can get tricky, so this walkthrough guide should help if you get stuck. Feel free to ask for extra help in the comments section.
See my walkthrough for the LITE version.
Walkthrough:
You can watch my video for the full game or continue below for my step-by-step guide.
1. Read the message you got and answer however you like. Keep going until they tell you to “Light up the box” using the flashlight.
2. Tap on the camera icon at the bottom.
3. Tap on the flashlight icon to turn on your flashlight.
4. Look around until you see a dotted circle on the floor. Tap it to move there. Then tap on the circle on the fuse box to open it.
5. Tap on the circle on the keypad to zoom in on it. Notice the numbers on the note crossed off. You have:
0254
3445
6636
For each column of numbers, notice the pattern so you can figure out what the next number should be. It goes:
0, 3, 6, 9
2, 4, 6, 8
5, 4, 3, 2
4, 5, 6, 7
So the code is 9827. Enter that to charge your phone battery.
6. Go back and turn around. Read the new message you got and respond.
7. Look at the image they sent you. They ask you what’s their name. Solve the word search puzzle. Find these words: PENCIL, STAMP, COIN, KNIFE, RING, COFFEE. Whatever letters are leftover at the end is the person’s name: TREBOR. Answer him with that.
8. After some more messages back and forth, open the camera again and turn around. Tap on the circle to walk there.
9. The door slams shut. Notice the scratches on the door. They go DOWN, UP, UP, UP, UP, DOWN. Copy that pattern with the door handle to open it.
10. Notice the hanging pendant. Then you’ll get another photo. Look at it and then read the text you were sent.
11. Go back to the camera and turn around. You’ll get a pop-up telling you a new app we installed. Press OK and then open the game.
12. This is a fairly easy puzzle. Slide the tiles around so you can get the K out of the box.
13. You have a new message. After reading it, open the camera again and walk to the chess game. Look at the game on your phone again and notice where the Q’s are located. Then move the queens on the chess board to those same spots. Then take the gemstone.
14. After a short cutscene, tap on the white door and then look at the photo of the pendant in your phone again.
15. Notice you got a message from someone else but it was deleted.
16. Trebor messages you again. Answer however you want. He tells you to look at the mirror and tell him what you see. He also says “❤️👄👀”.
17. Open your camera again and this time tap the button on the left to turn on selfie mode. Line up the camera so you see red dots moving around your body with letters above your head. Pay attention to the dot on your heart, your lips, and your left eye and you end up with RIP.
18. Message Trebor RIP and he’ll answer you. Then open the camera again and look around.
19. Tap on the circle to move there and then tap on the gate to open it. Continue through.
20. There’s a combination lock here with the words HOPE WAS HERE above it. What you need to do is open each locker to see which word is inside. Find HOPE and look at the green digital number above to see what number it shows before and after you open the locker. The difference between the two is going to be the first number for the combination lock. Then do the same for WAS and HERE and you end up with 749. Enter that as the combination.
21. Look at the photo of Hope on your phone. Also, notice your Notes were updated with her name.
22. Trebor texts you that Hope is dead. Respond however you want and then answer the other person texting you. Trebor is annoyed. After he texts you again, you’ll see an image of a truck and then he’ll text you again: “I command. I know everything. Do you know when?”
23. Open your camera again and follow the circles on the floor to some toy blocks. A new app is installed on your phone, the Calendar. Take a look at it to see that you can change the date.
24. Use the camera again and look up at the wall above the blocks to see 28 lines and one of them X-ed out. It’s the 14th line. And only one month has 28 days — February. So open the Calendar app and set it to 14 February. Then, just change the year until you get the word ROSES in 2020.
25. Go back to the camera view and use the blocks to spell out ROSES.
26. Your Notes have been updated with the date of the incident. Answer Unknown’s texts and then Trebor’s. He says, “Some flowers can heal the soul or wound the flesh.”
27. Open the camera again and follow the circles to some vases of roses. Move them around so their shadows spell out THORN. Then answer Trebor’s text with that as her full name. Now your Notes have been updated with Hope Thorn’s full name.
28. Look at the photo of her medical records and then answer Trebor’s texts. He wants you to “say what you are.”
29. Look at your Notes again for a TODO list and then notice the Maps app was installed. Follow the TODO list around the room and note down the letters you find at each spot:
Get flowers = C
Attend funeral = L
Fill gas = O
Buy a dress = W
Grab a toy = N
30. Put the letters together and answer Trebor with CLOWN. Read the rest of his texts.
31. Open the camera to see a jack-in-the-box in front of you. First, press the button to rotate it to another side. Turn the discs to make an image of a 3 and an arrow turning counter-clockwise. Then press the button and do the same thing to get a 1 and an arrow turning clockwise. And last, you get a 2 with an arrow turning counter-clockwise again.
32. Press the button to go back to the crank and rotate it 3 times counter-clockwise, 1 time clockwise, and then 2 times counter-clockwise. Make sure not to let go of the crank until you’re done. If you did it right, you’ll get a green light and a clown will pop out. Grab another gem.
33. Look at Trebor’s text and then at the photo he sent you of a clown. He texts you again, “How about a phone call?” When you ask about it, he says it’s on your face.
34. Look at the photo of your clown face again. Notice the three symbols on the shirt. Then zoom in and look all around for either those whole symbols or parts of them. They should have numbers next to them. Once you have them all, put them in order and you get 5553469047.
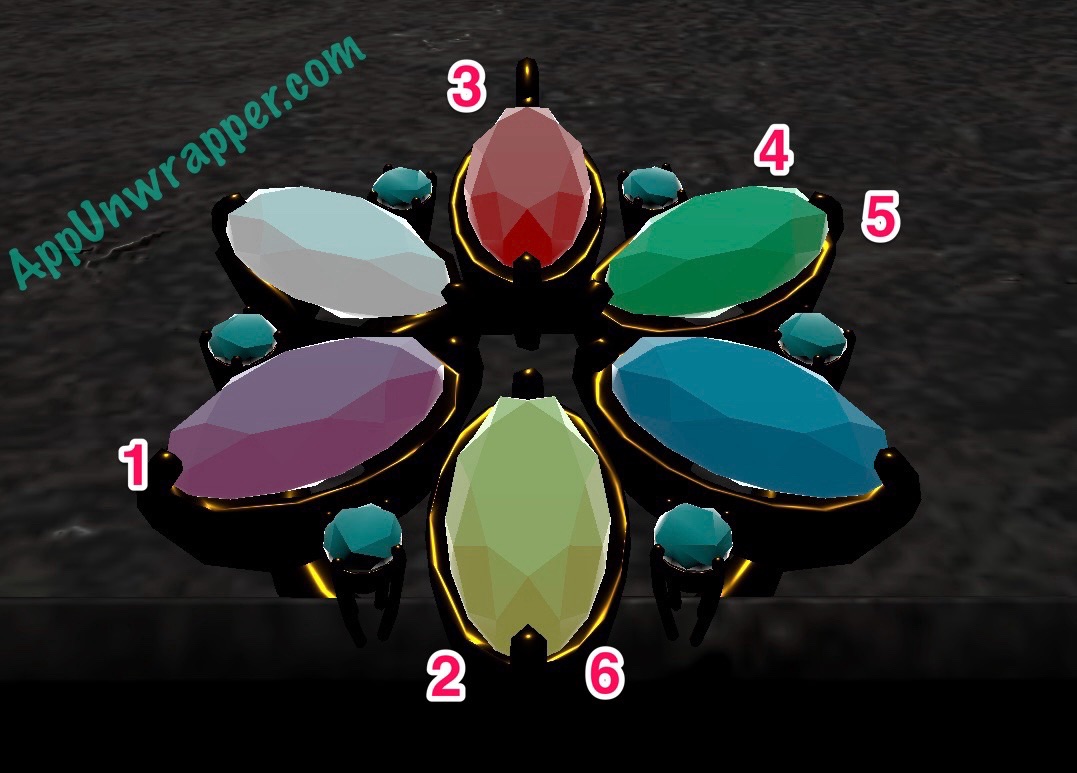
35. Open the Calls app and dial 5553469047 and then press CALL. Notice the ringing is coming from somewhere inside the room.
36. Open the camera again and turn on your flashlight. Look for the circle on the floor and walk to it. Keep going until you get to the door with the pendant. You’ll get another text. Answer until he says, “Tell me where you made the kill!”
37. Open the camera again and walk to a painting on the wall. There are 4 dials numbered 1 – 7 and they each have images below them, one bigger and one small. They’re telling you to trace a shape from the biggest eye to the smallest eye, then the biggest heart to the smallest heart, and so on. The shapes will look like numbers. You end up with 5 for the eyes, 7 for the hearts, 1 for the lips, and 2 for the tears.
38. Now you see a painting of the Mona Lisa but something is different about it. The Eiffel Tower is in the background! So the answer is Paris. Text Paris to Trebor. Your Notes will be updated with that info.
39. You now have another photo of a newspaper. Look at it and then answer Trebor’s texts.
40. Open the camera again and follow the circle to some batteries. The first one is set for you to CHARGE. We need to make 3 more words related to batteries. The first is ENERGY, then POWER, and last is FULL (yeah, I don’t like that one either. I thought it should have been FUEL but that didn’t work.).
41. You have new texts from both Unknown and Trebor. Trebor tells you there’s been another death and says, “Listen and spell her name NOW!”
42. Open the camera and go to the cassette player. Play the recording forward and then backward. When it’s playing backward, listen for numbers and note them down. You get 634125. Then look at the name of the band on the cassette tape. It says LIVE N EVIL. Basically, note down the 6th letter, then the 3rd, then the 4th and so on. You end up with EVELIN. That’s what you need to text Trebor.
43. Your Notes will be updated with that info and you’ll get another text. He tells you to look inside the trunk.
44. Open the camera and follow the circle to the trunk. Notice the tic-tac-toe boards on the lid. You basically just need to copy the patterns from the complete ones so they all look like either one or the other board.
45. Now you have another photo to look at, as well as the updated pendant. Then read Trebor’s texts. He says Evelin was your dance teacher. Keep talking to him and you’ll get another photo about Robert Thorn, who’s currently in a coma. Keep taking to Trebor until he stops.
46. Open the camera again and find the next spot you can walk to. It’s a bookshelf. Arrange the books so they depict a man with a crescent moon. Then notice the note above the keypad that says, “The first time ever what year“. Open the photo of the article about Robert again. Notice there’s an article to the right of that one that says it’s been half a century since humanity conquered the moon. It says “51 years” on it and the bottom of the newspaper says it’s now 2020. So 2020 – 51 = 1969. That’s the year we needed. Enter 1969 into the keypad. Then look inside the open locker.
47. You have a new photo with a quote from the Book of Revelation, 21:8. Trebor texts you again and asks you what number of murderers will melt in the fiery lake of burning sulfur. Look at the scripture again. The dots are just mirroring the scripture. The way to decipher this is going line by line of the scripture and ignoring the dots. Stop when you see another symbol and check which letters are in that same spot. Whatever letters you get will almost make up a word that’s a number, but you need to fill some of it in. You end up with:
– – = SX = SIX = 6
/ / = ON = ONE = 1
= = = = = THRE = THREE = 3
* * * = FOR = FOUR = 4
So you get 6134. That’s the answer you need to text to Trebor.
48. He then says, “Do you regret? Reset!” So go into the settings and tap on Reset and Regret and then enter the pin, 6134, to reset the phone.
49. You get a text from Unknown. Answer them twice and they’ll stop responding. You’ll also get a text from Trebor telling you to take off the mask.
50. Open the camera and look at the mask. Drag it over the word BAIT so the arrow is in the mouth and the litters B and I are in the eyes. The arrow tells you to go right to the next set of letters. Again, put the arrow in the mouth and the eyes centering on two letters, R and T. Continue doing this until you spell out the word BIRTHDAY.
51. Open your photos and look at Hope’s medical records. It says her birthday was 11/17/2014. So go back to the table and and enter 1117 to unlock the jewelry box. Take the last gem from inside,
52. Now the photo of the pendant is complete. You also have a text from Unknown that says, “Go ‘there’ one last time to connect the pieces and return with full consciousness.”
53. Trebor is annoyed that you’re still taking to Unknown. Respond and he says he’ll crush you.
54. Switch to the camera again and look around. There’s some images being projected on the wall. Pay attention to the colors of the butterflies in each. You end up with:
Pink
Yellow
Red
Green
Green
Yellow
55. Tap on the pendant and press on the gems to see what colors they are. You need to remember so you can press on the right order. You can also copy my order below.
56. Answer Trebor’s texts and you’ll get another photo. Keep talking to Trebor and then Block him. Talk to Unknown and answer them to see the ending.
And that’s everything! Apparently this is only the first chapter, so more might be coming?