Adventure Escape Mysteries – Sweet Dreams
By: Haiku Games


Haiku Games is back with a new Adventure Escape game, this time about a 5-year-old boy’s dreams. You play as Revi, a Dream Manager who has to help young Arlo conquer his fears about starting school. This walkthrough guide should help you if you get stuck on any of the puzzles in Sweet Dreams. Feel free to ask for extra help in the comments section.
See all my other Adventure Escape guides here.
Walkthrough:
Chapter 1 | Chapter 2 | Chapter 3 | Chapter 4 | Chapter 5 | Chapter 6 | Chapter 7
Chapter 1:
You can watch my video for Chapter 1 or continue below for my step-by-step guide:
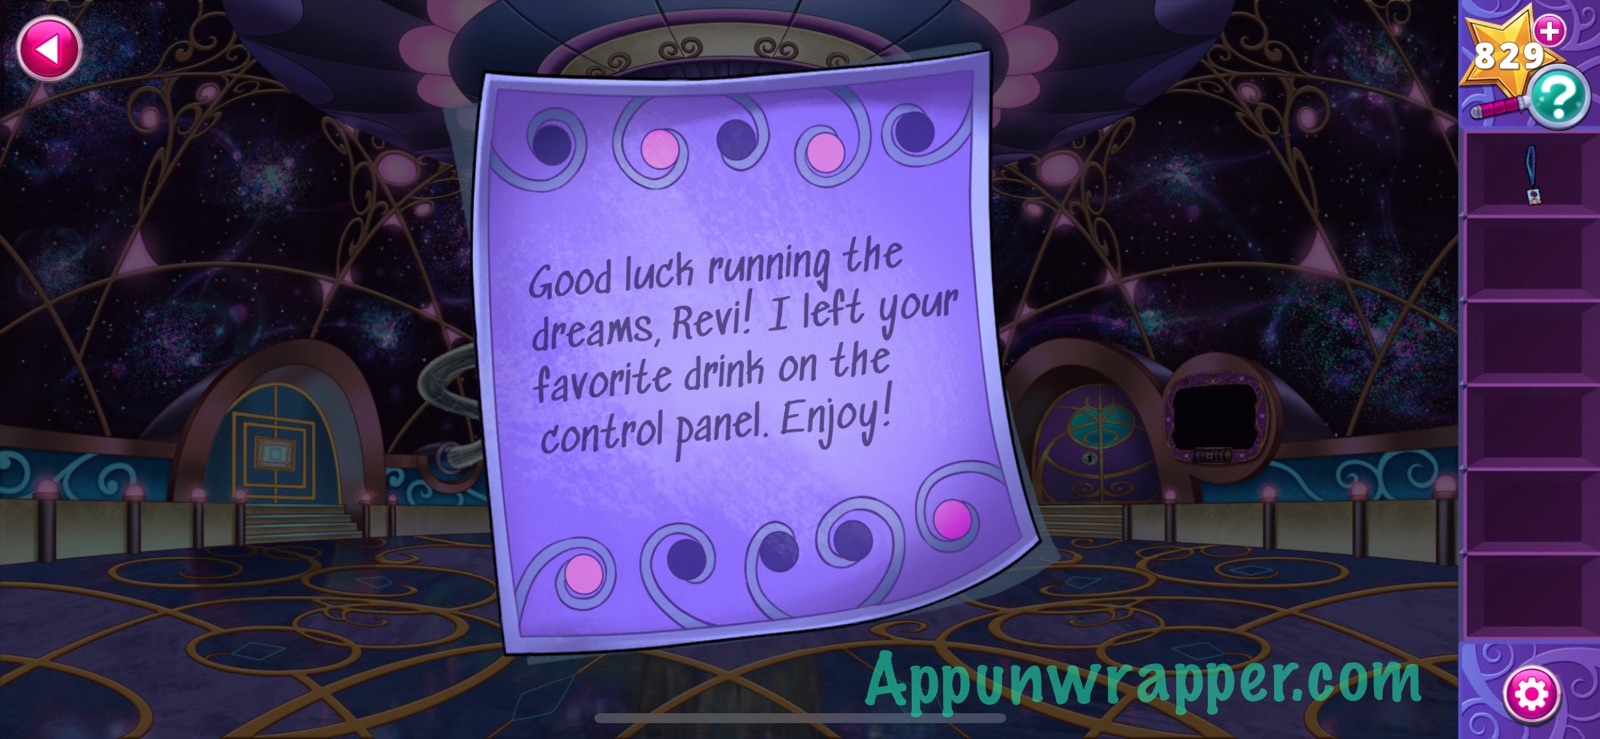
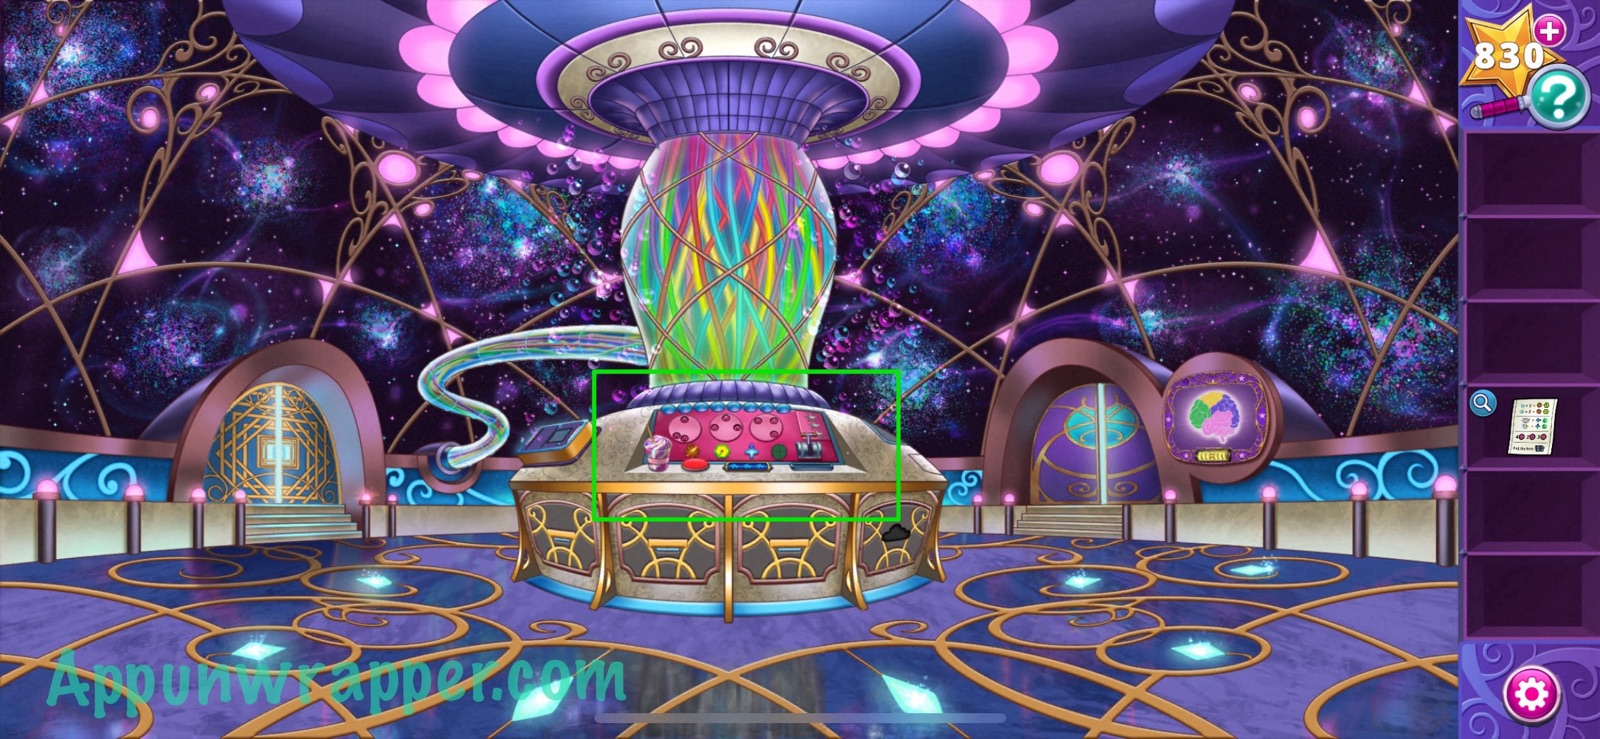
1. Tomorrow is Arlo’s first day of kindergarten and he’s scared. After he falls asleep, you take control of Revi, his Dream Manager. It’s also Revi’s first day, and after Shoku leaves, she’s on her own to get Arlo’s Dream Machine turned on. First, pick up the key card from the floor and notice the sticky note on the machine from Shoku. He left you your favorite drink on the control panel and also a clue on the sticky note. We’ll get to that in a bit. Look at the display to the right and take the empty battery. Also, notice the missing star gem.
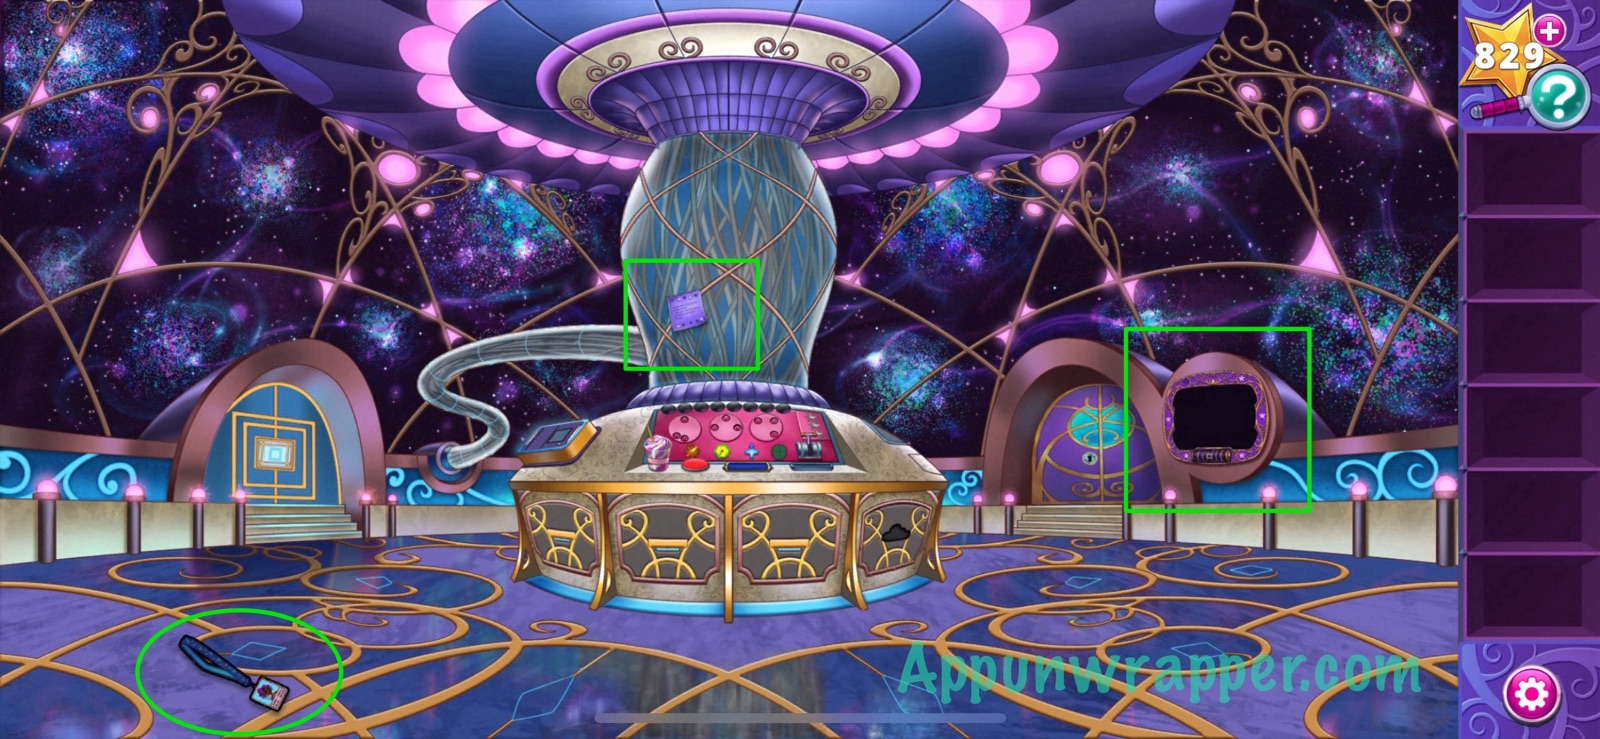
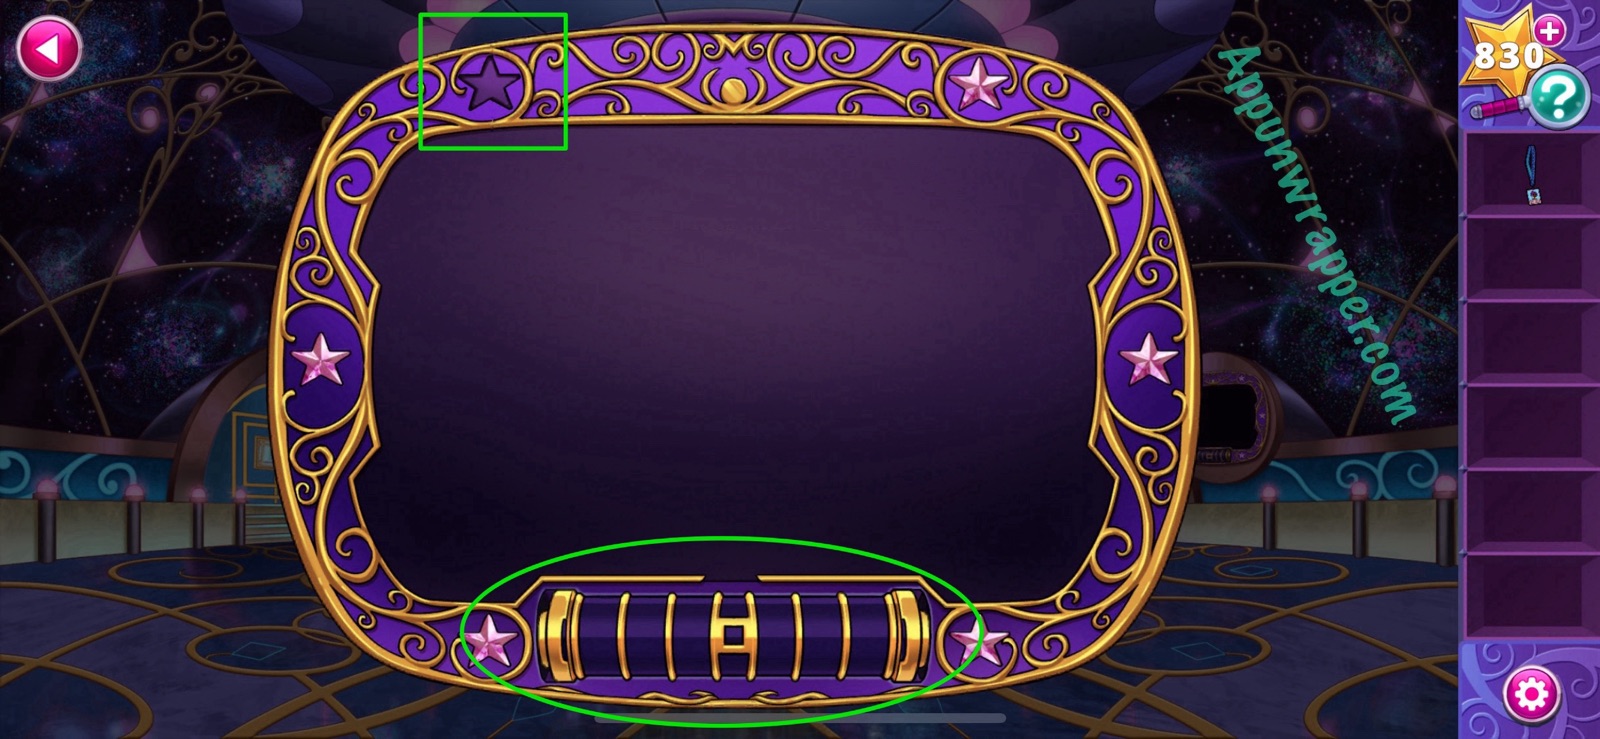
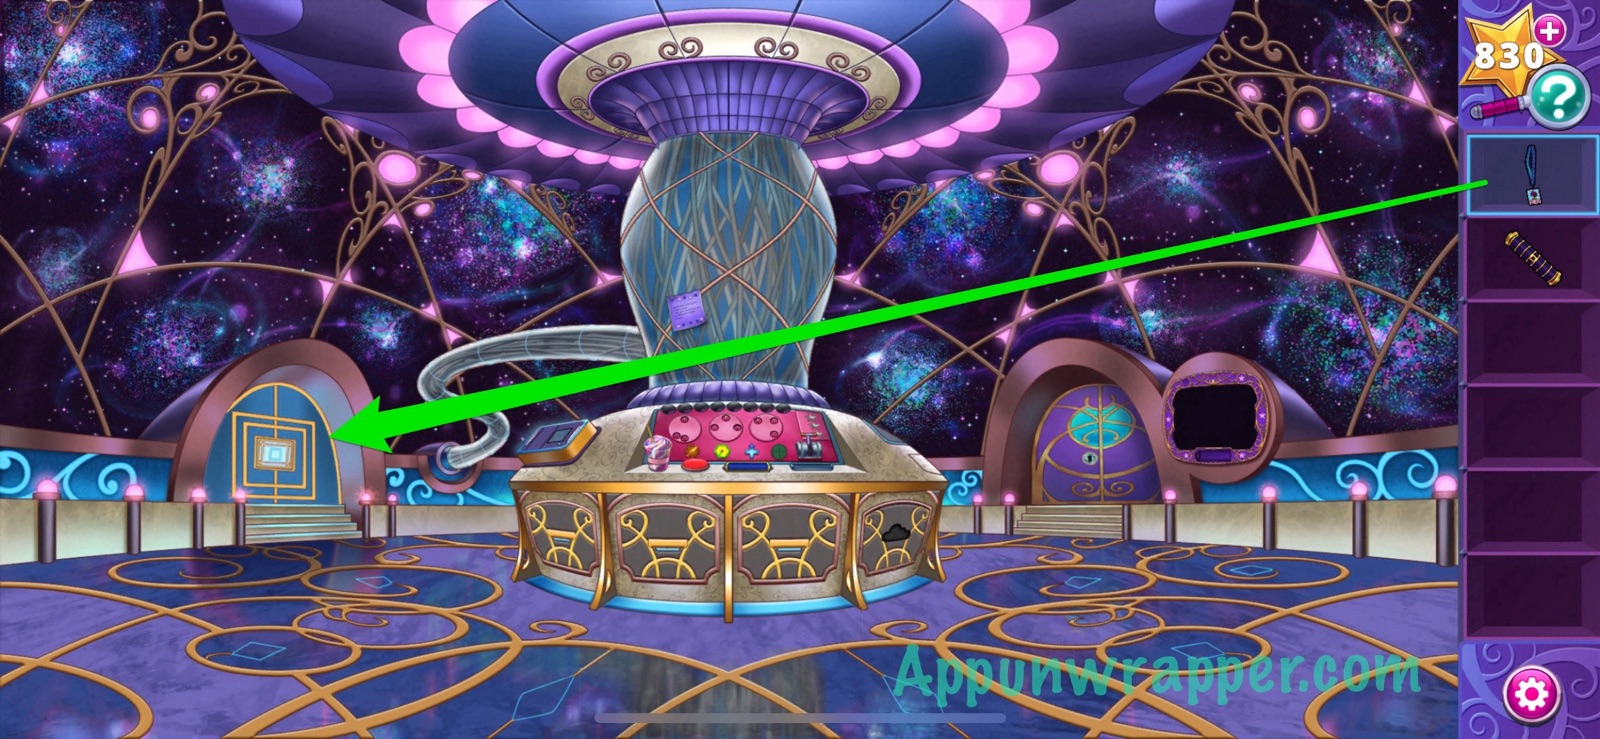
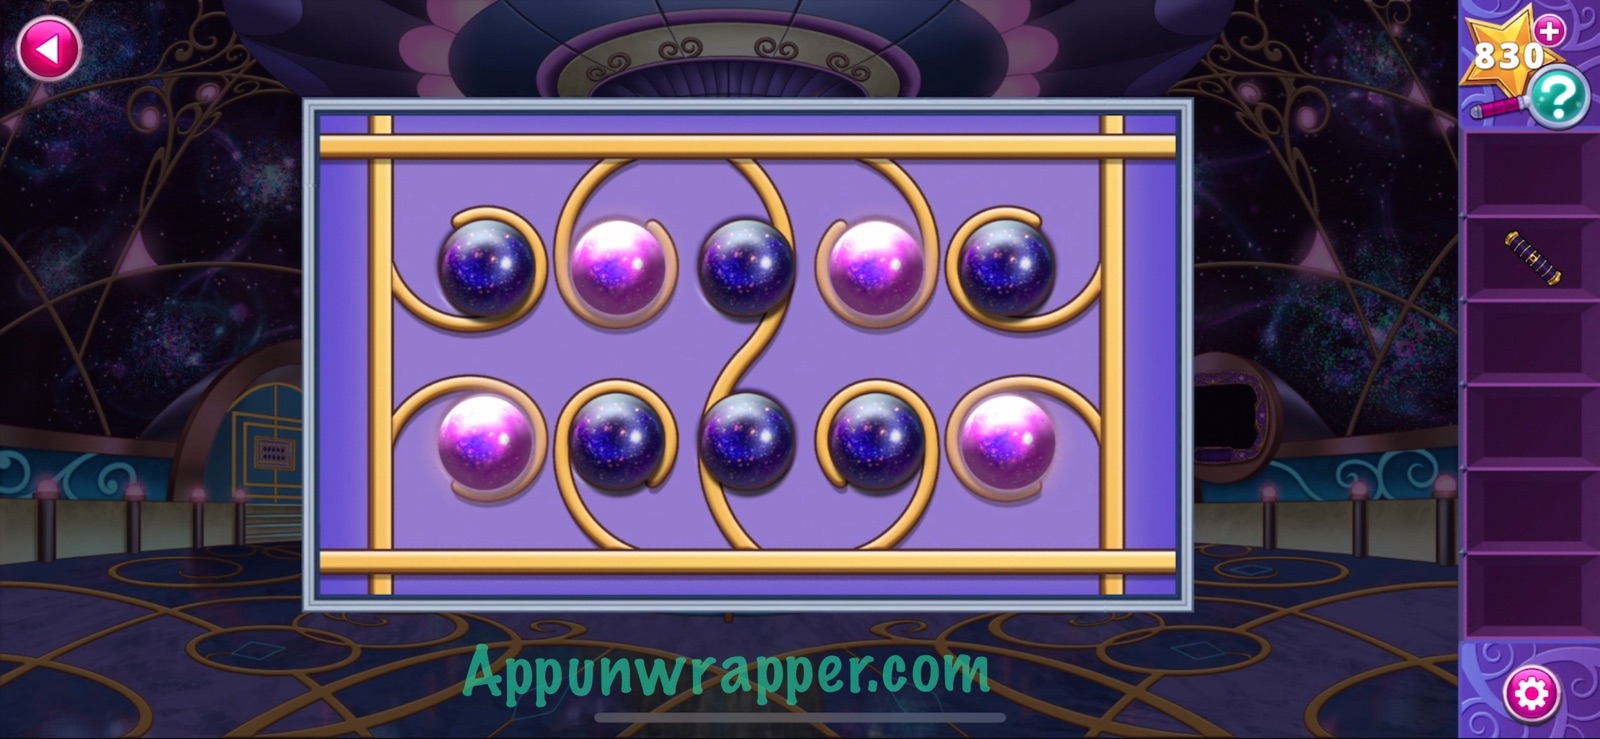
2. Use the key card to unlock the panel on the door to the left. Use the colored balls from the sticky note to figure out how to light the balls on the panel. You can copy my photo below. Then go through the open door to the Mechanical Room.
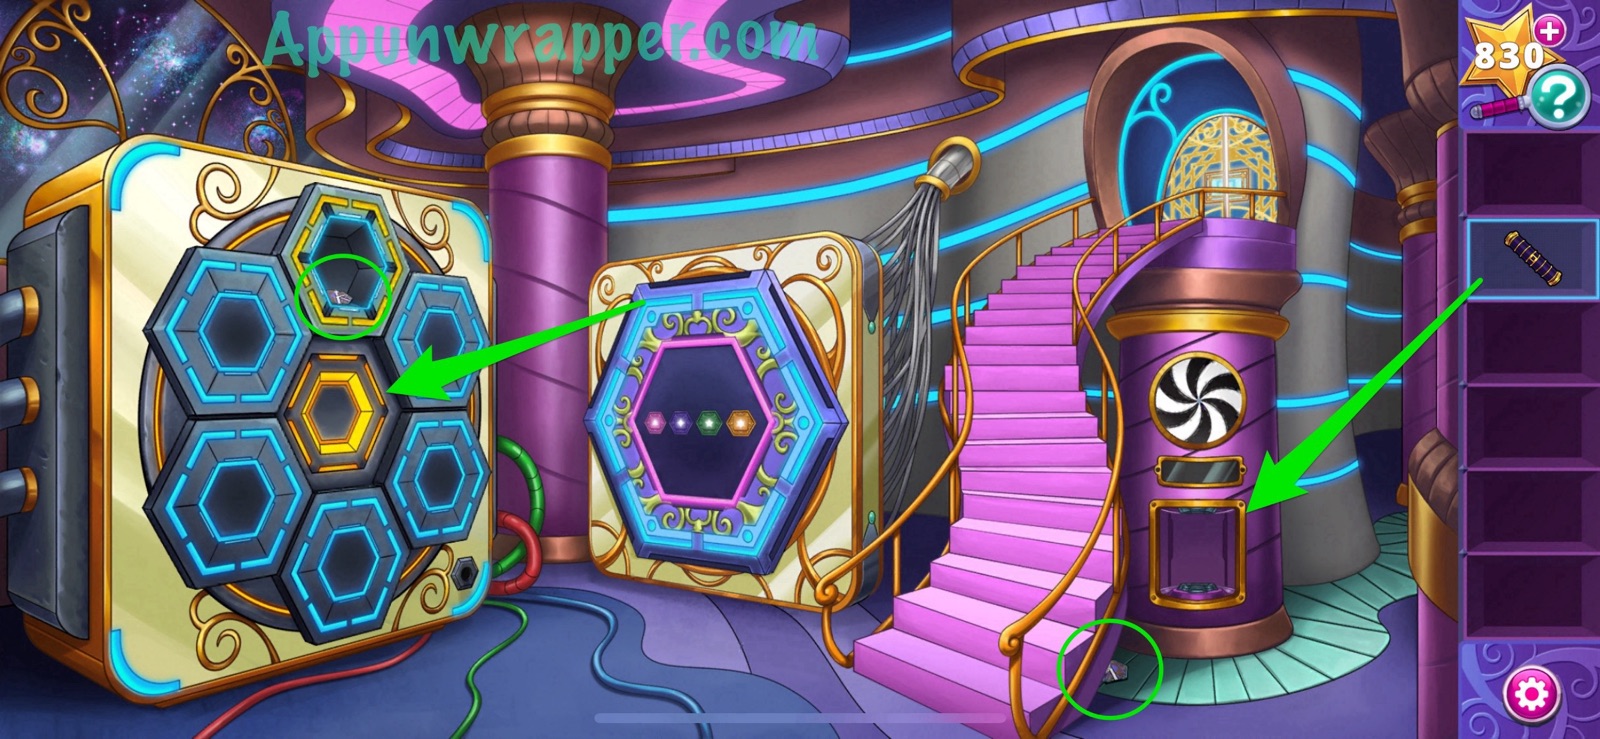
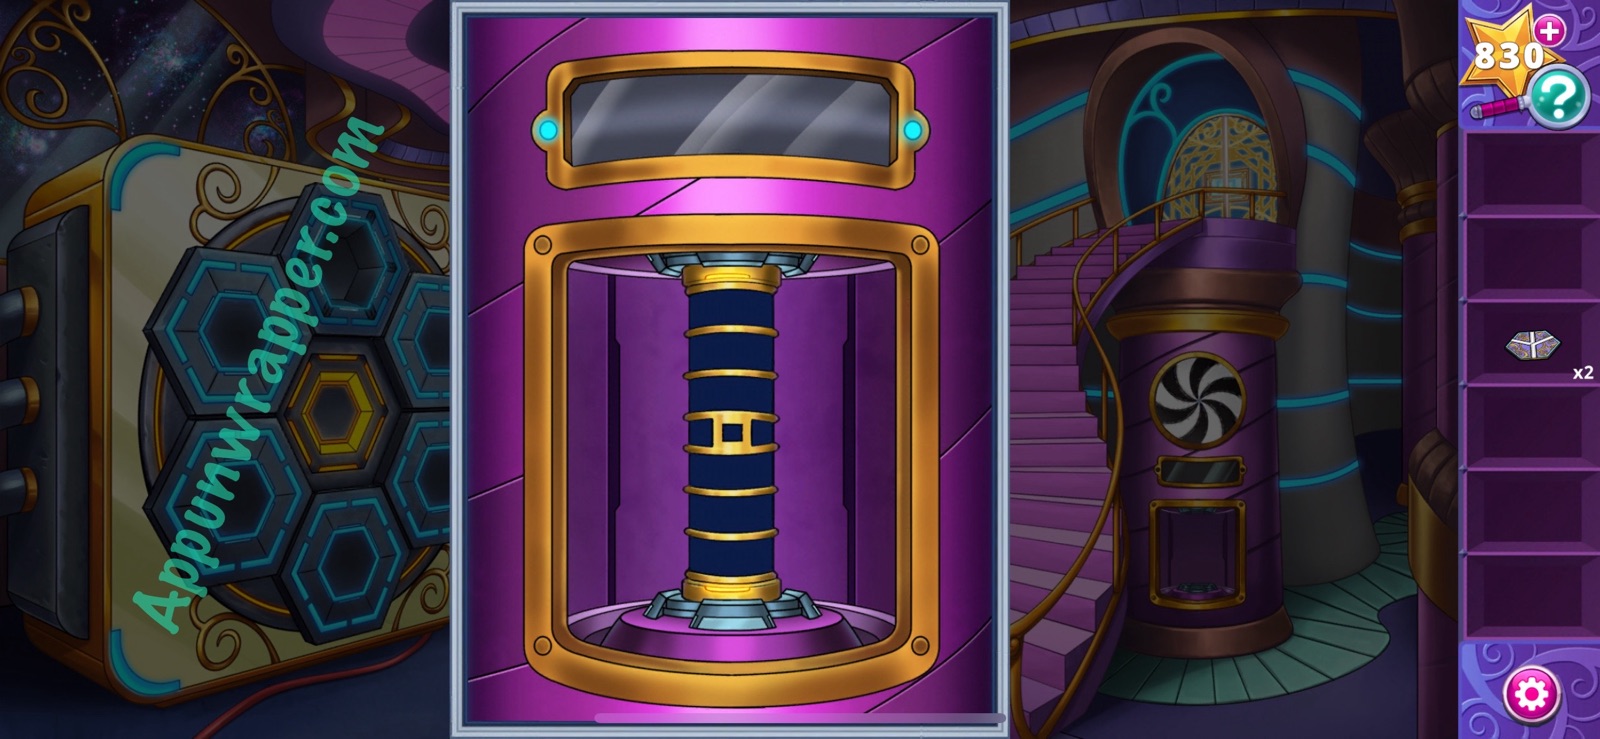
3. Grab the hex from the floor. Also, press the orange hexagonal button on the left and take another hex. Also, charge the battery in the charging station.
4. Go back upstairs and place the charged battery in the display. Now you can see Arlo’s brainpower.
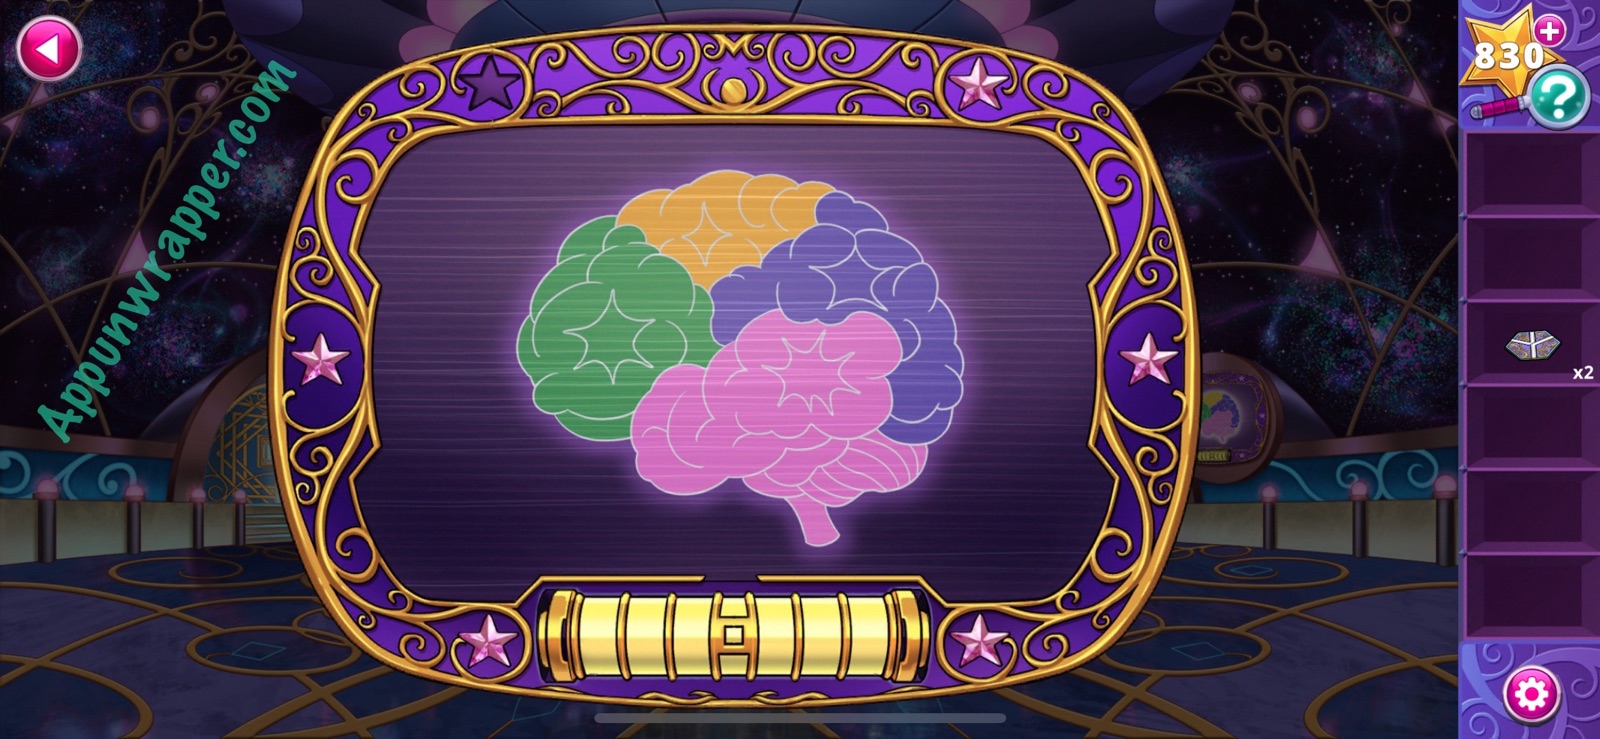
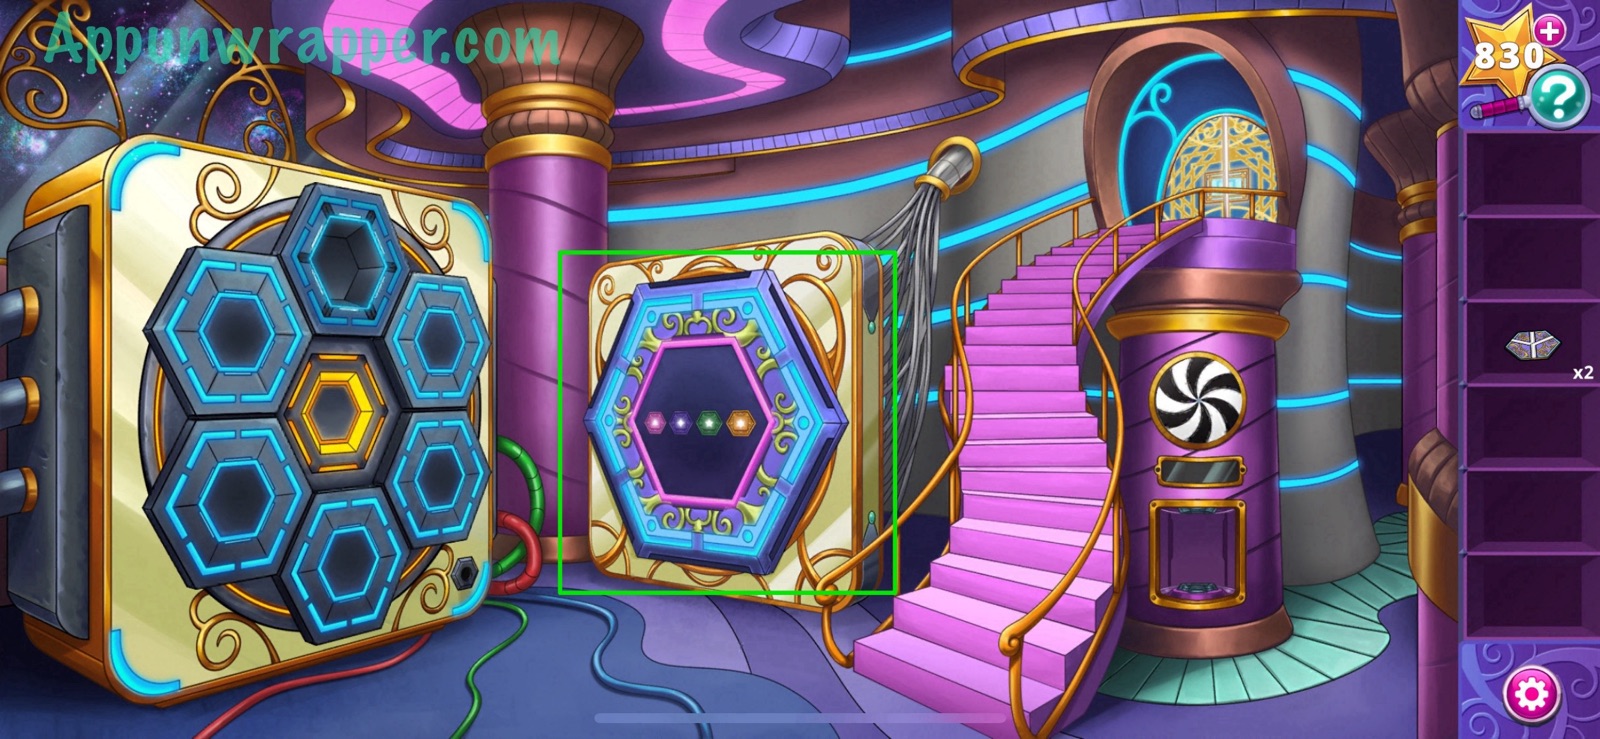
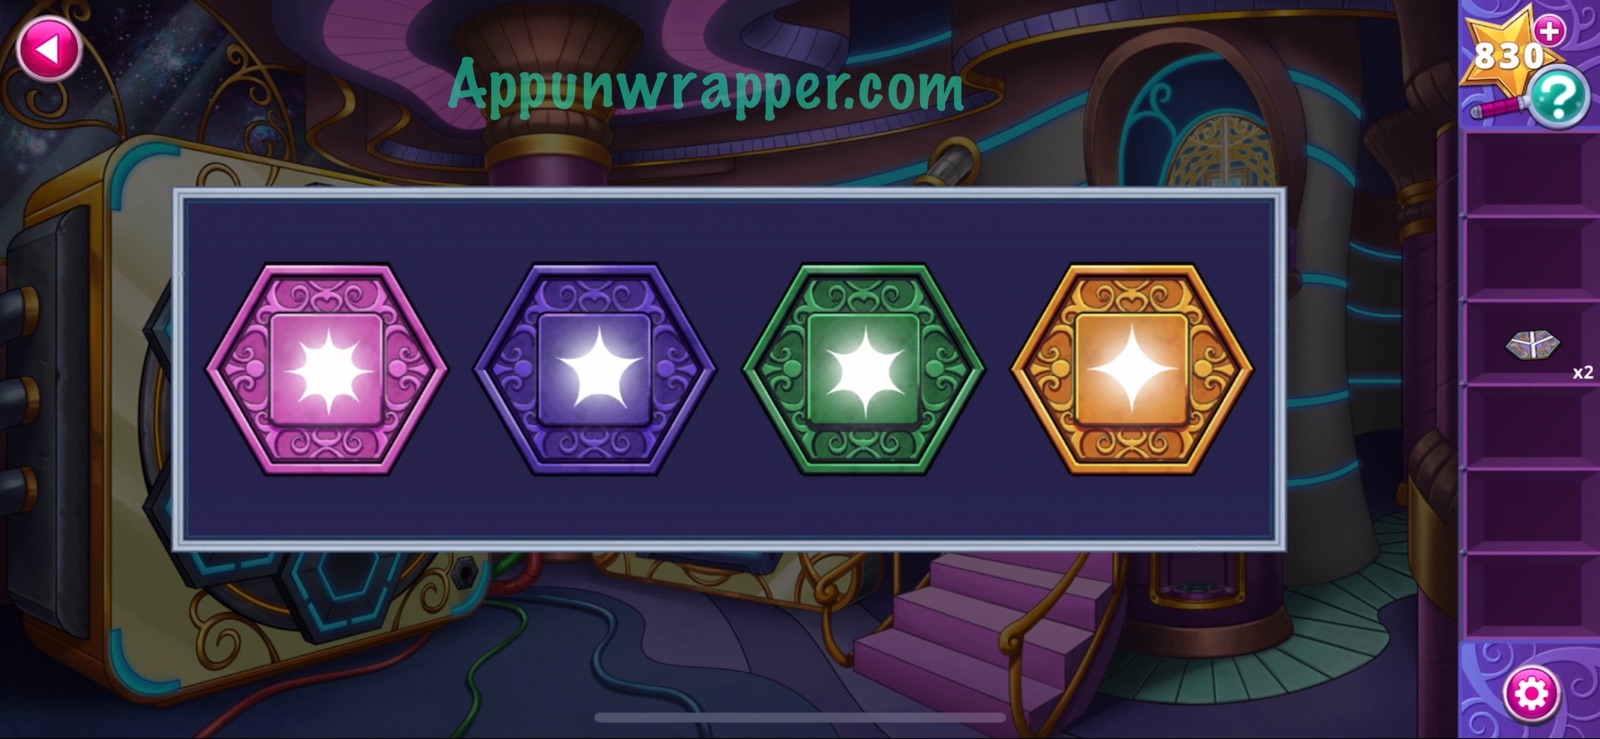
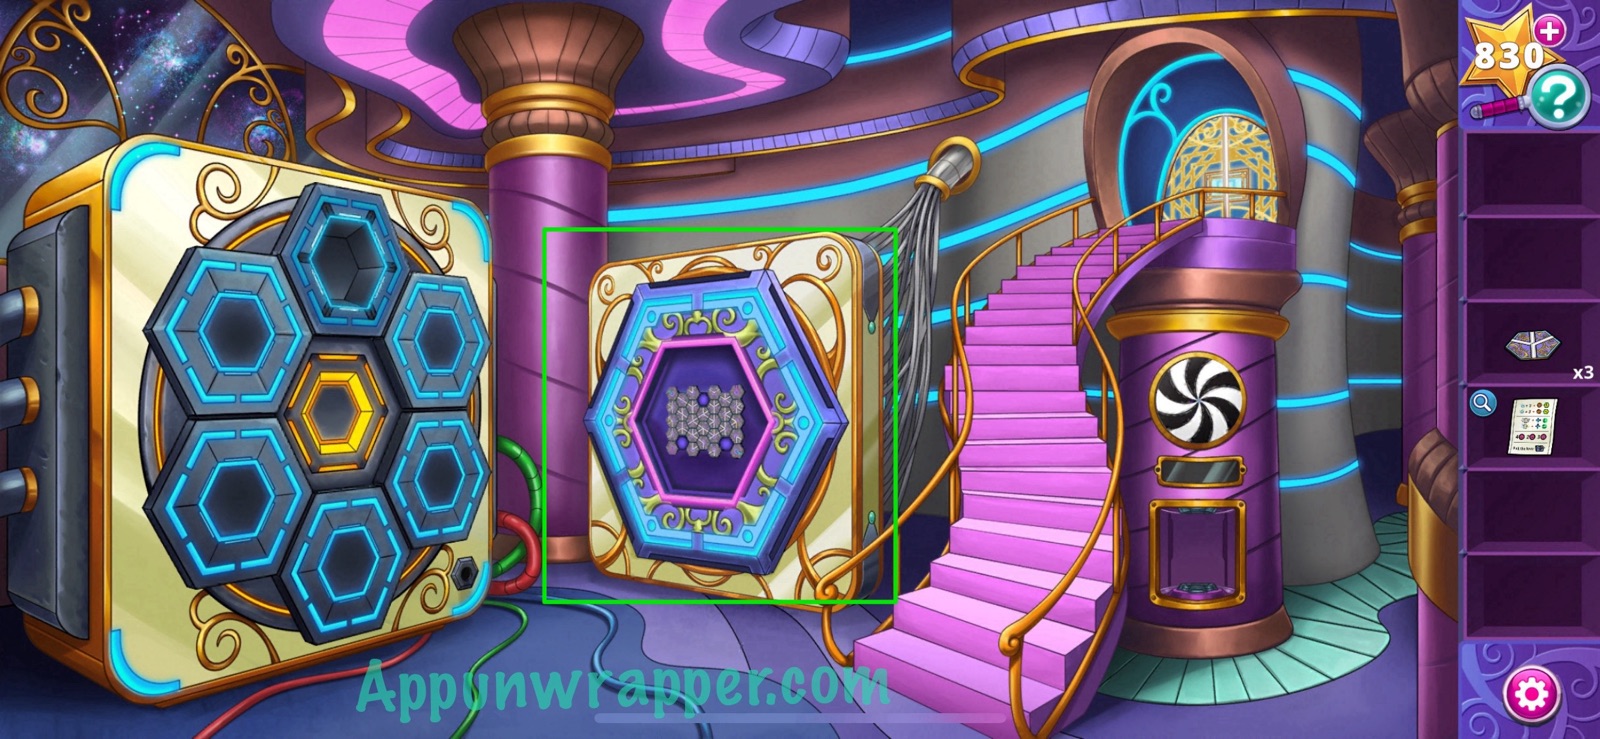
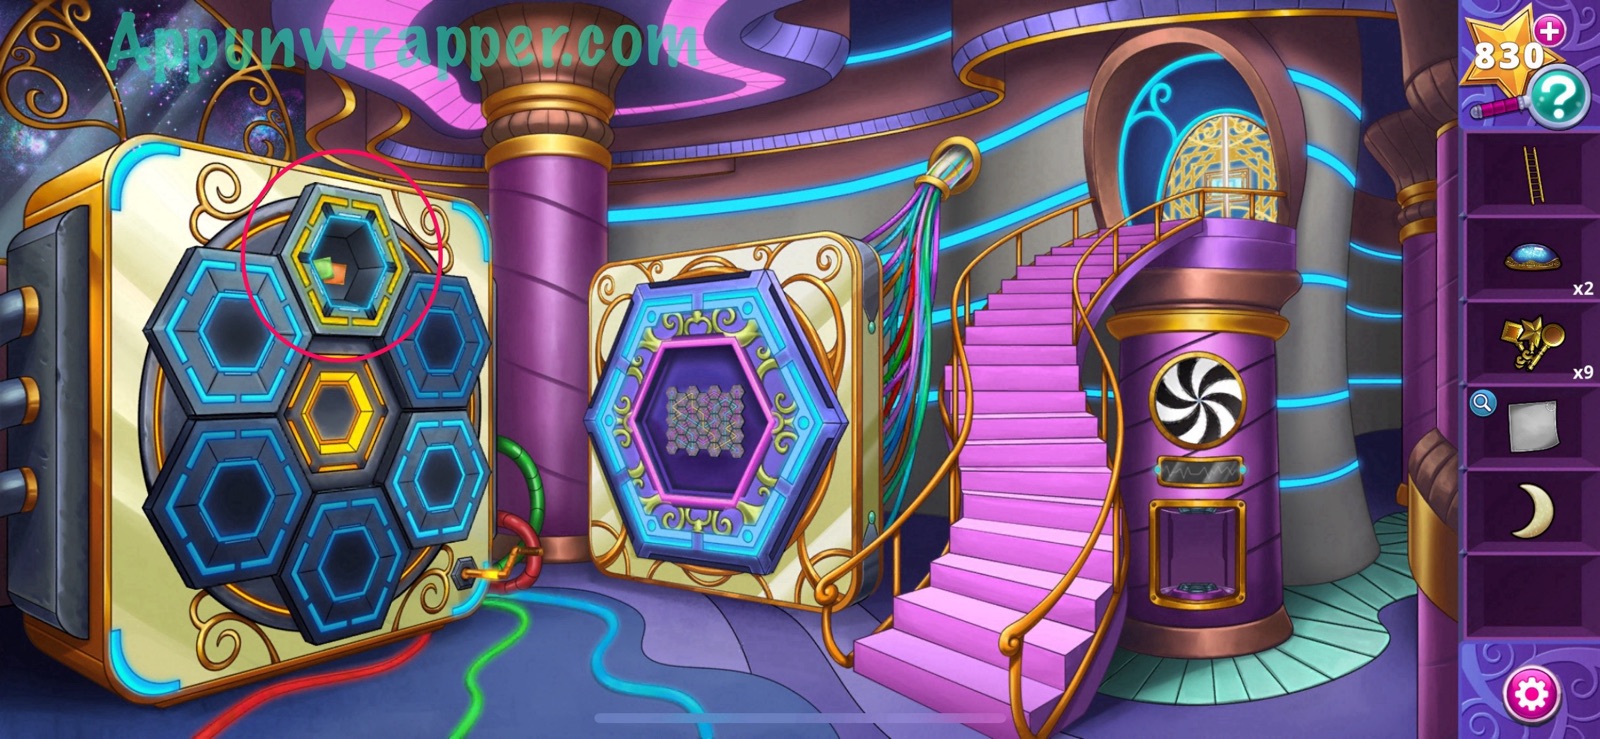
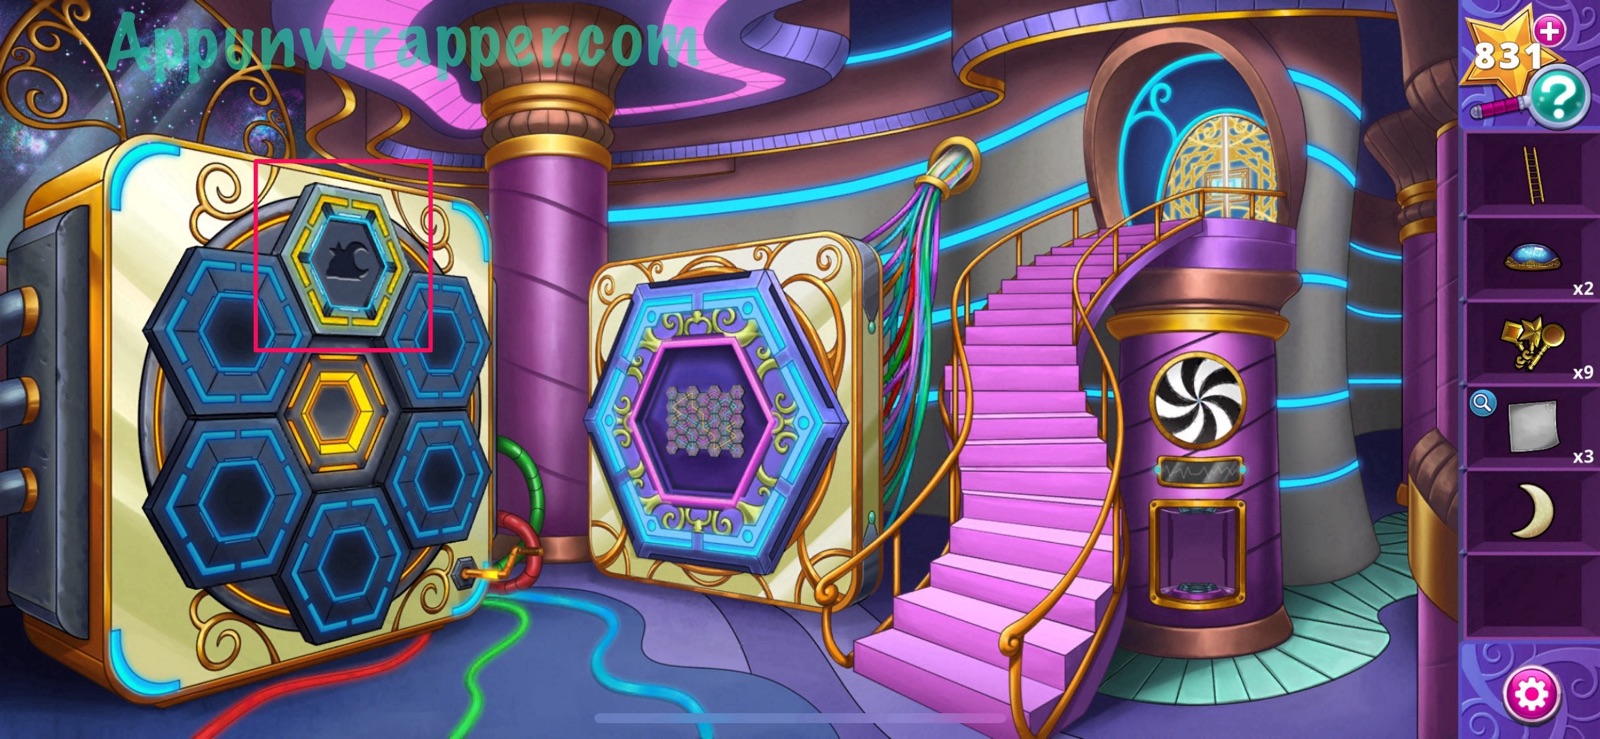
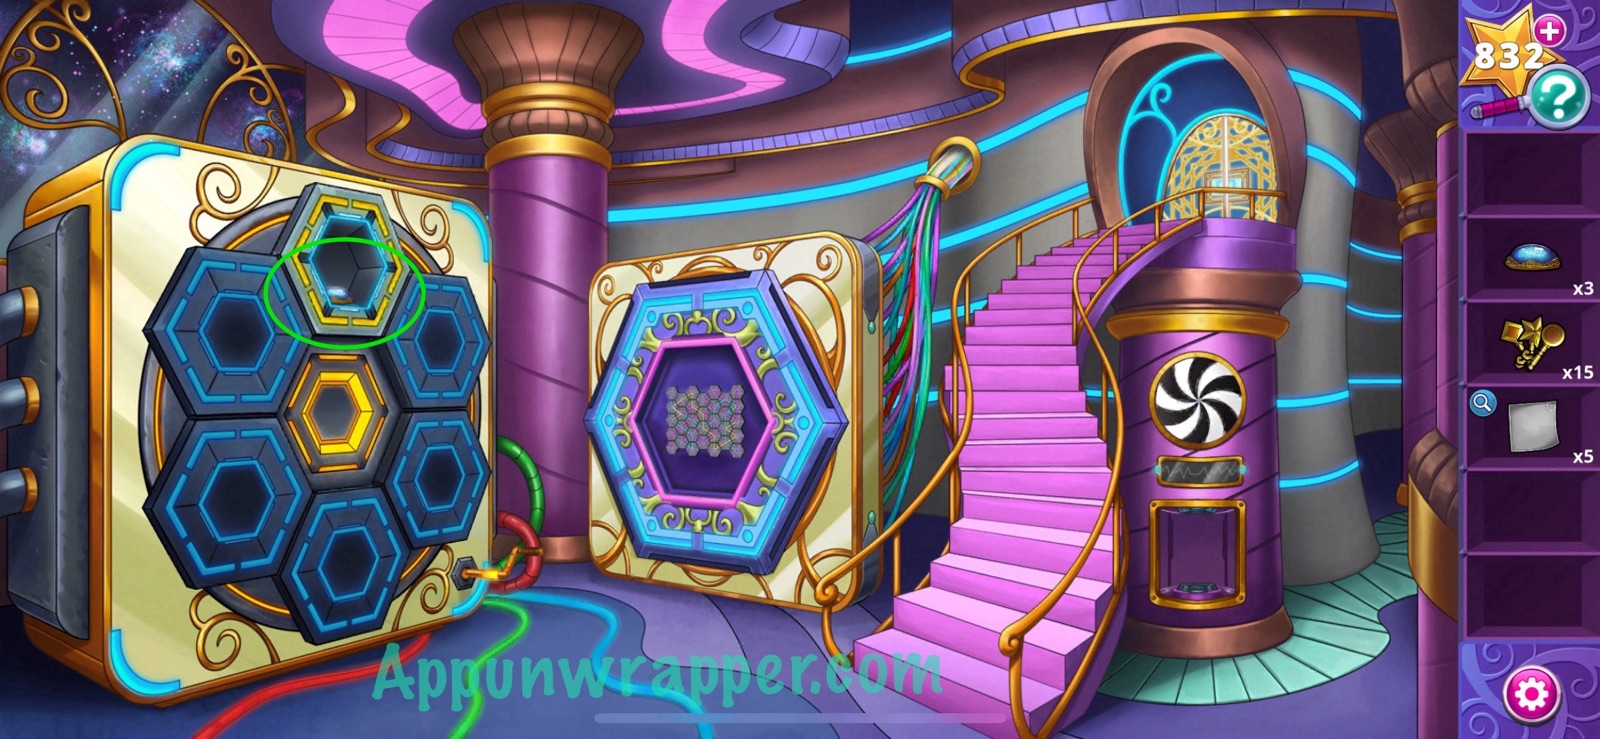
5. Go back to the Mechanical Room and tap on the giant hexagon. There are four colored hexagons. Tap on them to match the shapes to those you saw on the diagram of Arlo’s brainpower. It should look like the photo below. You’ll then get a key.
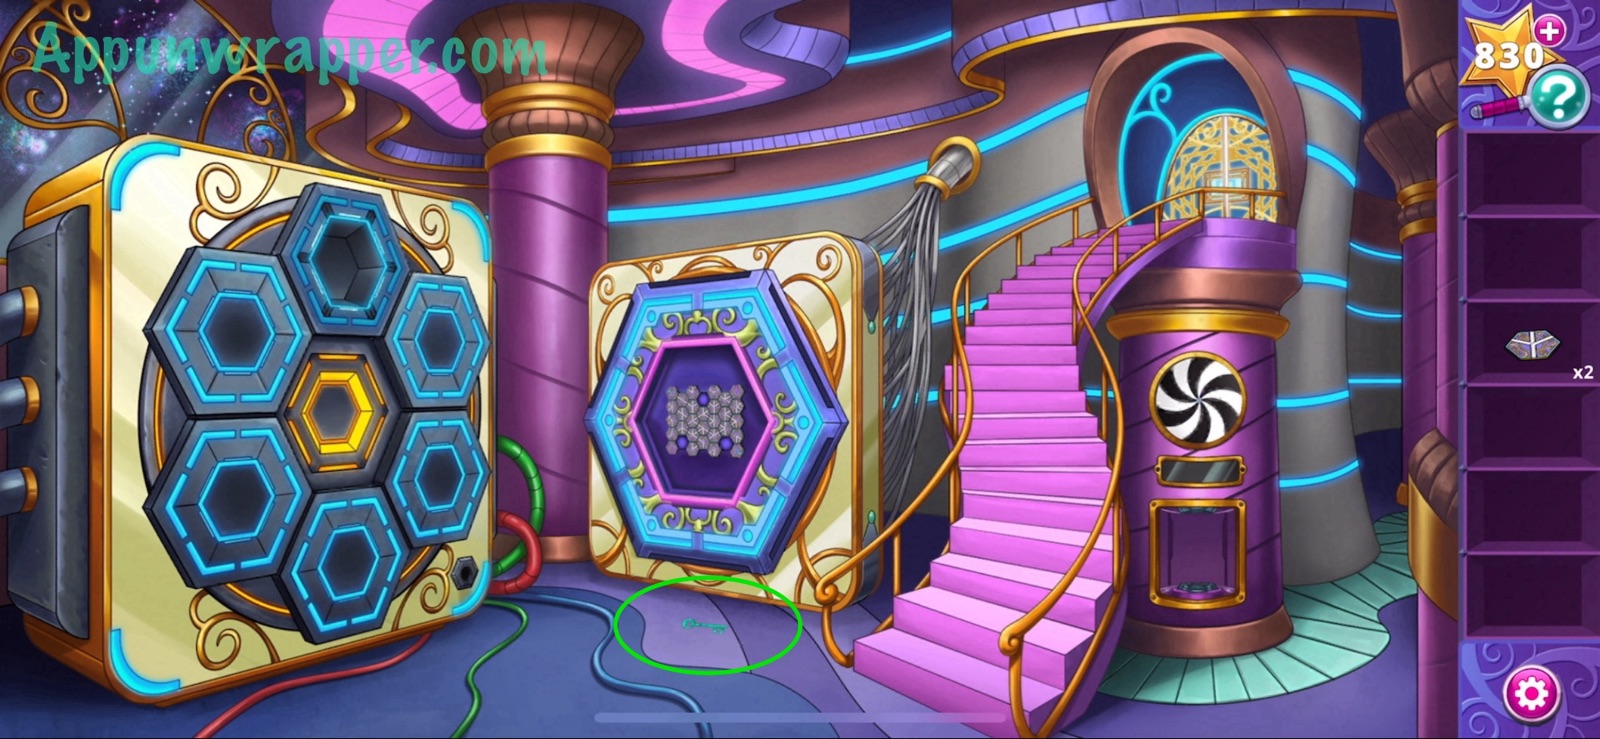
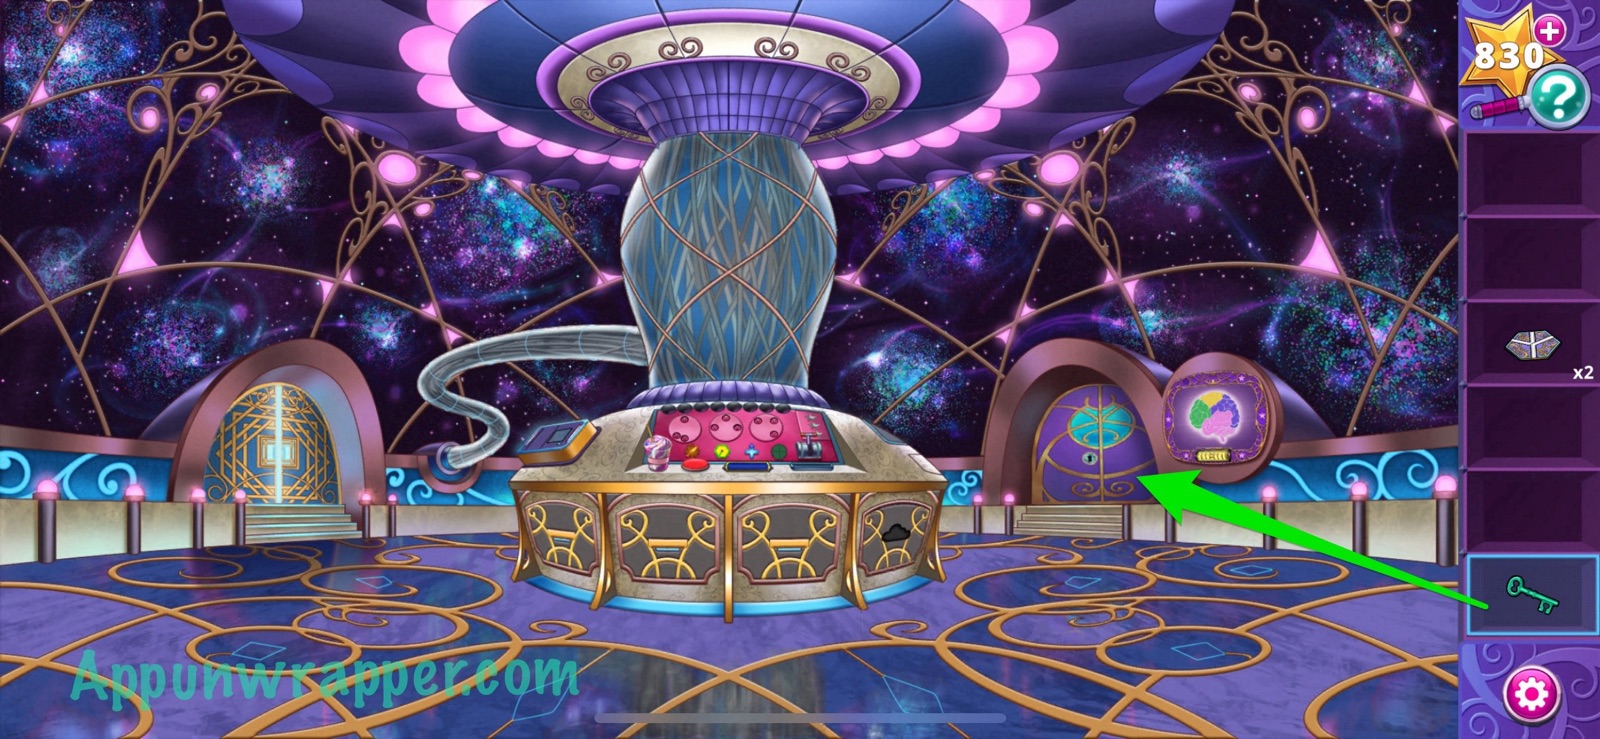
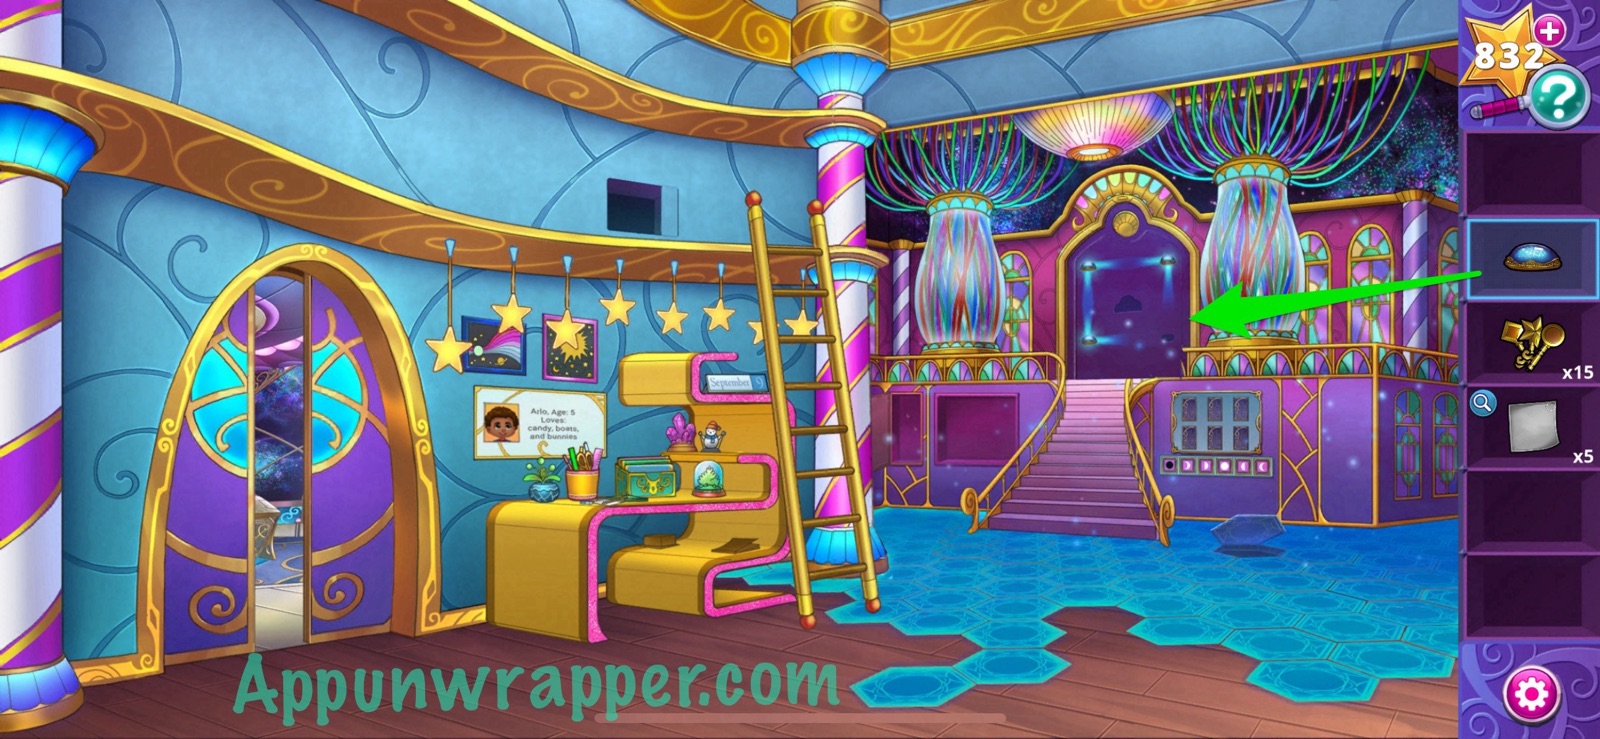
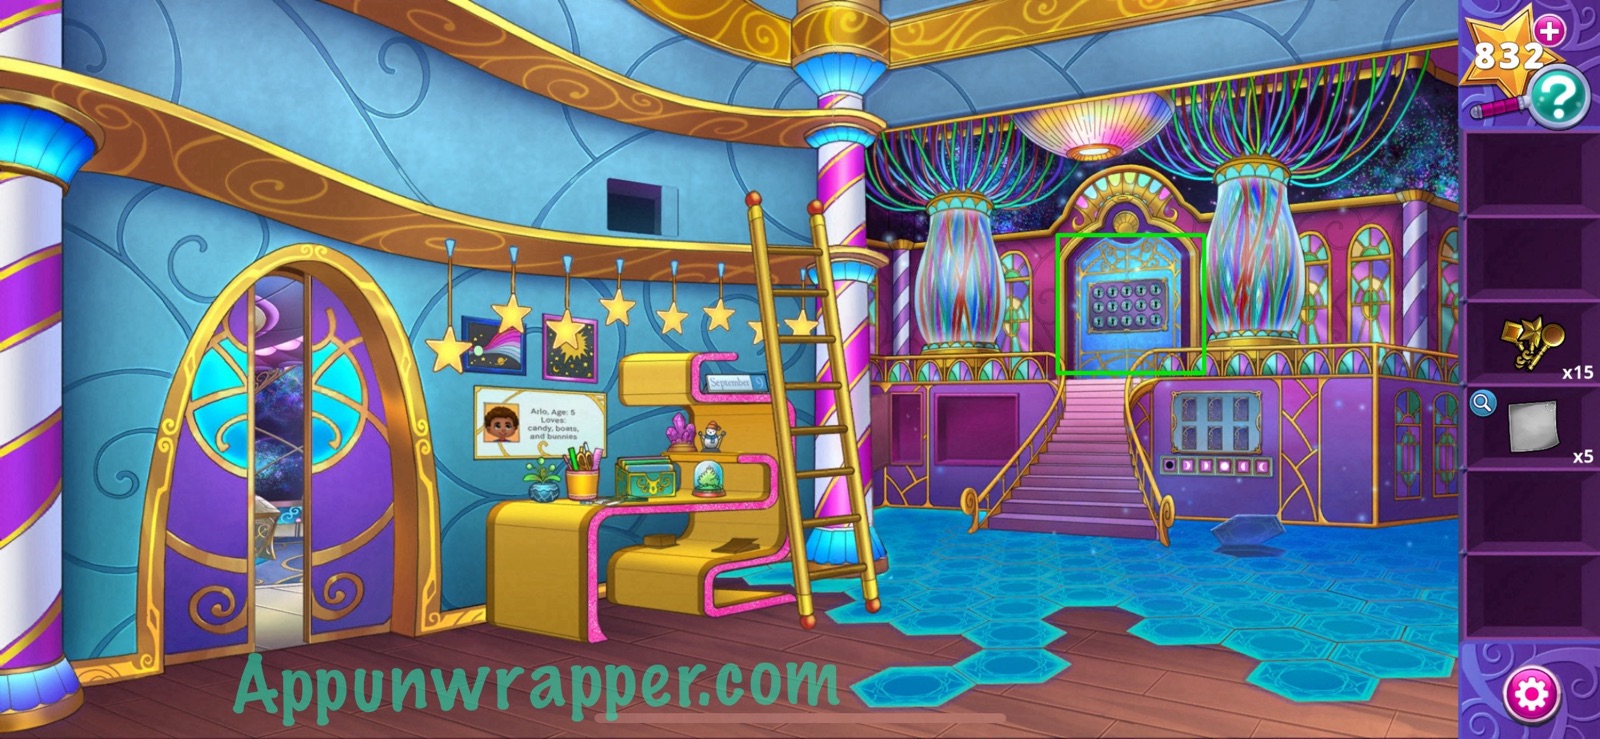
6. We can’t solve this puzzle yet because we’re still missing a hex. Go back upstairs and use the key to unlock the other door. Head inside to the storage room.
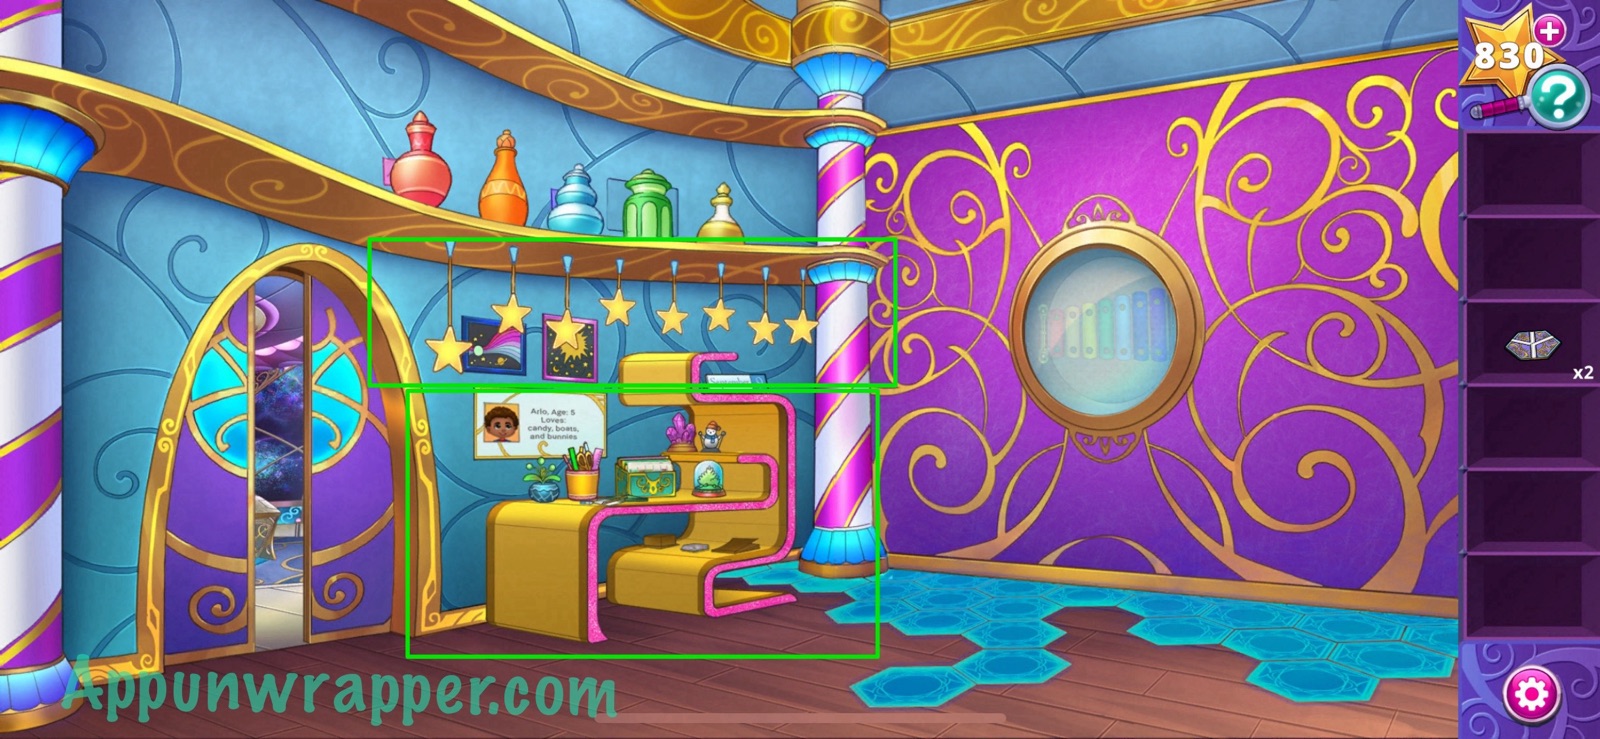
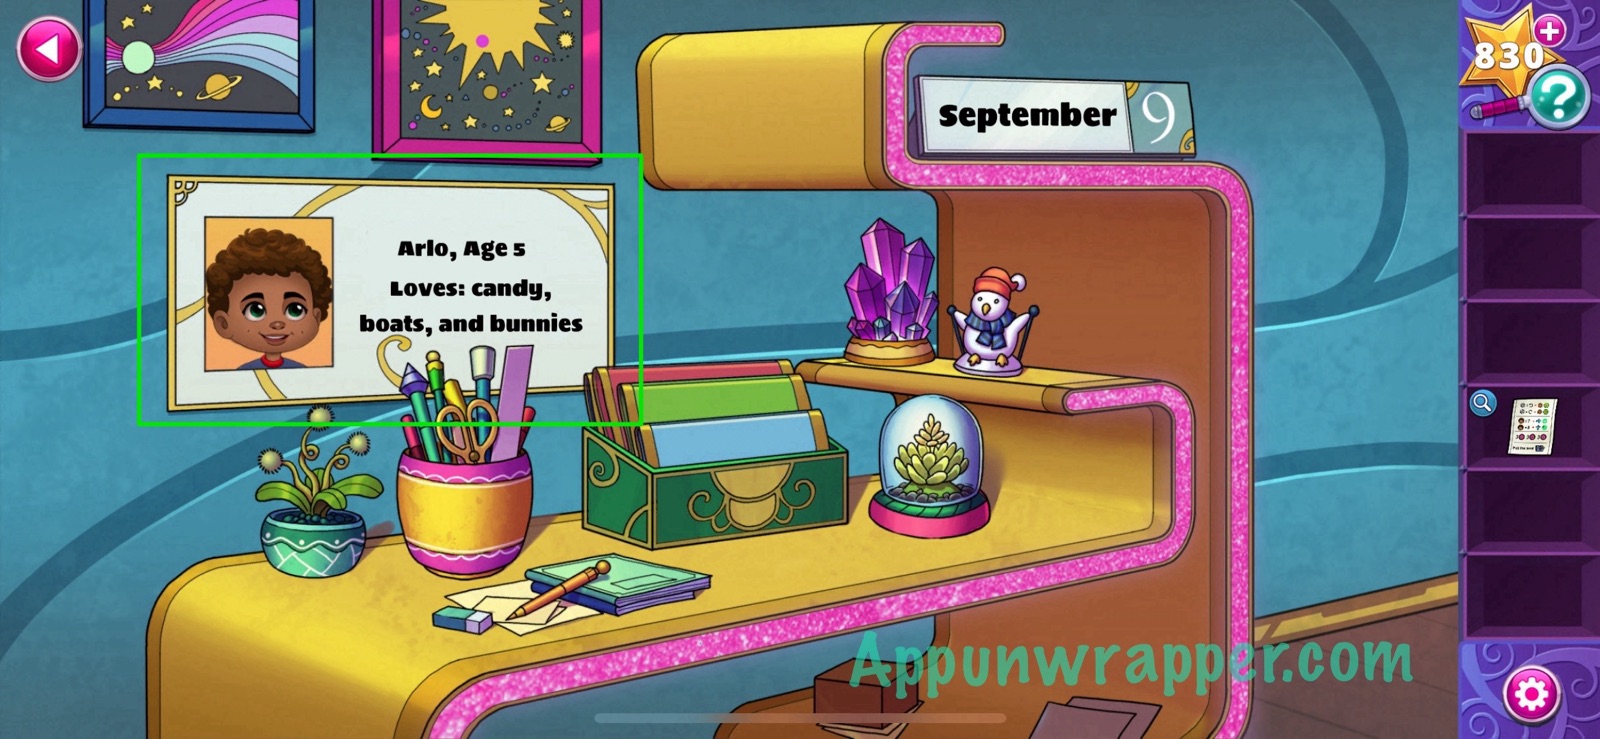
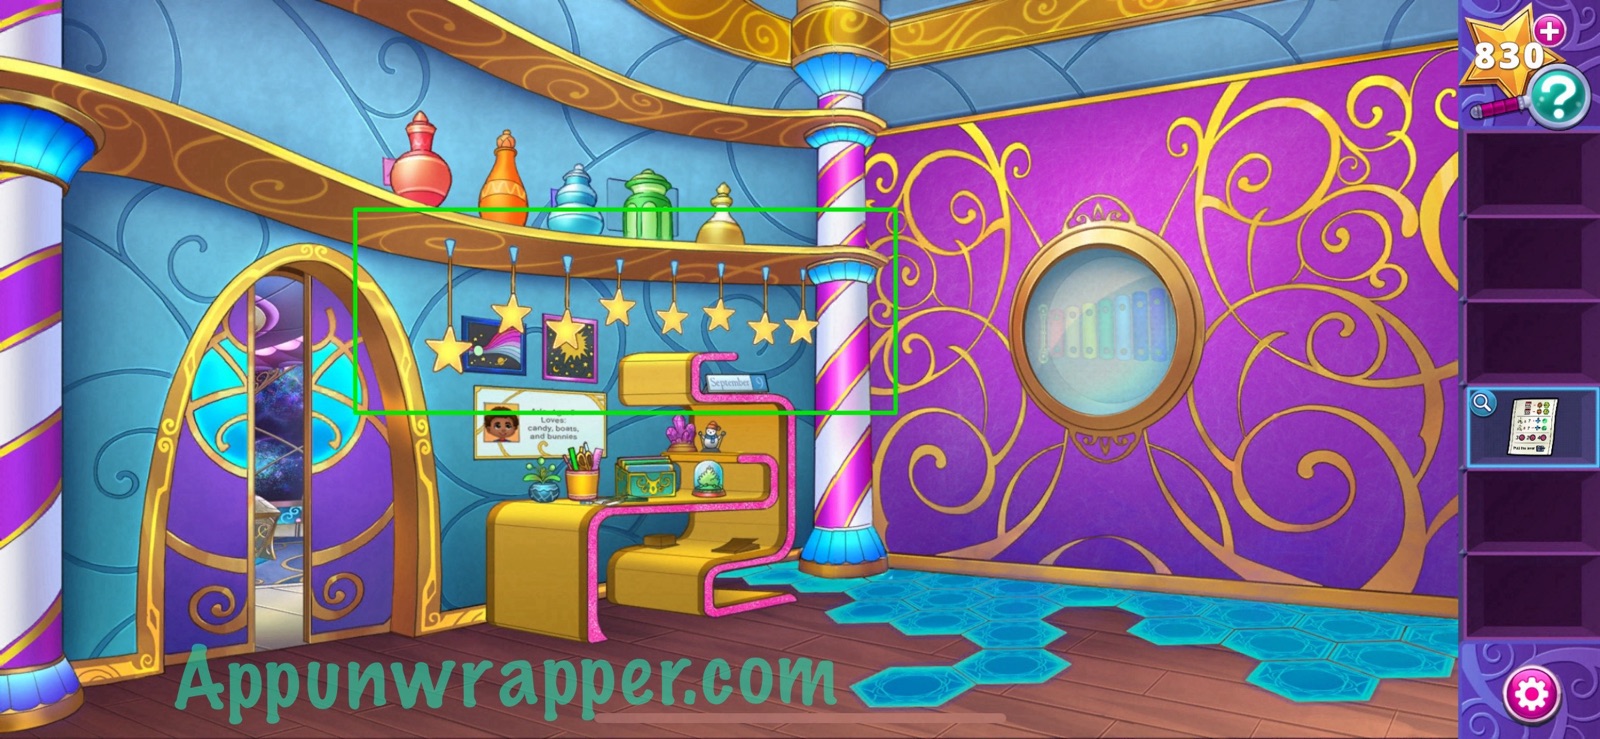
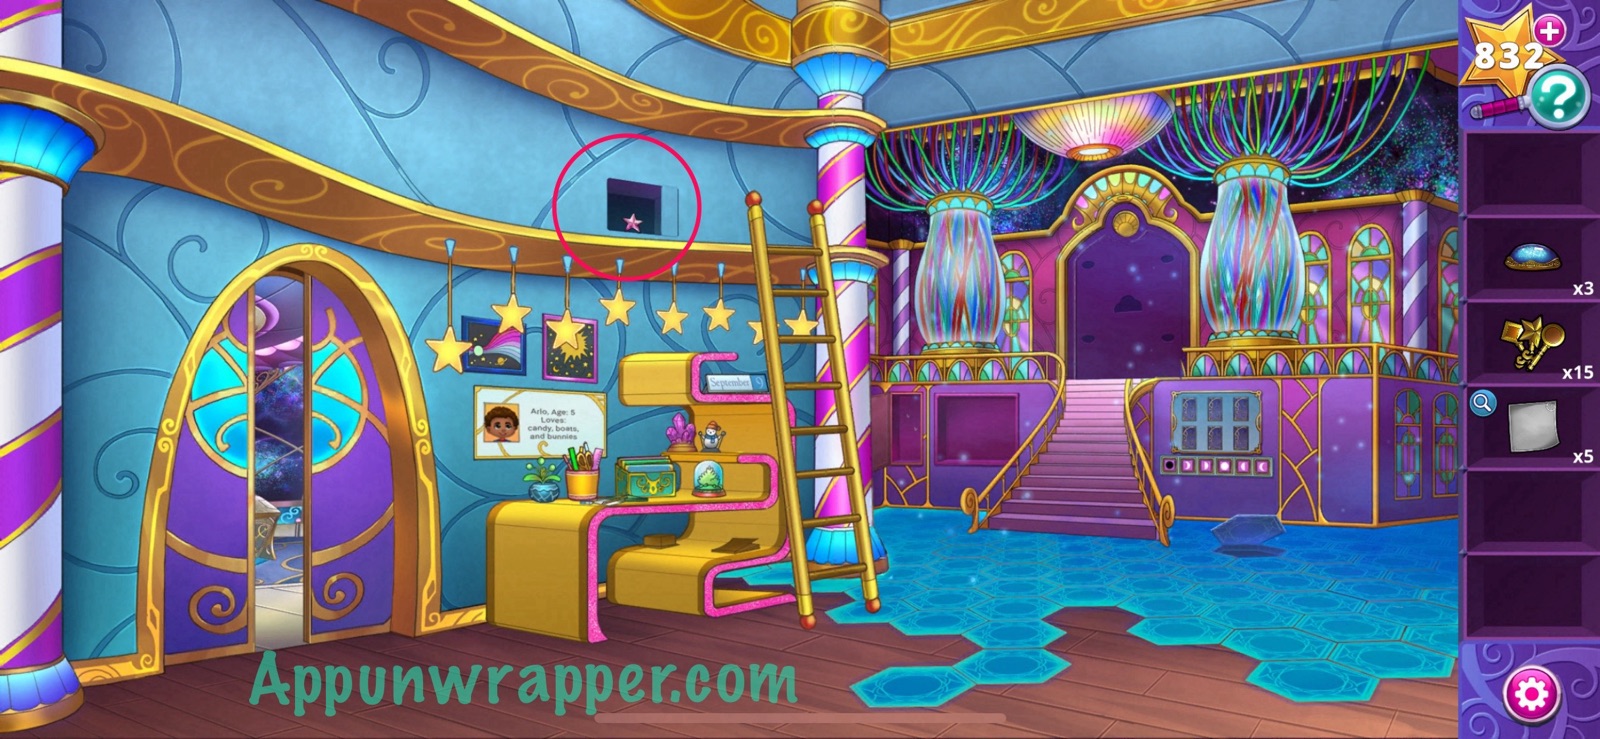
7. Notice the stars. It’s a clue we’ll need later. Tap on the desk. Grab the hex and the console instructions. Take a look at the instructions. Also, notice the info about Arlo and the date, September 9.

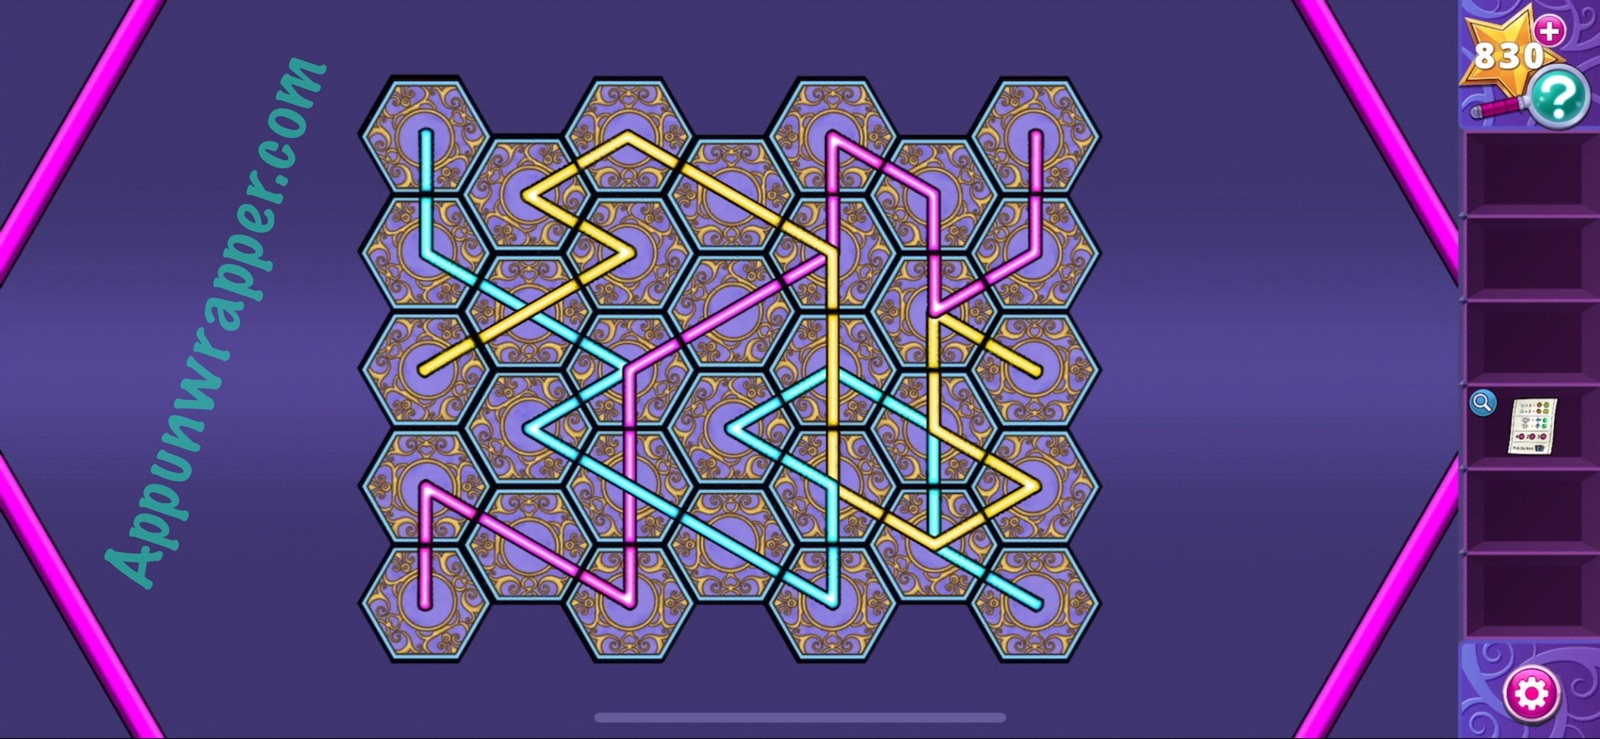
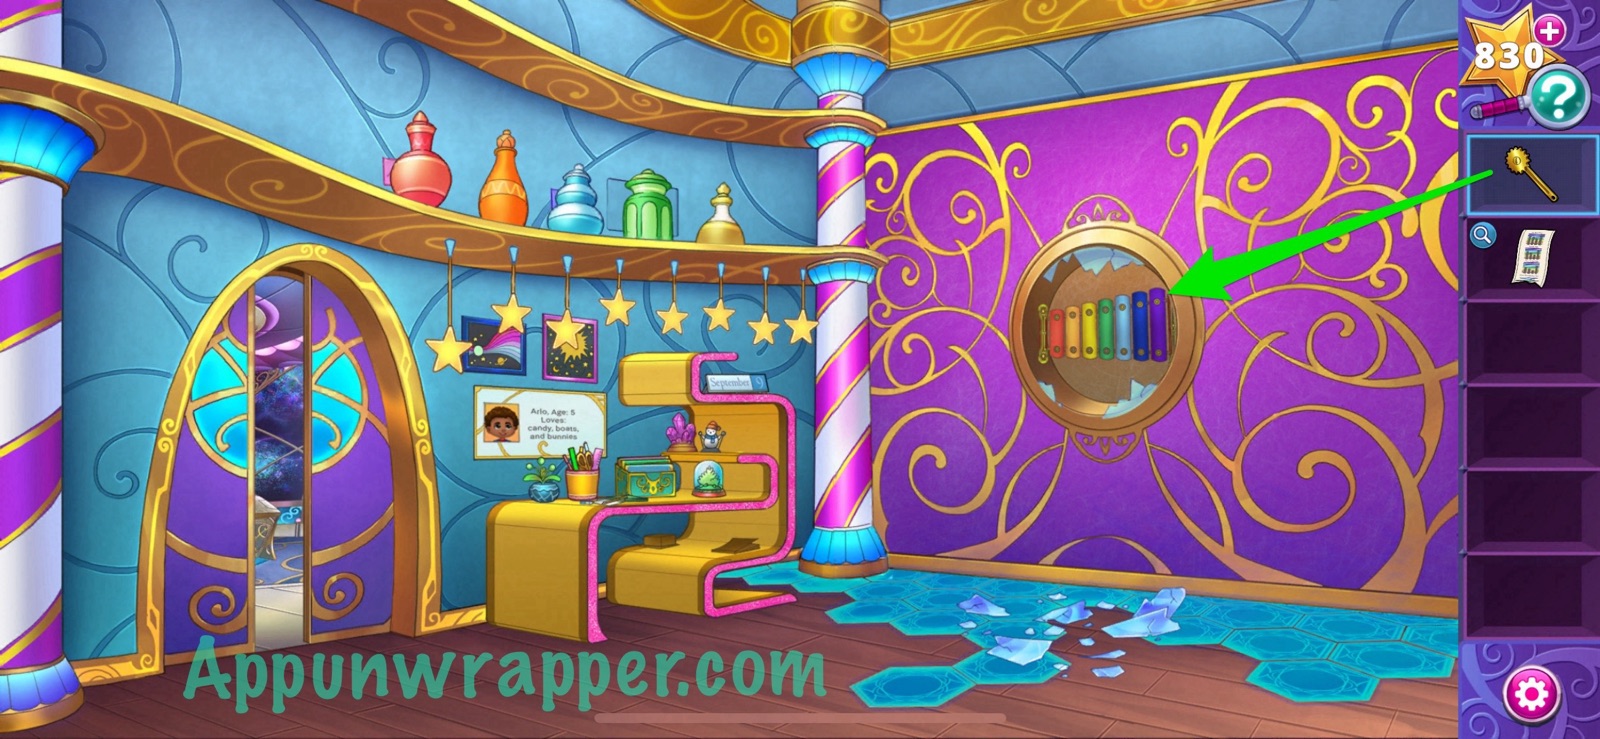
8. Go back to the Mechanical Room and place all three hexes down and solve the Circuit Flow Puzzle. Rotate the hexes to create a path between each of the three sets of matching colors. Connected pathways may only contain one color, and all paths must be used. You can copy my solution below if you’re stuck.
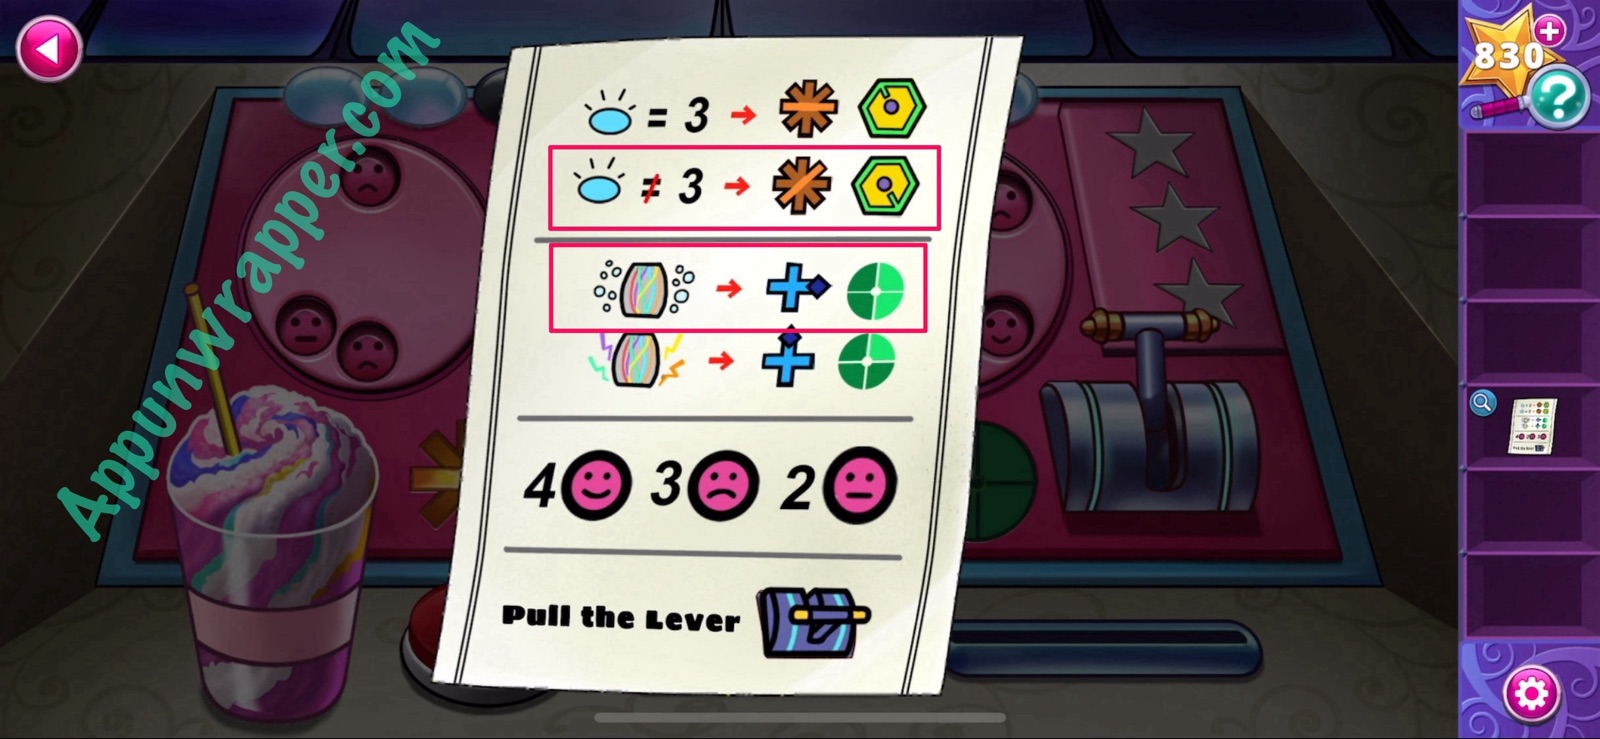
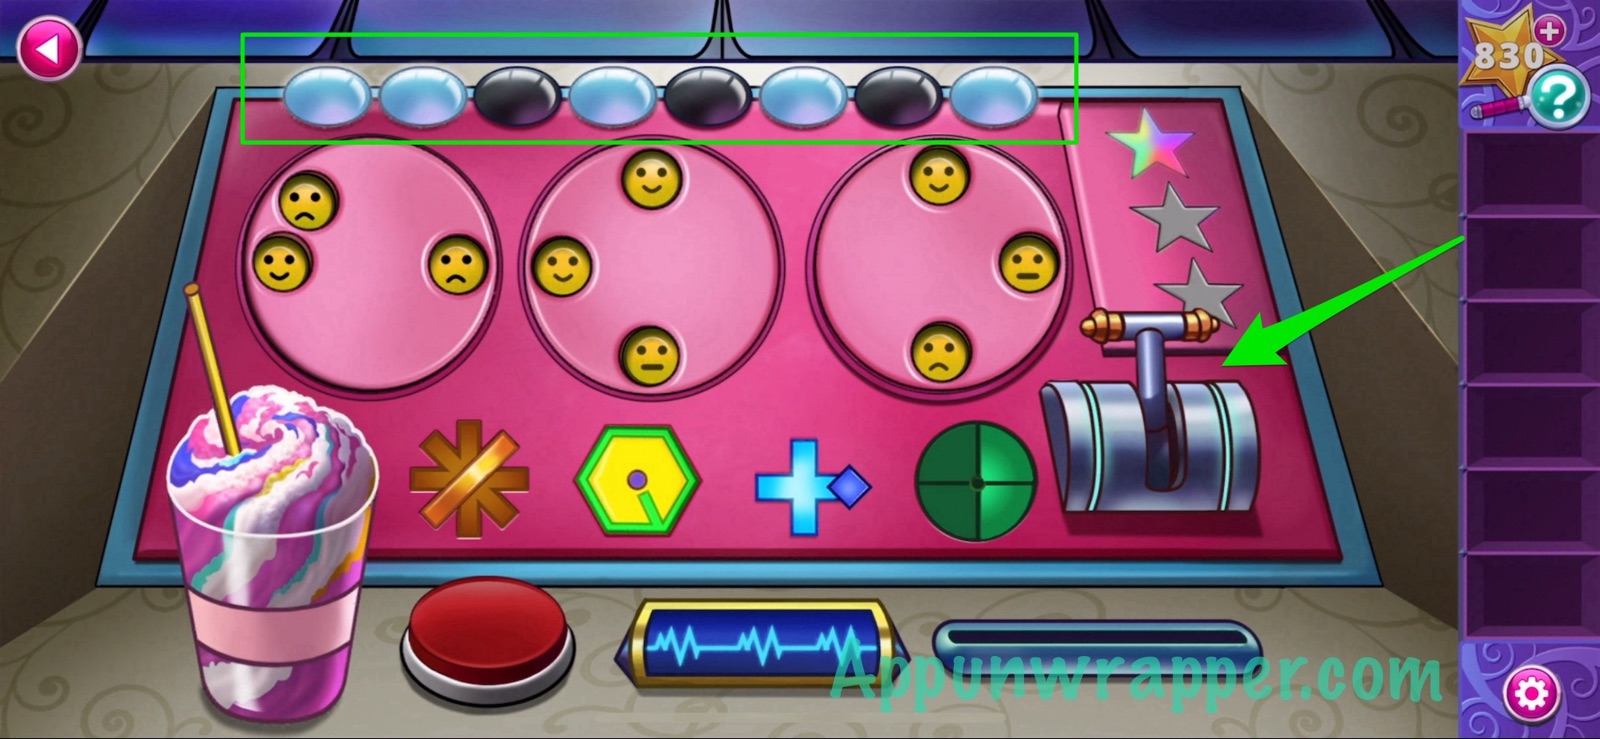
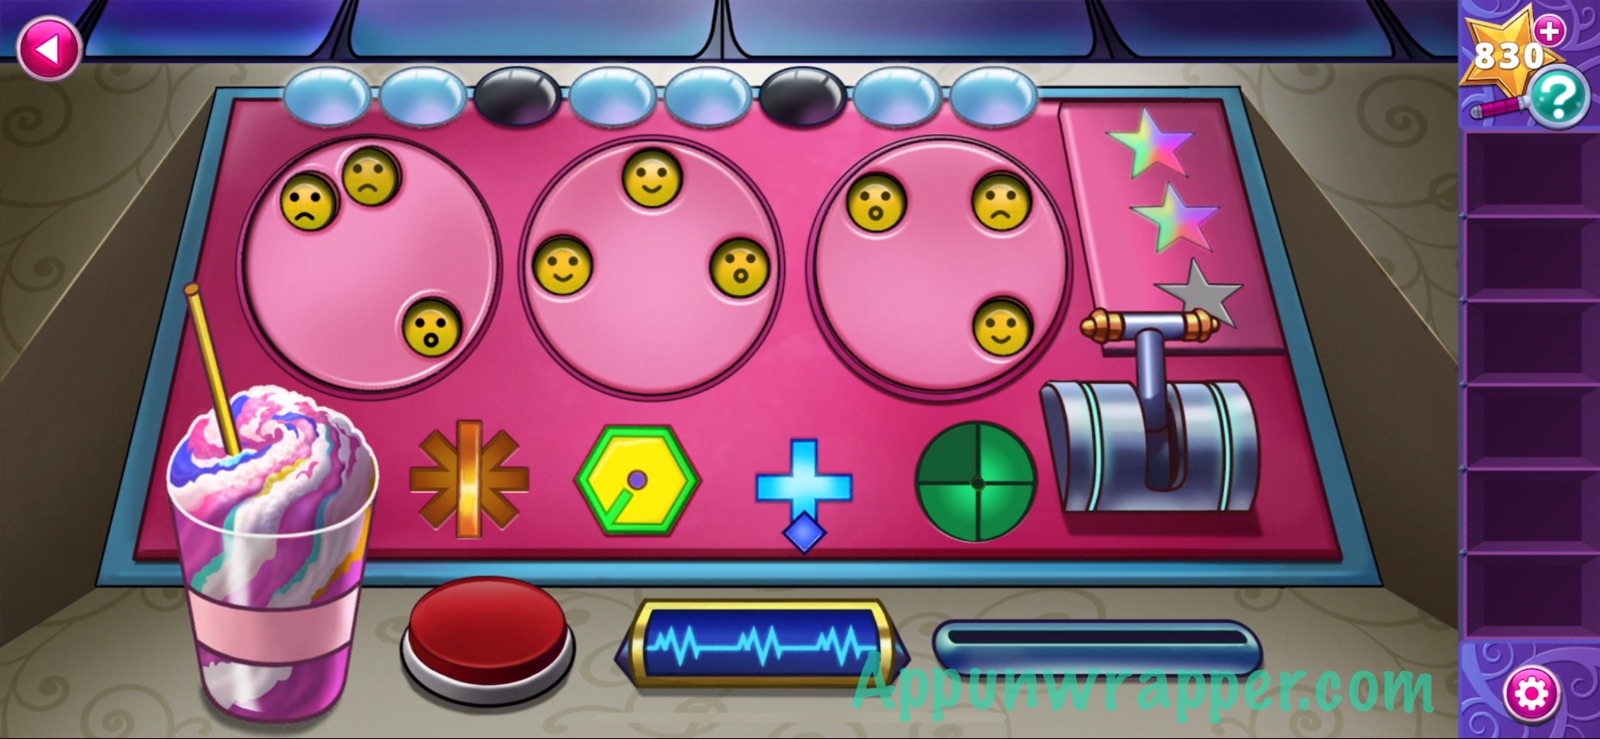
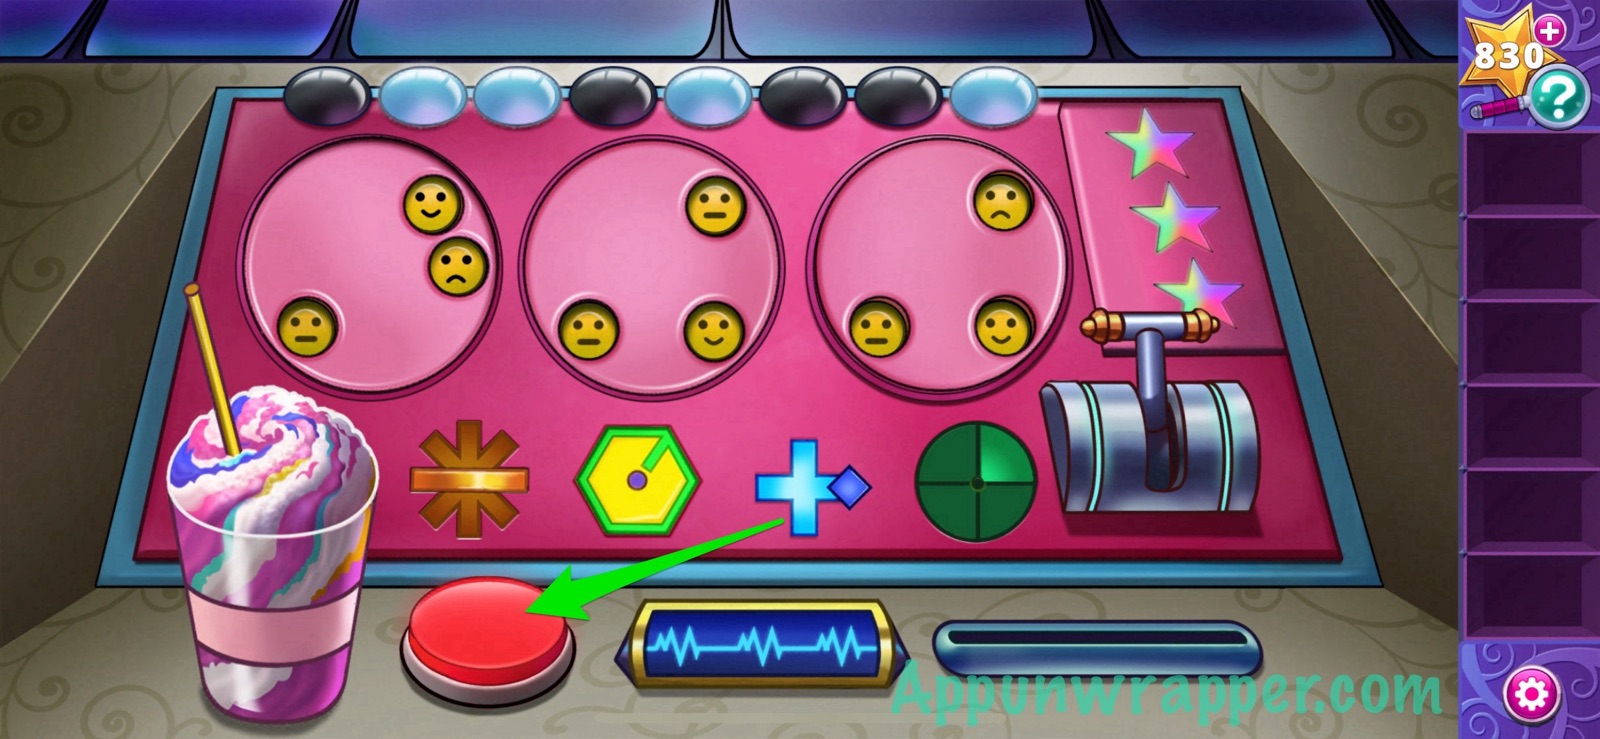
9. Now the power is on. Head back upstairs and look at the console. Follow the instructions to figure out how everything should look. Let’s start with the first set of instructions. It’s saying that if there are exactly 3 lights on, you should copy the directions of the dials to match that line. If the lights that are on do not equal exactly 3, copy the second line. There are 5 lights on, so copy the second line. Then, zoom out and notice there are bubbles around the console, so the second set of instructions is telling you to go by the first line. So light up the green buttons to match the ones on the page. Next, rotate the discs with holes in them so there are 4 smilies, 3 frowns, and 2 neutral faces. And last, pull the lever to complete the puzzle. If you did everything right, one of the stars should light up and you’ll get another page of instructions.
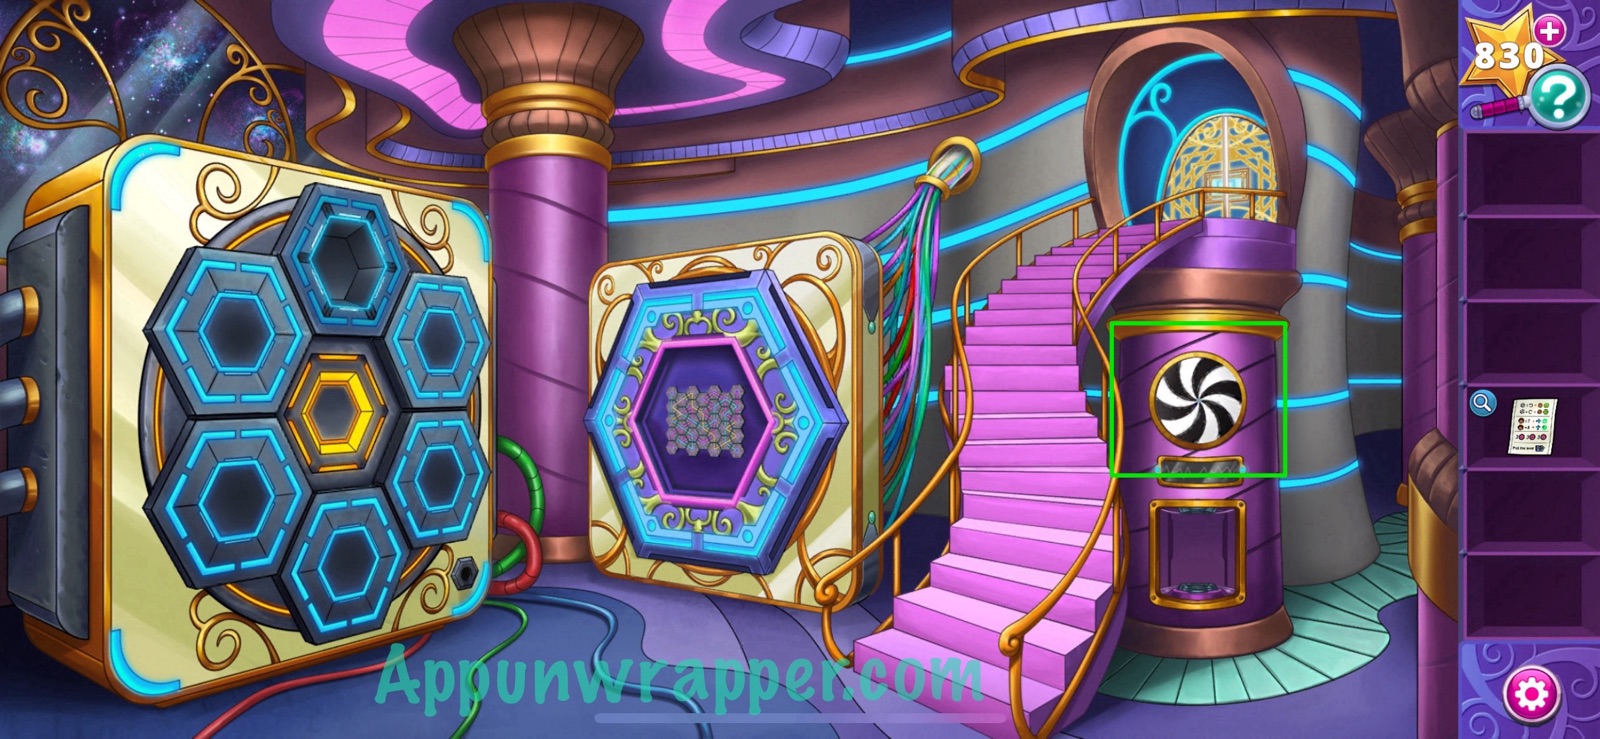
10. Now let’s work on the second console puzzle. Look at the instructions. Again, let’s take it one section at a time. The first has a hypnotic spiral and we have to locate it somewhere first. Go back to the Mechanical Room to find it on the battery charger. Watch it to see it’s moving counter-clockwise. So follow the first line of instructions. The next set of instructions shows a drawing of Arlo. If you remember, the sign in the storage room said he was age 5. So follow the second line in that section. Then continue with the rest so it looks like the image below and pull the lever. Then you’ll get some dream strips.

11. Now, find the Dream Distributor and place all the dream strips down. You need to place the strips down on the board to create an image of Arlo’s dream. Use the rotation button to turn the board so that each strip can be placed in the proper orientation. You can watch my video if you need help.
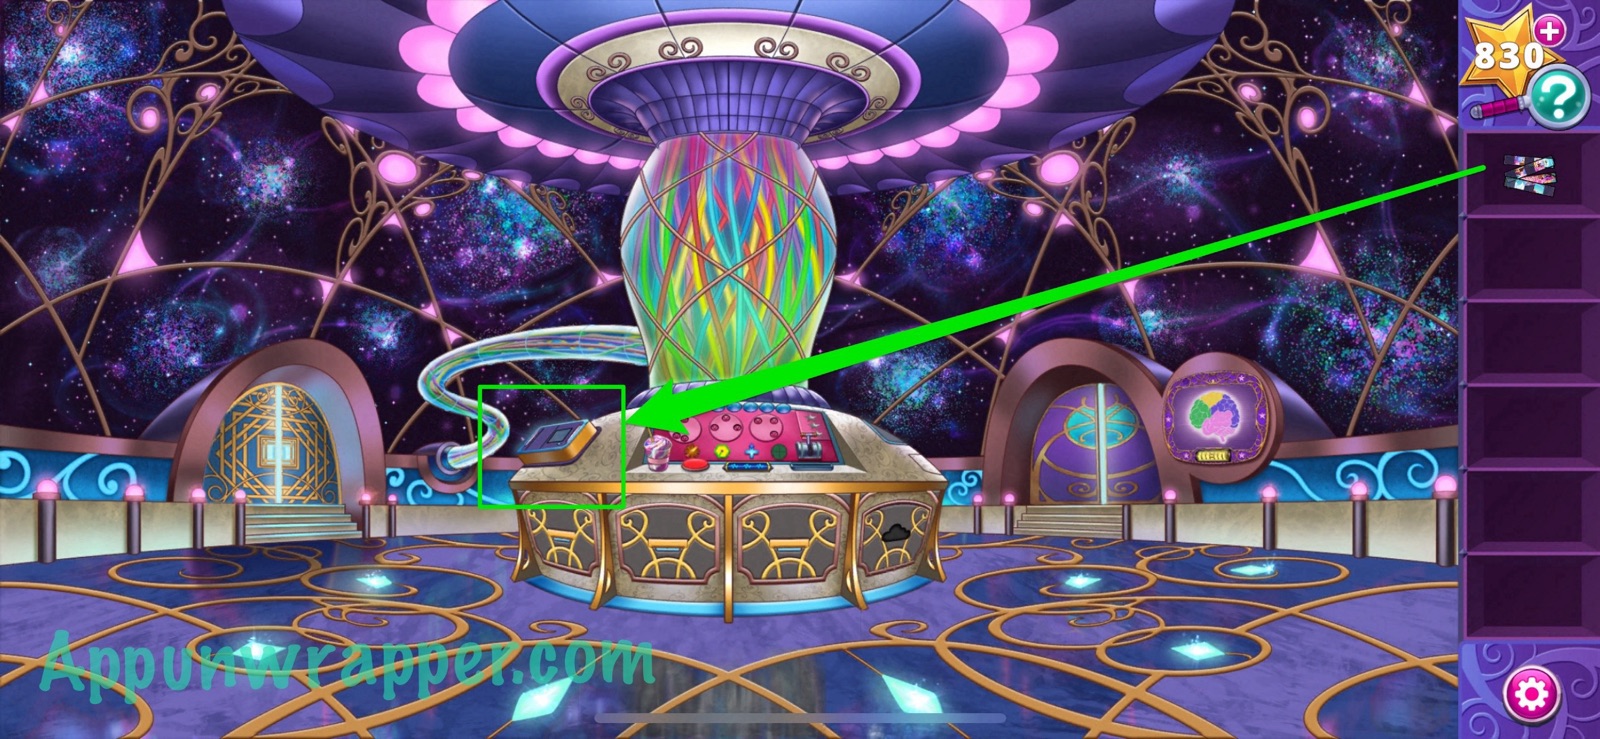
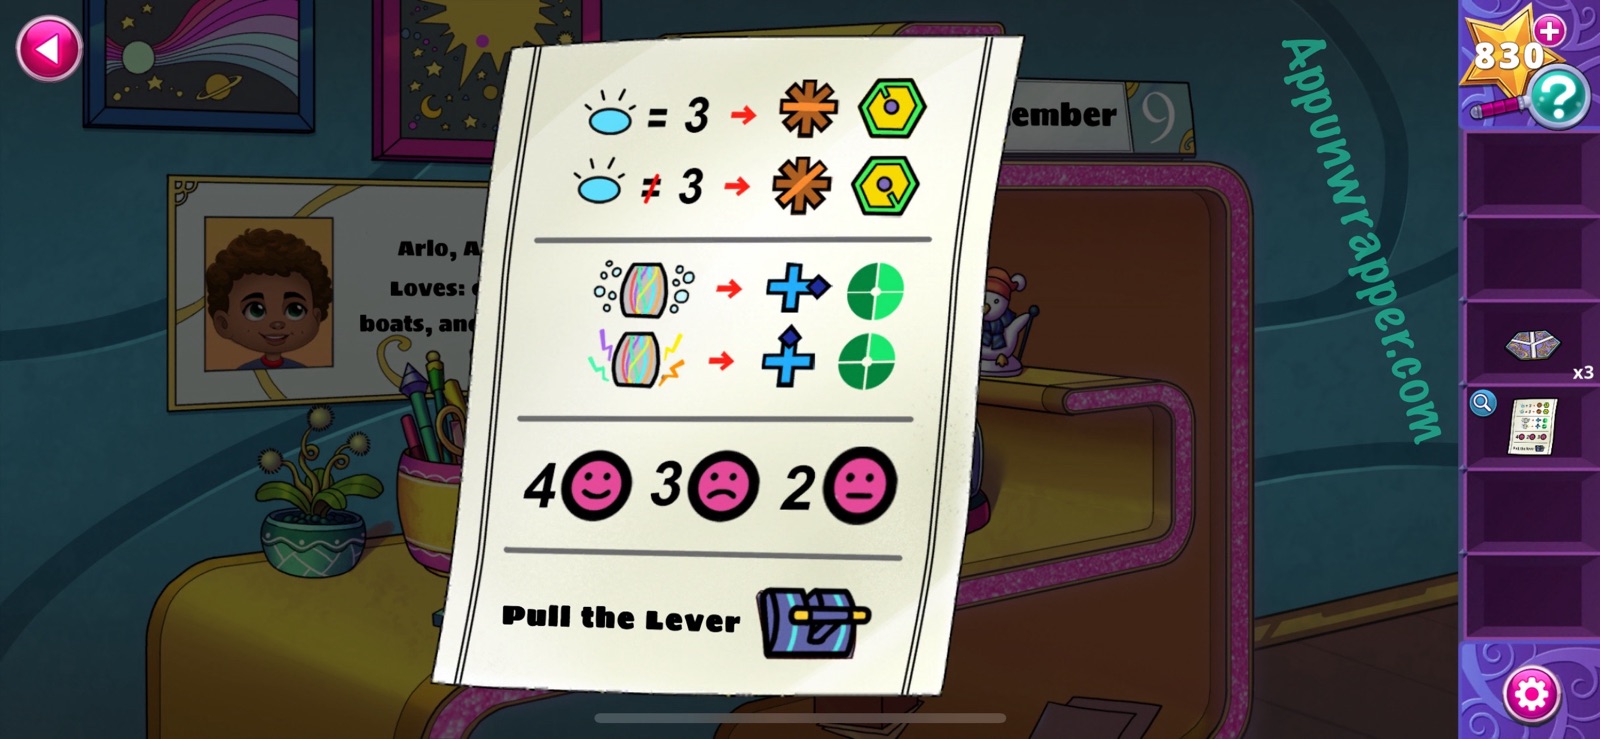
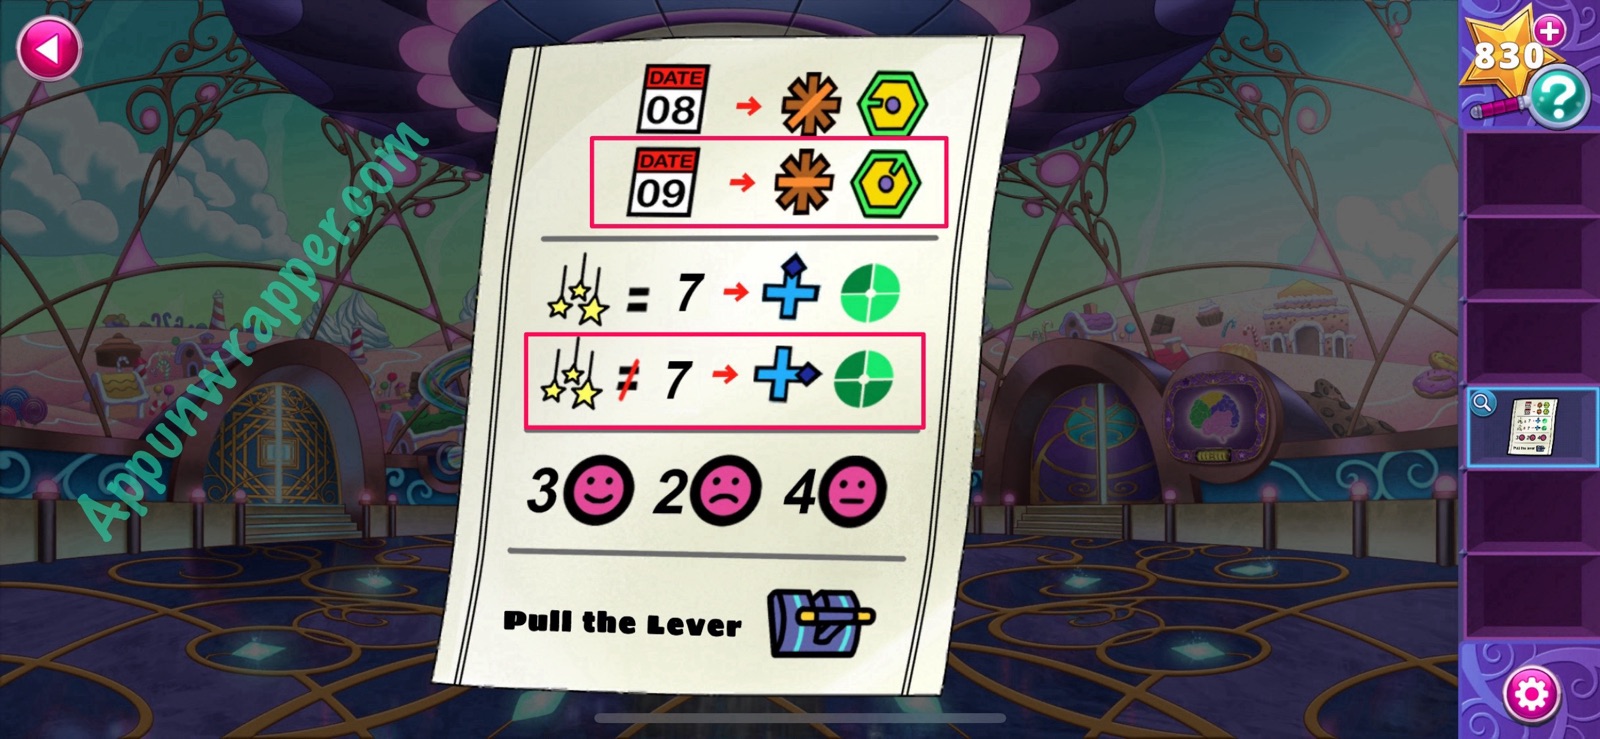
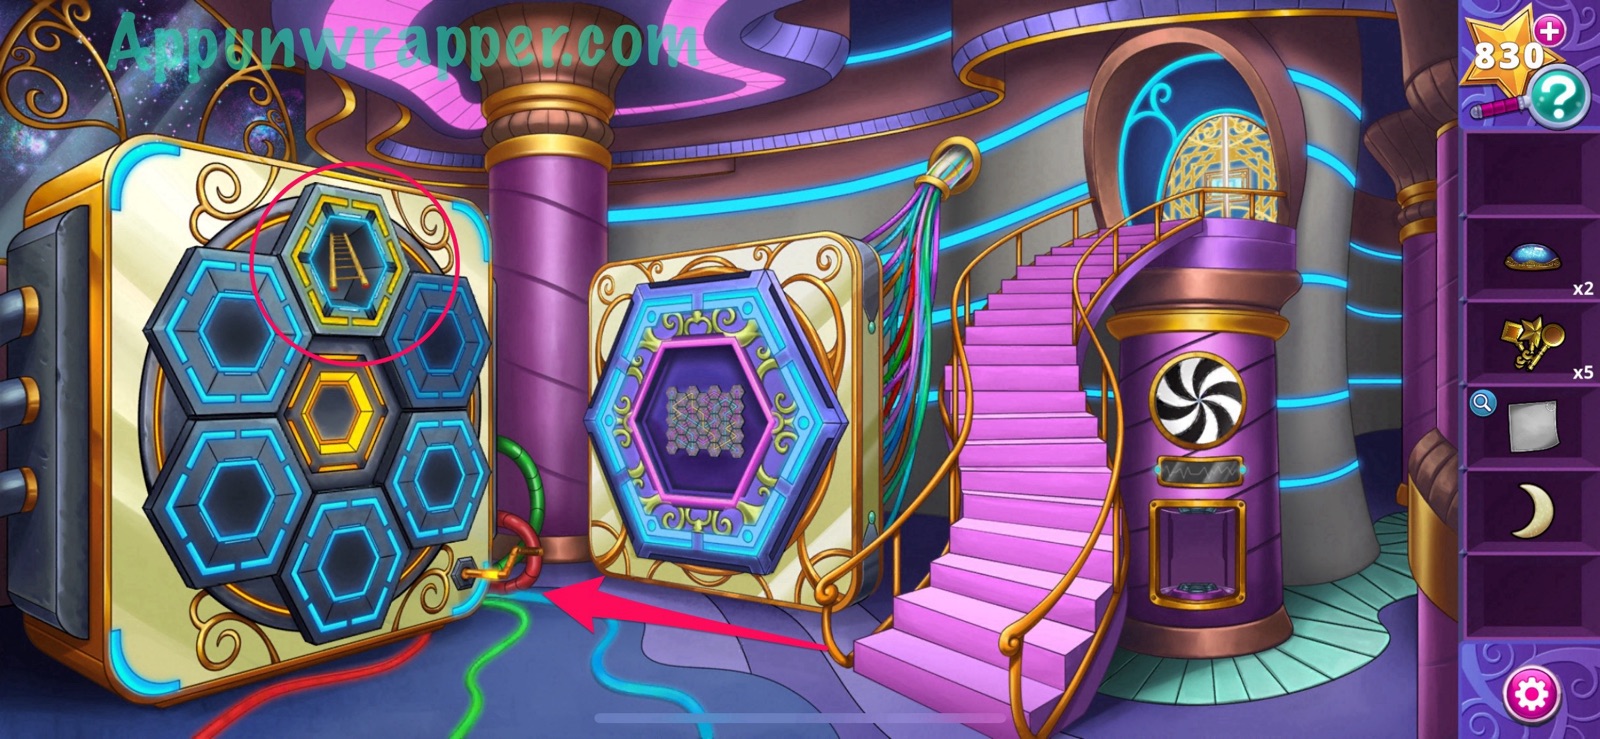
12. Now we have one last page of console instructions, so take a look at them. The first section refers to the date. We saw the date in the storage room was September 9. So follow the second line. The second set of instructions wants you to count the yellow stars in the storage room. There are 8, not 7, so follow the second line again. And the rest is as usual. Copy my solution below if you’re still stuck. After pulling the lever, press the big red button.

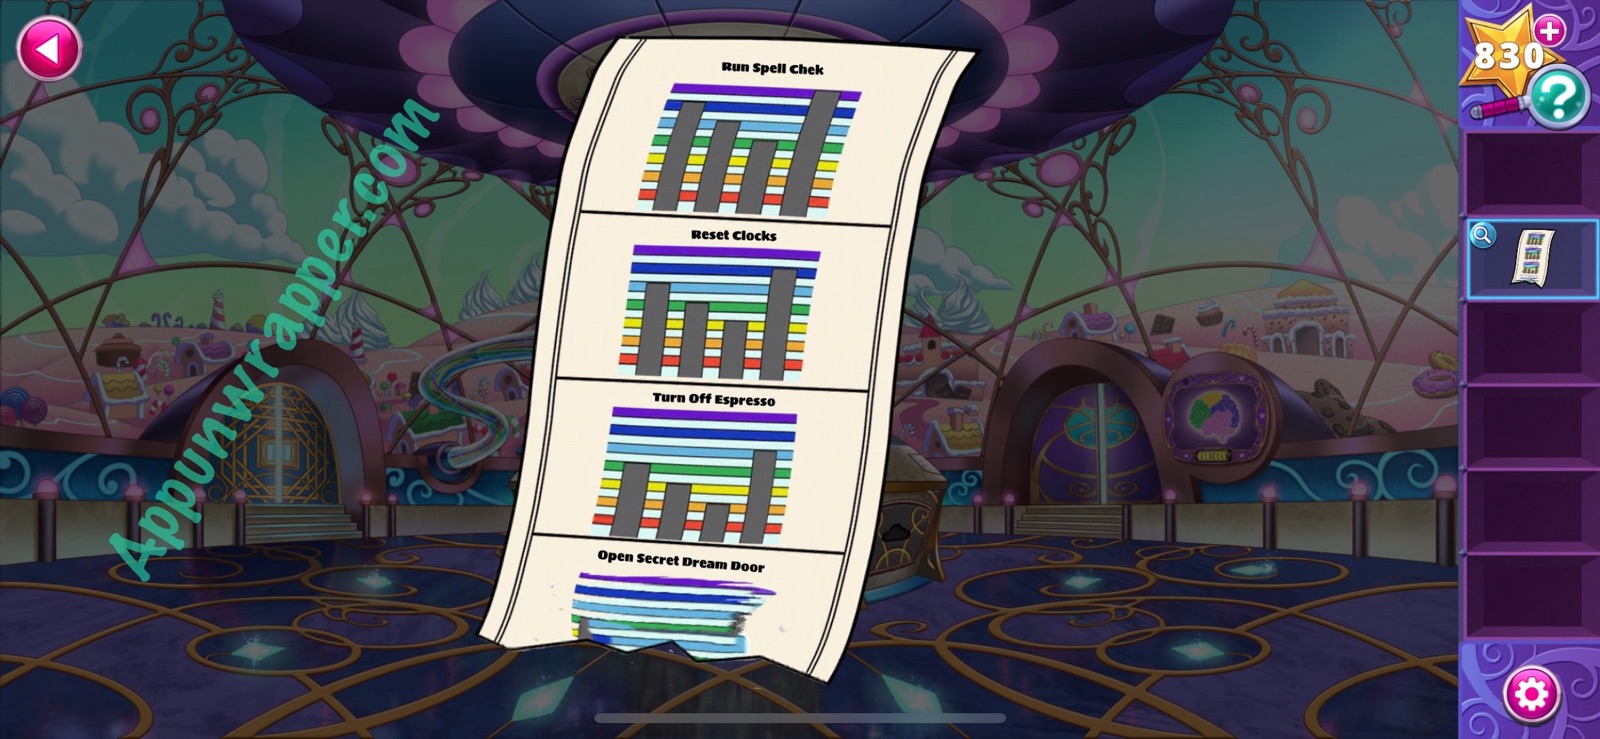
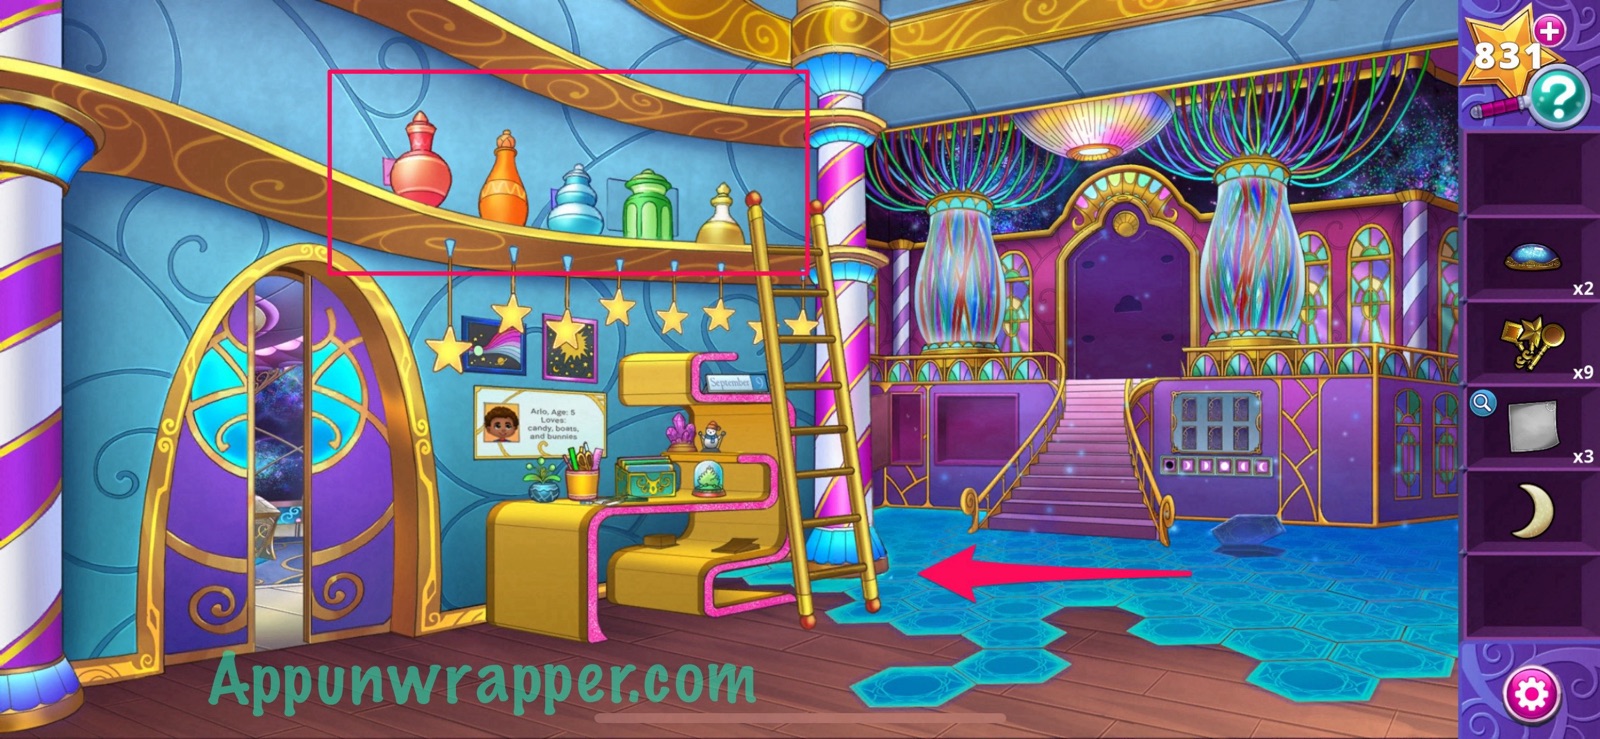
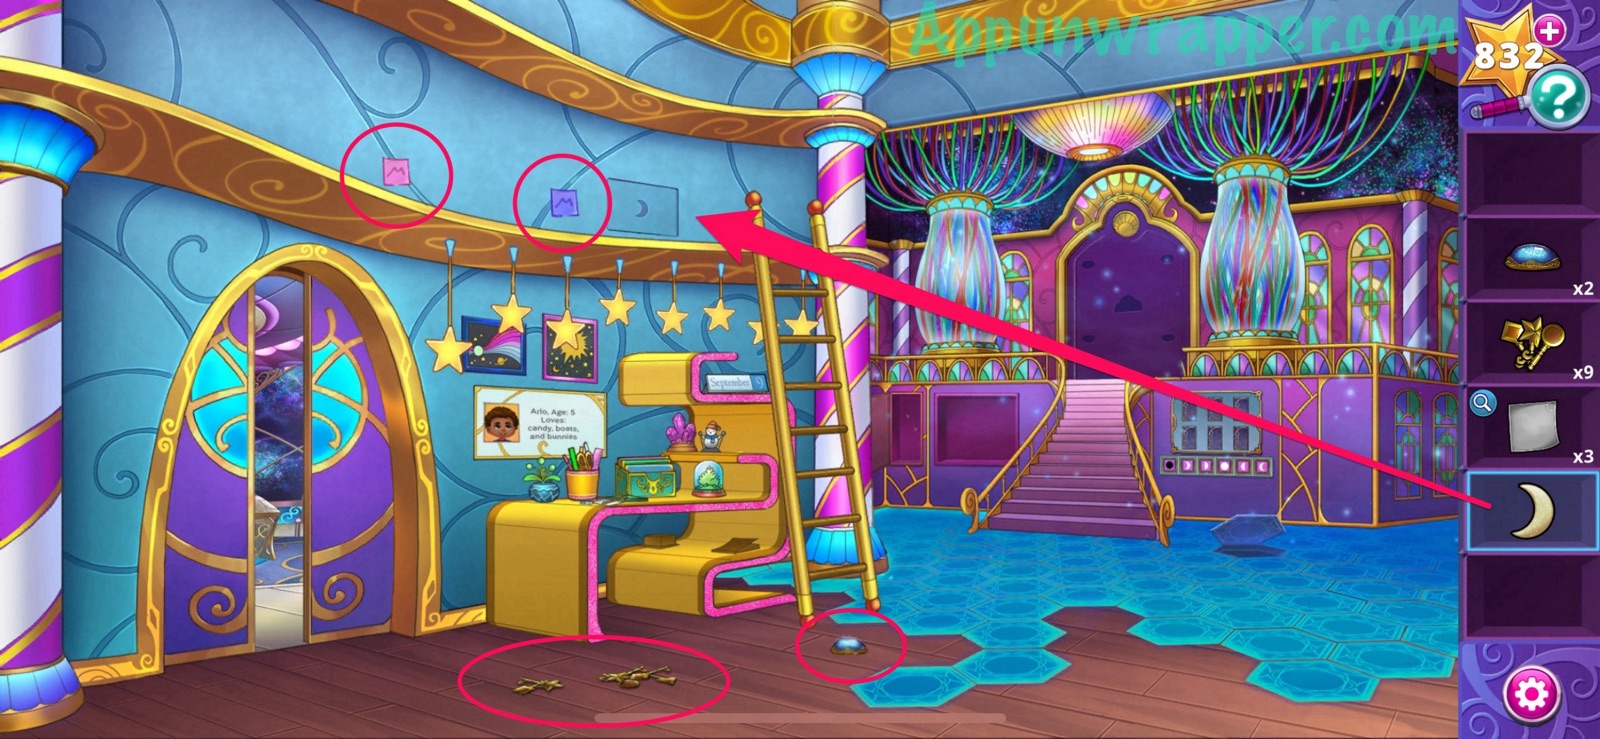
13. Oh no! The drink spills and breaks the console! Look at the emergency note that prints out. We need the instructions for “Open Secret Dream Door” but it’s torn and blurred out! You can see a pattern with the other three, though. With each one, the bars drop down once. So keep that in mind.
14. Grab the metal rod.
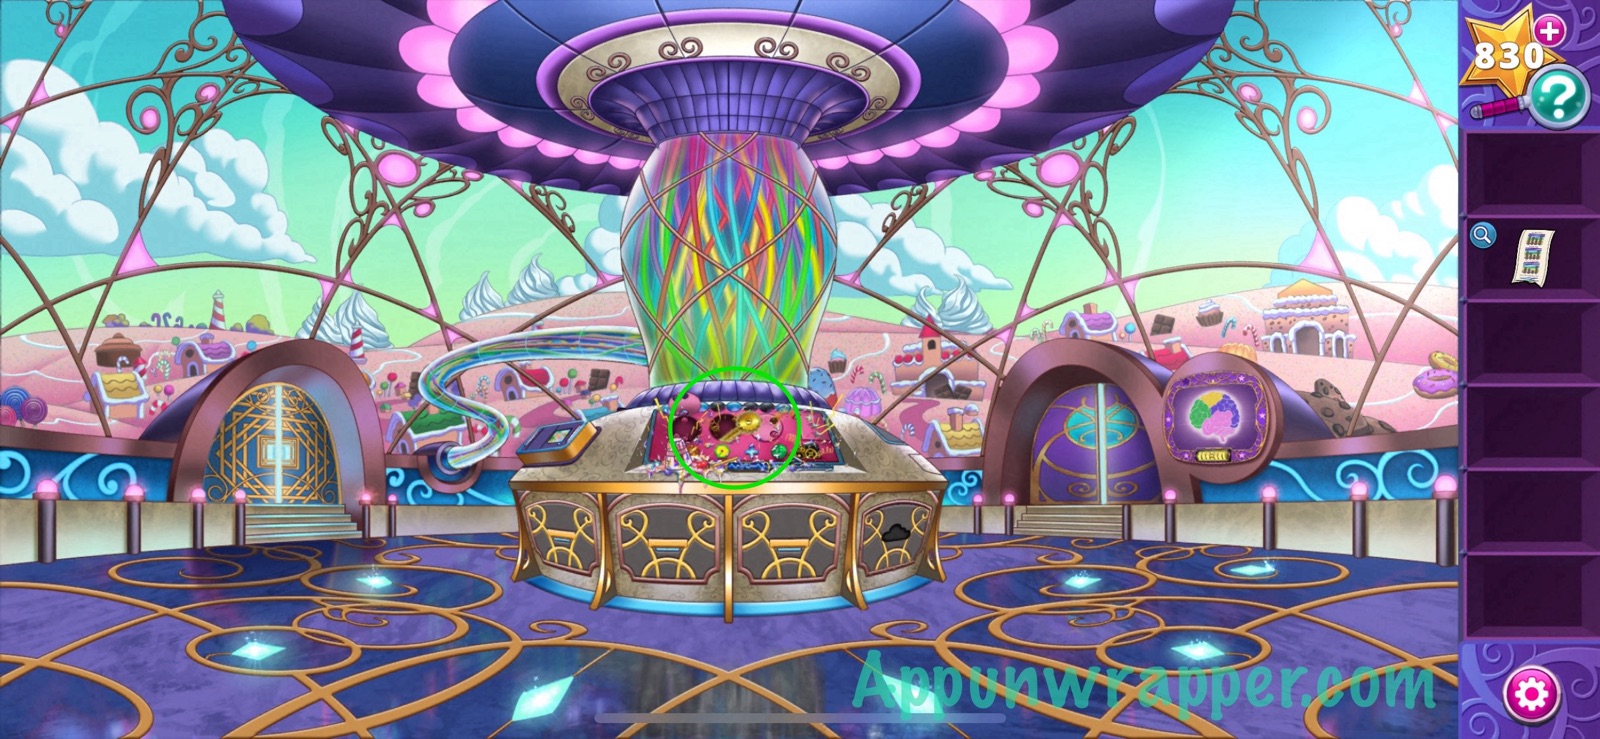
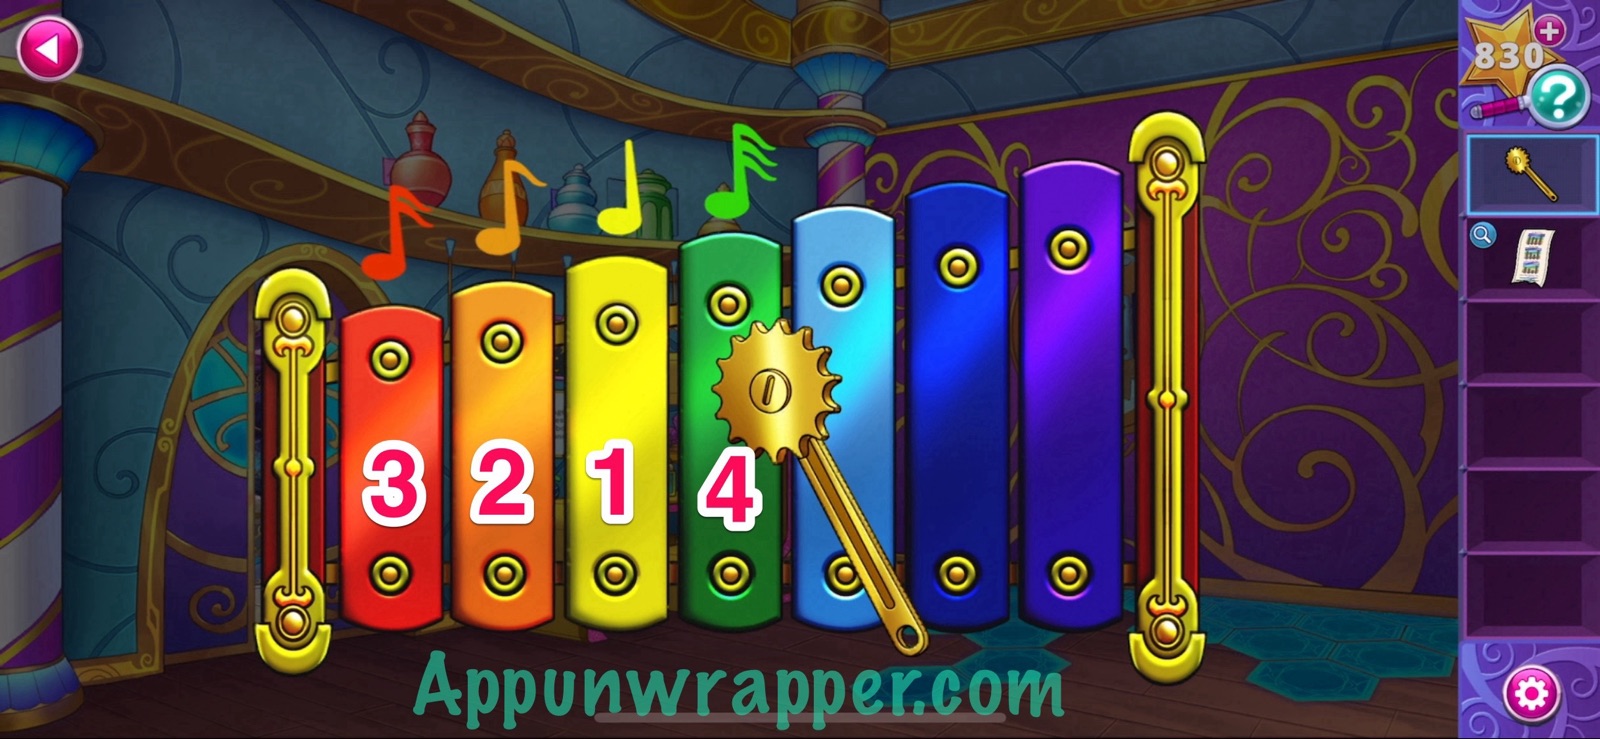
15. Go back to the room on the right and use the metal rod to break open the glass over the xylophone. Then tap on the xylophone and use the metal rod to play the notes base on the emergency note. Since “Turn Off Espresso” is Green, Yellow, Orange, Turquoise, we can figure out that “Open Secret Dream Door” is Yellow, Orange, Red, Green. Play the notes in that order.
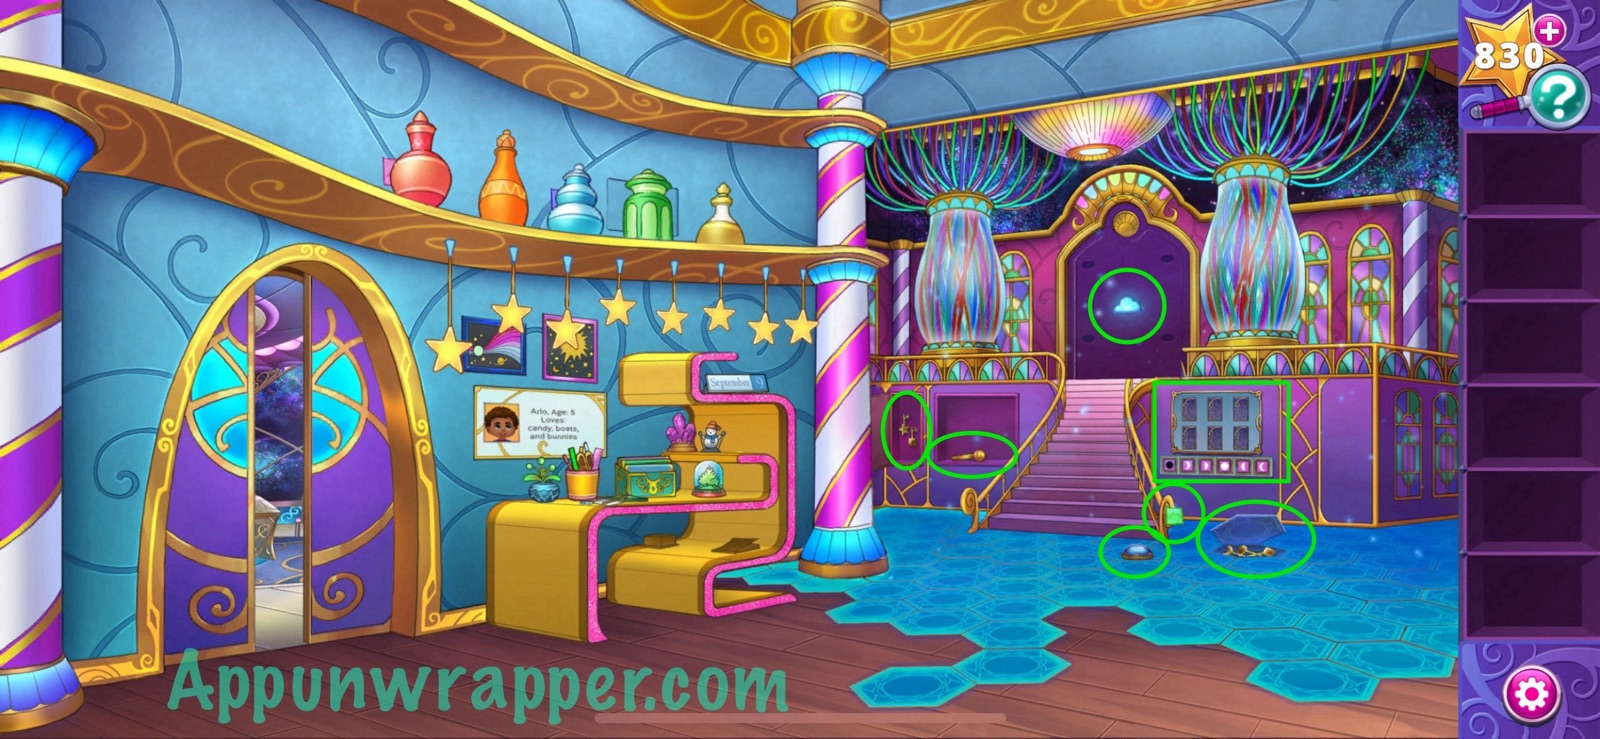
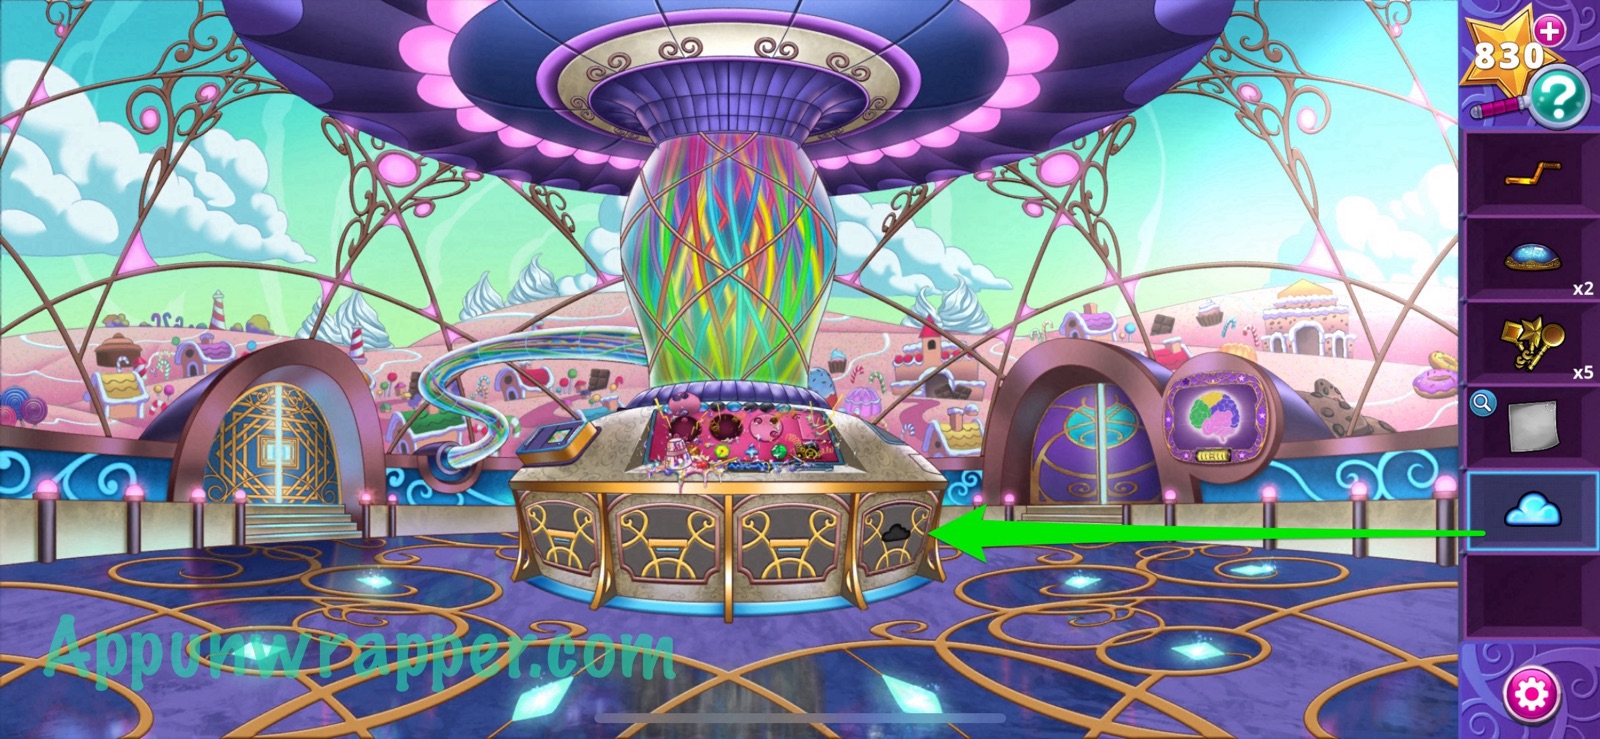
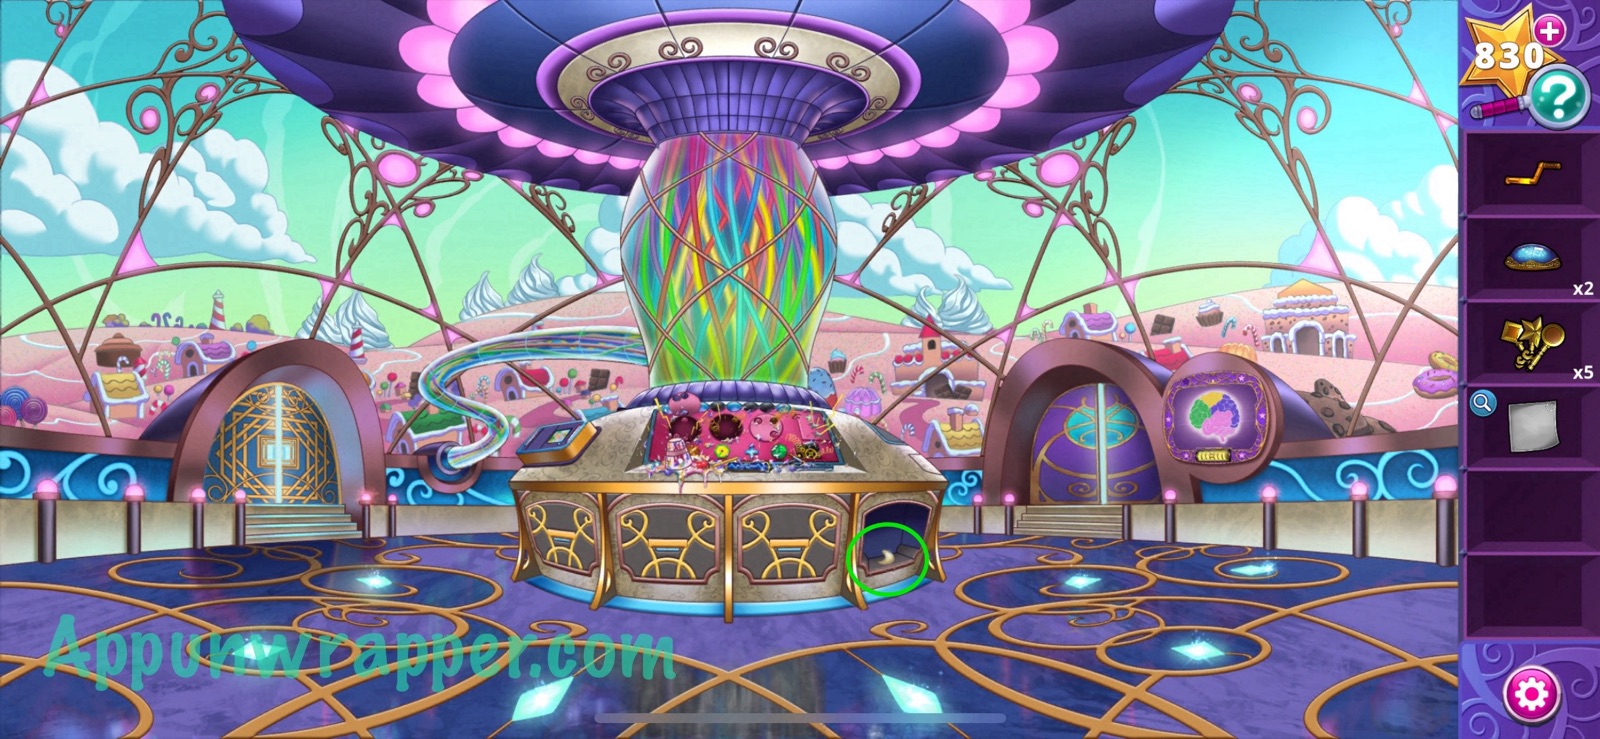
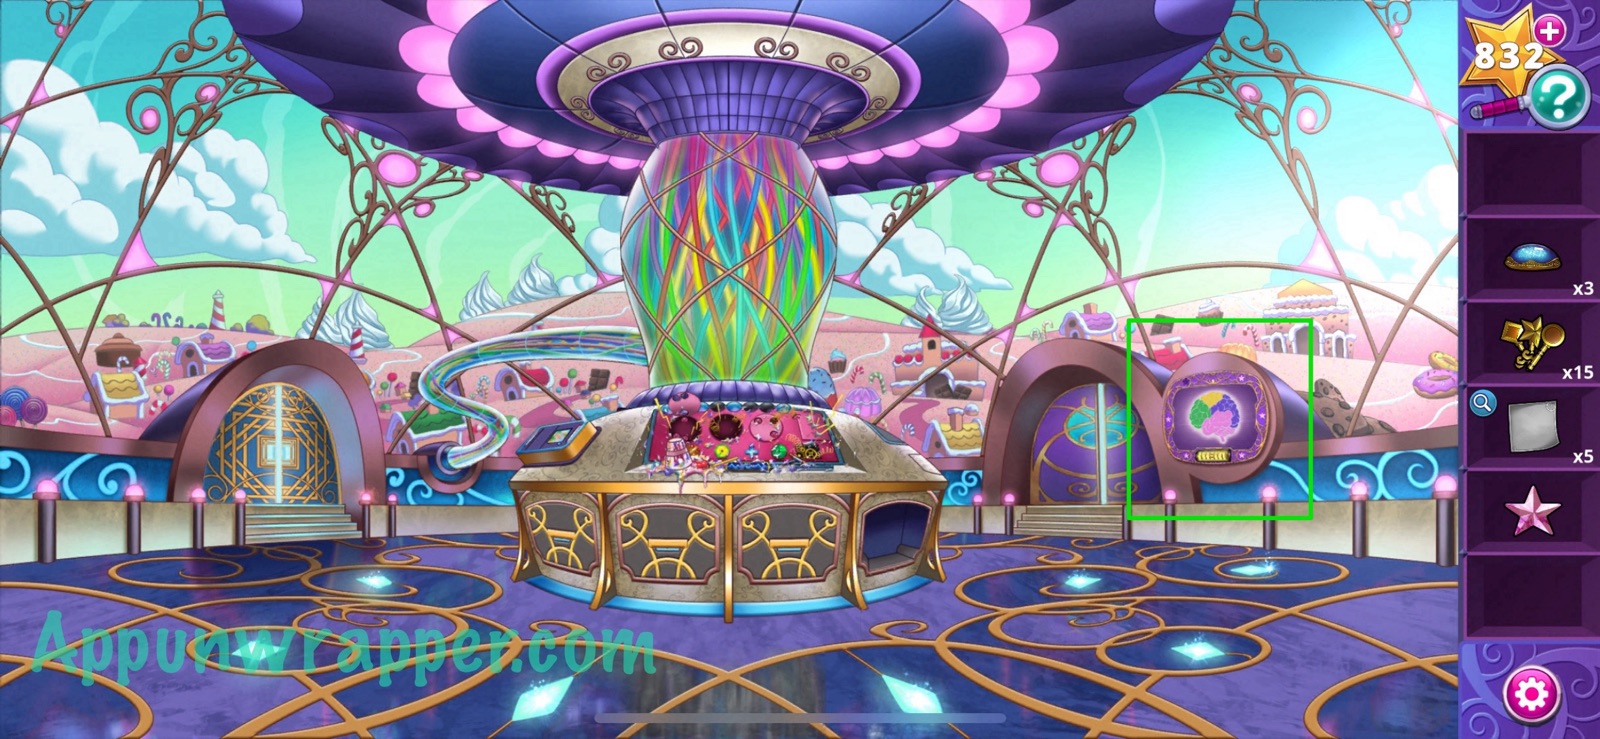
16. Now we have access to the secret dream room! Grab the cloud gem, lightstone and sticky note. Also find the crank and 5 keys. Also, tap on the puzzle to the right of the stairs. We need to solve it to get another lightstone
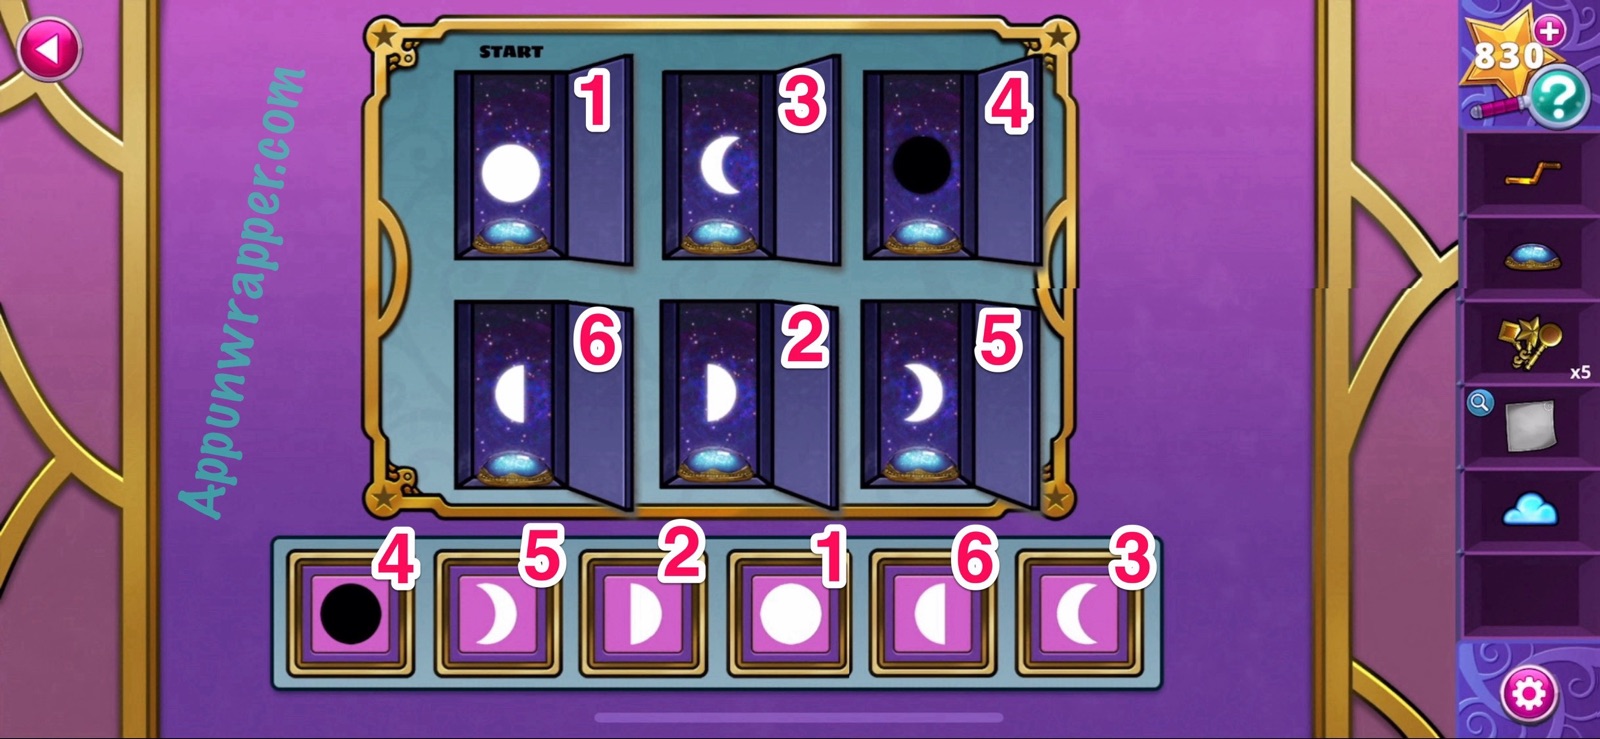
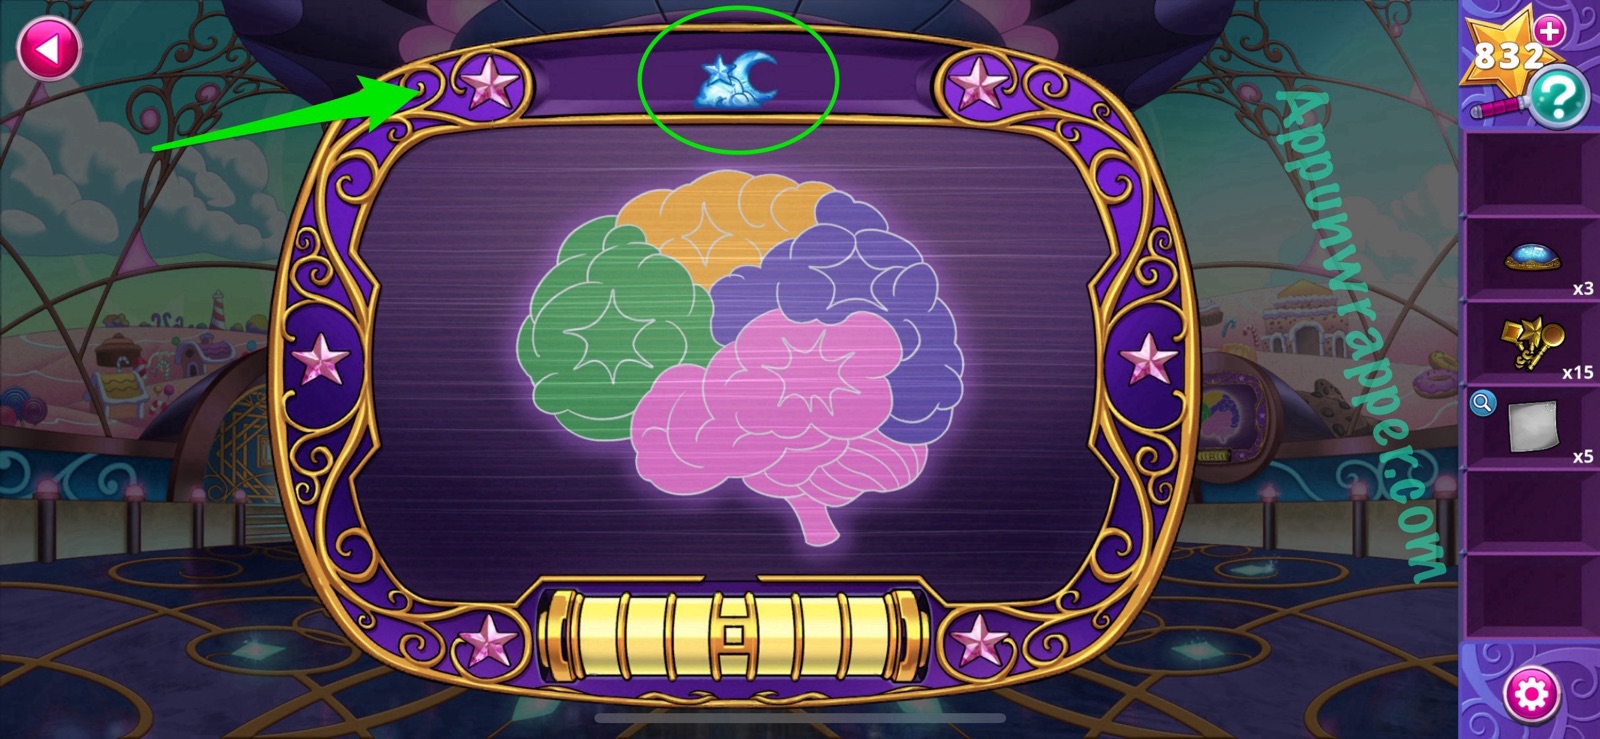
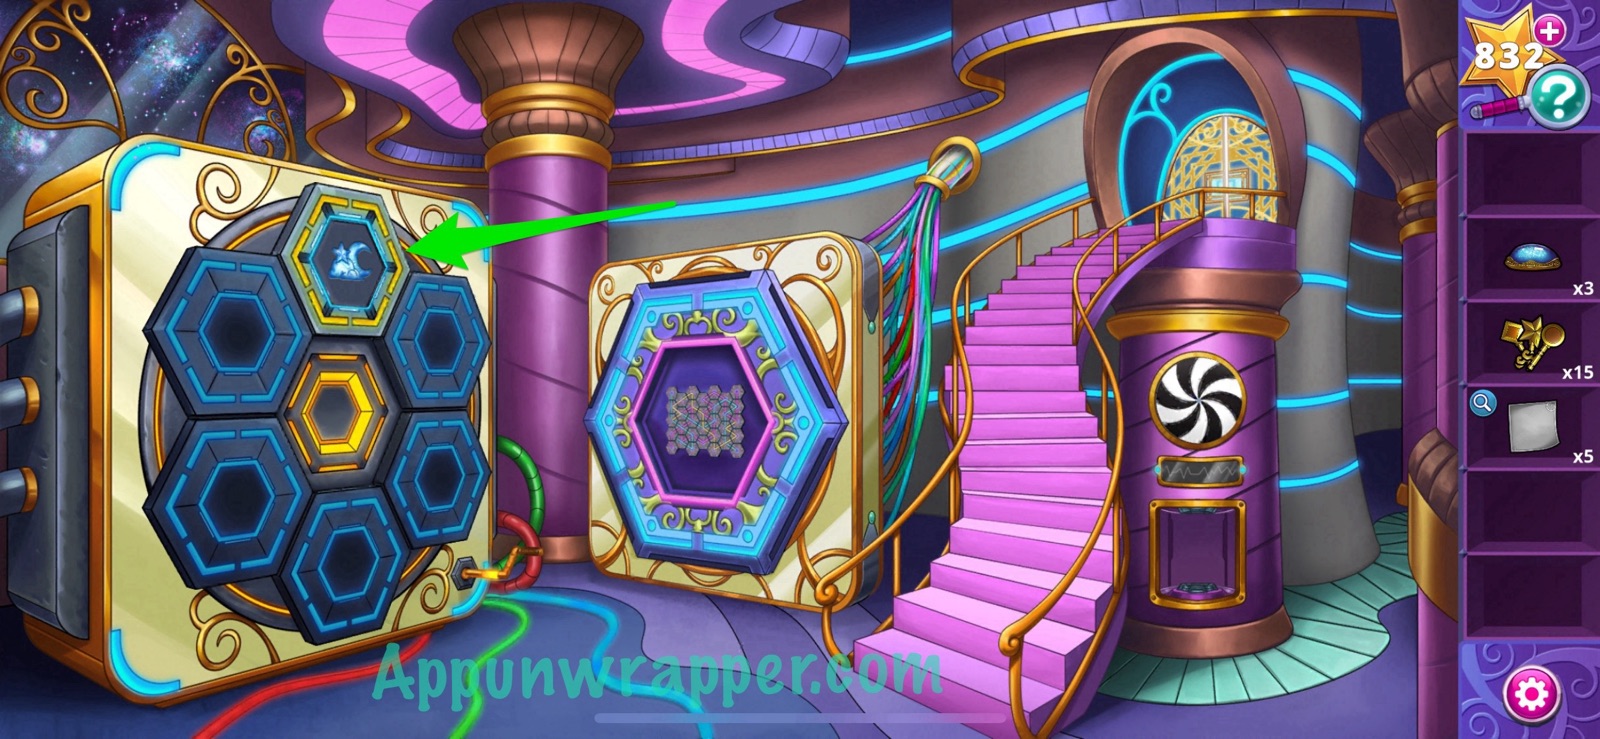
17. Let’s solve the moon cubbies puzzle. We have to follow the lightstone through the different doors, and then press the moon buttons in the order that you see in the cubbies. Start with the door that says START. Each time it moves, open the cubby where it went to see where it goes next. Then copy the order, as shown below. Then take the lightstone.

18. Go back to the console and place the cloud gem in the slot to get a moon gem.
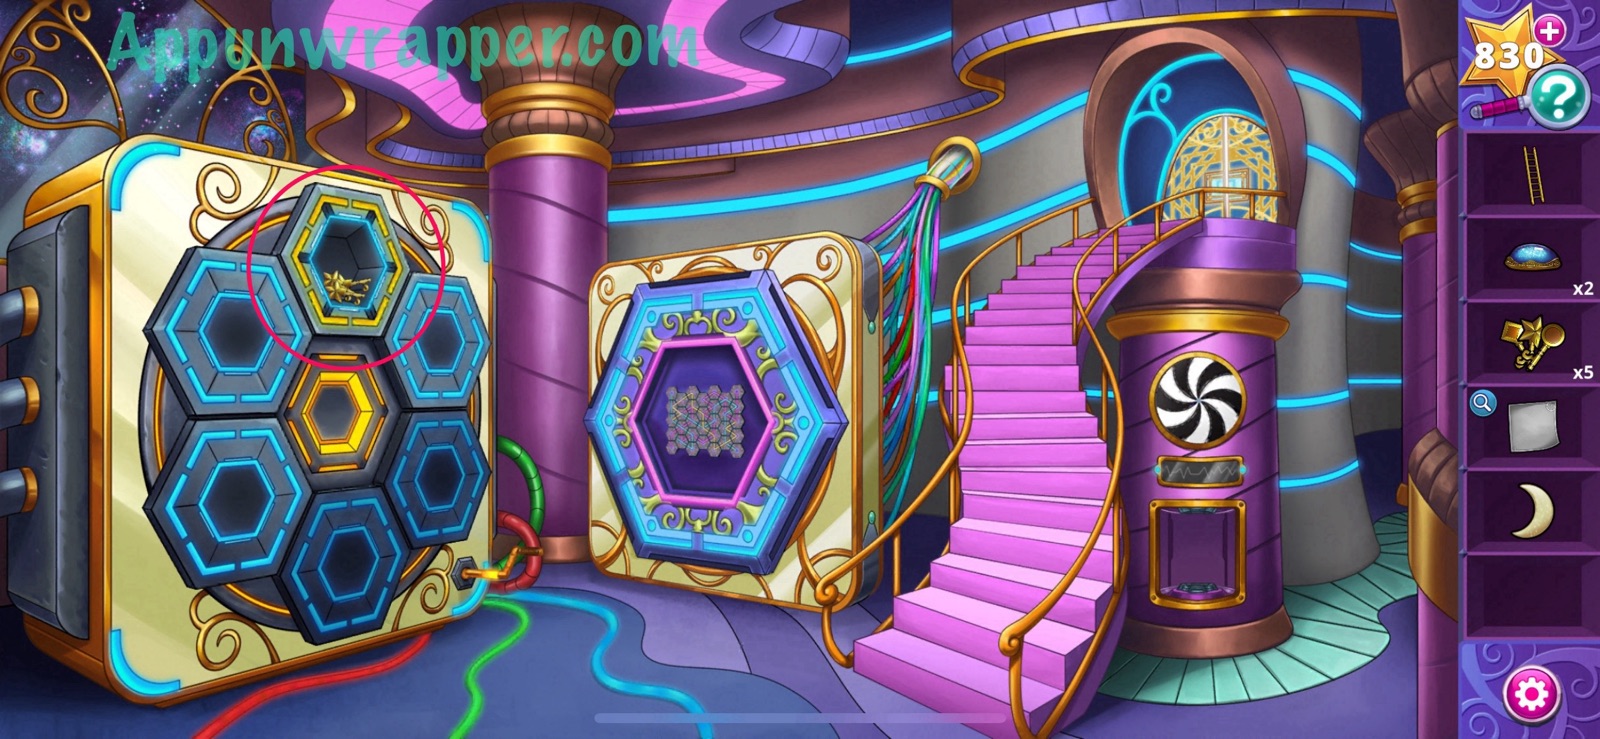
19. Go back to the Mechanical Room and insert the crank into the machine with all the compartments. Turn it once and open the compartment to get a ladder. Keep doing this to get 4 more keys and 2 sticky notes. Also, notice a slot that needs a specific gem to fit in there.
20. Go back to the storage room and use the ladder to reach the top shelf. Knock all the urns off the shelf and then grab the 2 sticky notes, 6 keys and lightstone. Also, place the moon gem in the slot and take the star gem.
21. Go back outside to the display and place the star gem in the empty slot. Take the celestial gem.
22. Go back to the Mechanical Room and rotate the crank until you find the empty slot again. Insert the celestial gem and the the lightstone.
23. Go back to the storage room and place all four lightstones around the slot where you got the cloud gem. It will reveal 15 keyholes!
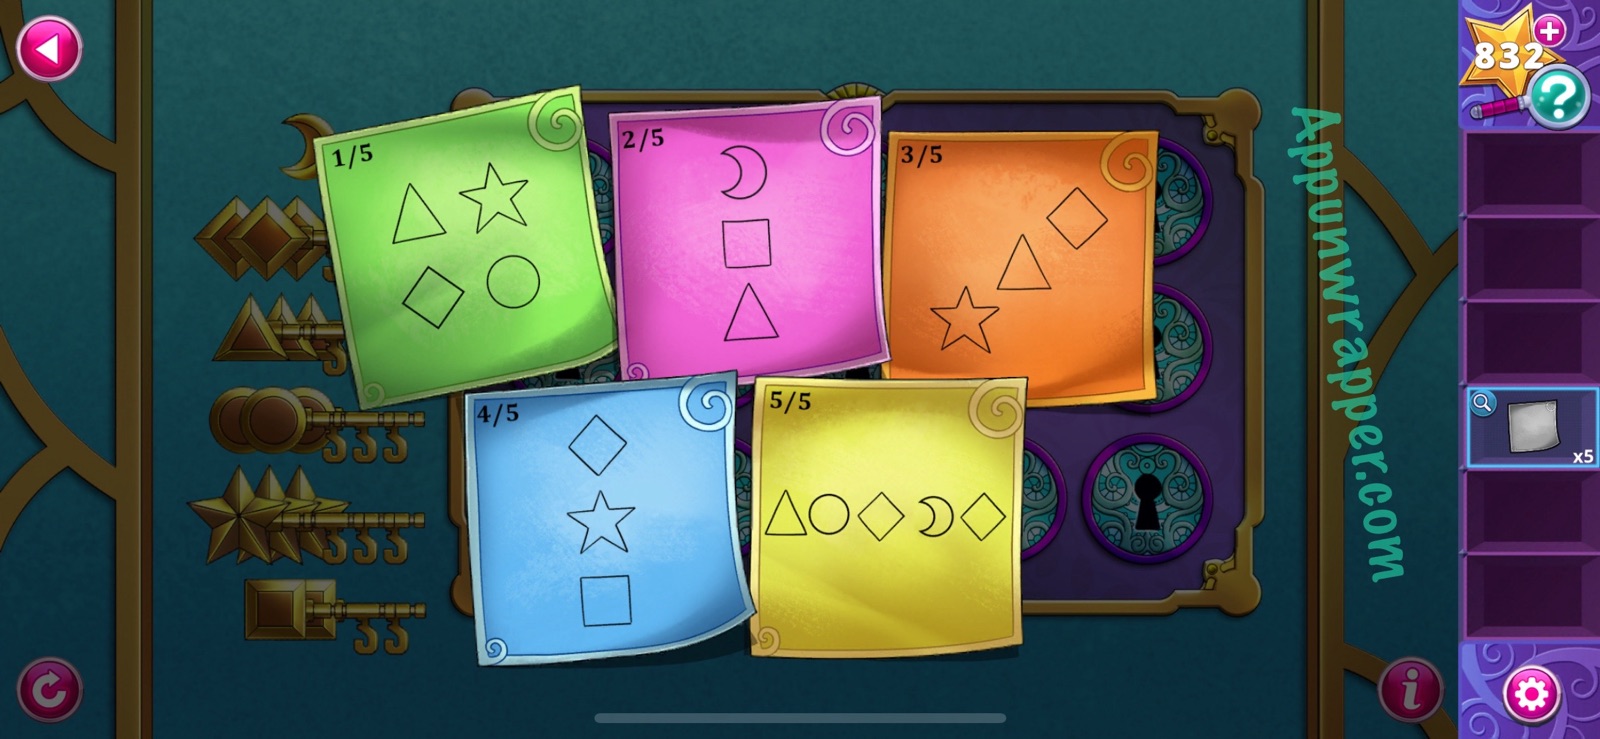
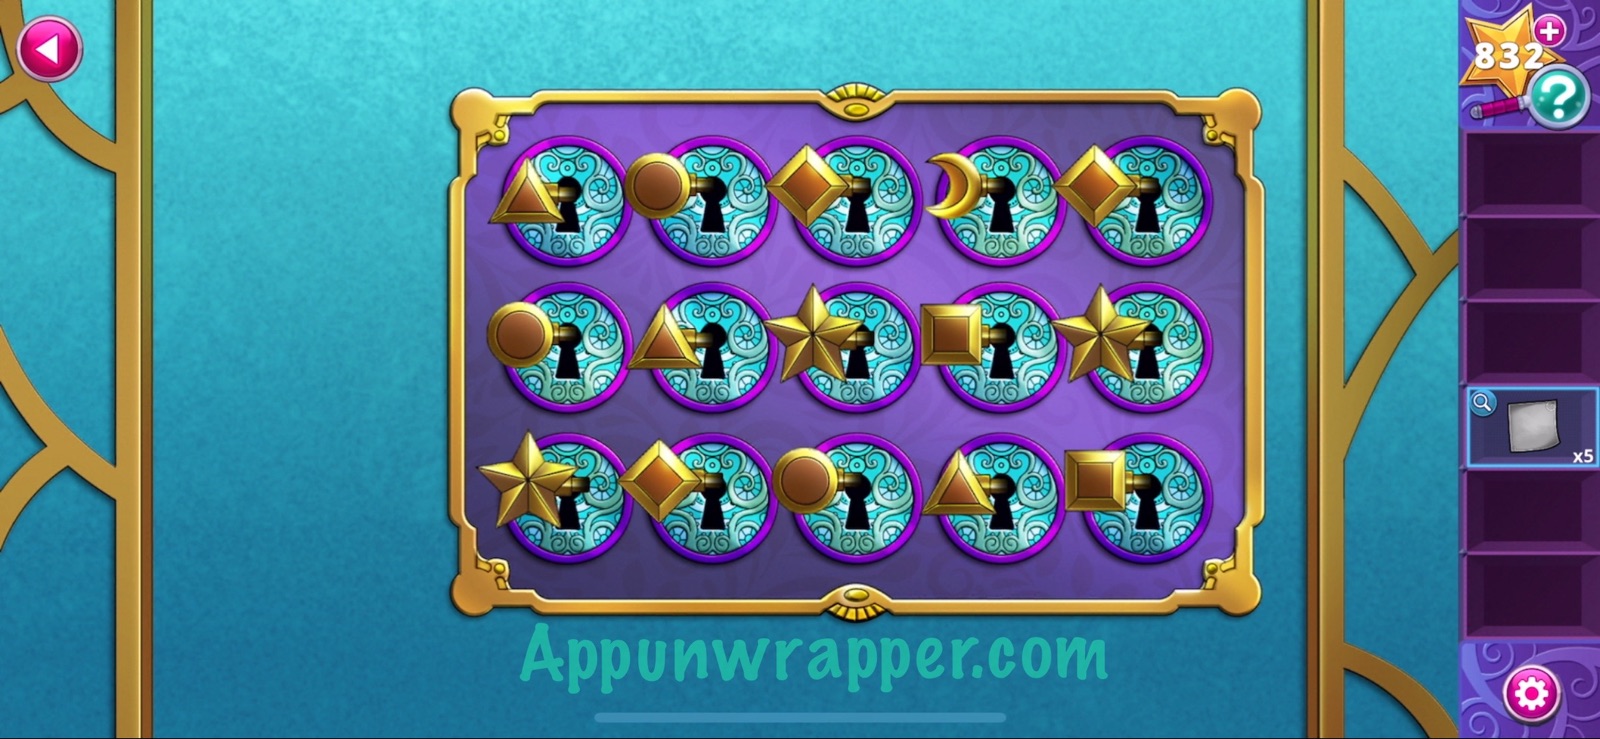
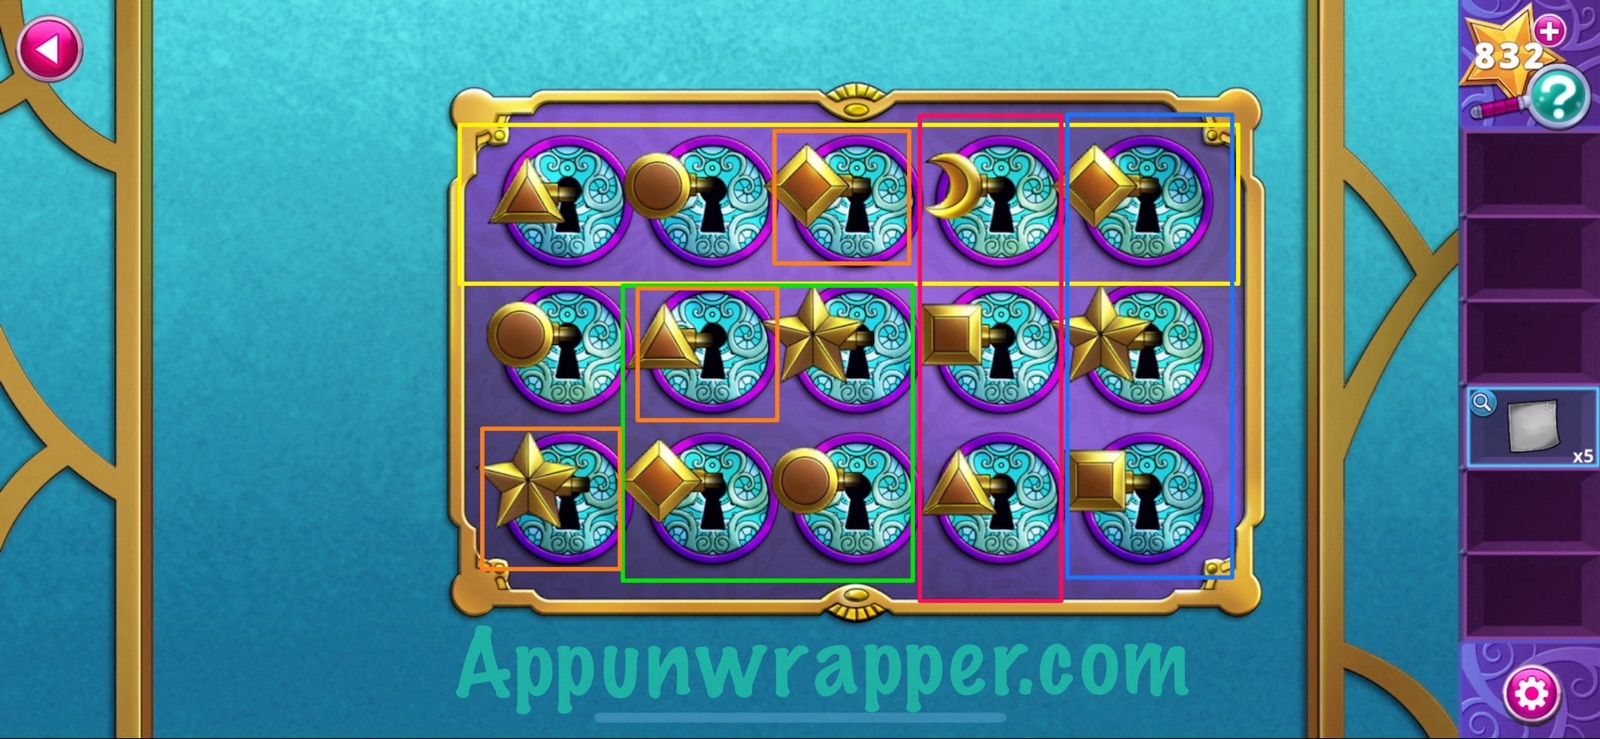
24. Let’s solve the Dream Door Lock. Place all 15 keys down. Look at the 5 sticky notes and use the clues on them to figure out how to arrange all the keys. Basically, the clues tell you which shapes need to be next to each other. There’s only one moon key, so I recommend starting with that. It should look like the image below when you’re done. I tried to also break it down by colored sticky note to help you see how I worked it out. And that’s the end of the chapter!
And that’s the end of Chapter 1! Click here to continue to Chapter 2 or choose a chapter below.
Chapter 1 | Chapter 2 | Chapter 3 | Chapter 4 | Chapter 5 | Chapter 6 | Chapter 7

2 of the square and 1 diamond key will not move. Is there a certain sequence the keys must be placed?
That’s weird. It should work in any order.
Pity it’s only available for VIP subscribers 😡
I am missing 3 keys, I remember picking up the ones in cubicles and in storage room with ladder, all the puzzles are solved and picked up everything. Inserted various gems already, I don’t know where to find the last 3 keys.
Hi can u pls tell me where u foung the last 3 keys. I would really appreciate it.
Thank you
By that moon puzzle thing there’s a tile that’s darker than the rest tap on it and it’ll open up, that’s where the keys are.
All good, found the last ones.
Somehow this lightstone riddle did not work for me. I couldn’t place the lightstone at the start of the moon doors and could not follow it, because it was nowhere to be seen. How is this supposed to work? I found three and placed them in the slots of the cloud-door. Now I don’t have one left to do the moon-door thing.
The stone is there in the puzzle and when you solve it u will get. I just didnt understand the logic but as I pressed the buttons adviced here I got it done.
The light stone appears in the doors, try to open random doors to find it. It will then teleport to different doors. Follow it and you can collect it at the end. That’’ll be your 4th light stone for the entry door.